Showing posts with label Crochet. Show all posts

Ba-Bee Shower Crochet Set

A couple weeks ago, my daughter asked if I could whip up a little something for one of her work mates that was having a baby shower. She mention that the mom-to-be was using a bumble bee theme for her nursery and baby shower.

The shower was for a baby boy. I have not created a lot of crocheting for baby boys. There are just more options when making the frilly things for girls. I put on my thinking cap and came up with this hat and booties set.


I tried to create the booties without making them look prissy by adding a pom pom instead of a bow and skipped the ruffles. I tried my best to make the pom poms look like little bumble bees but they didn't turn out that way.

I added a tiny bumble bee top knot beanie to complete this adorable little set. She added a few other things to the gift and headed to the baby shower where her gift was adored by the mom to be.
This little crochet set was a win.

Image result for honey nut cheerio bee


Fruit Coasters

I haven't really be feeling up to par the past few weeks. My Menier's has been at about a level eight. It will literally just wipe me out. I fight it. I still go on my walks and keep doing my normal daily activities except drive. I do not trust myself behind the wheel during my episodes so I get my sweet husband to take me to work. There I struggle to get things done because my concentration level is berserk.
What is Menier's Disease? Check it out HERE.

I have a few Ambassador task to complete with a new company I have been playing with lately. I will share more on this one soon. I feel a little overwhelmed and need to do some thinking.
In the meantime I have done some relaxing and enjoying a little crocheting for my own good. It gives me time to clear my mind. I do a lot of thinking while I crochet.

I made these fruit coasters to add to my Etsy shop. Are they not just the cutest thing ever? They scream summer picnic to me.


They were fun to make and I plan to do other fruits later. My attention span is about that of a two year old. I get bored making the same things over and over so I move on to something else.

Once I shared these cute fruity rounds with my social media followers, someone reached out to me and asked if I could make some Kiwi coasters. "Sure", I said. That was actually in my next plan. I made them using the same pattern as the fruits but the details were just different.


They turned out cute and as soon as I posted them online, they sold. I wasn't even finished writing the description before I heard the "Cha Ching" chime in from the app alerting me that they had just been bought. It was from the lady that had asked me to make them.

HERE is the pattern I used for the coasters if you would like to make some for yourself . If you can't crochet and want a set, I still have the fruity ones listed. I plan to make some pineapple and pear ones soon.


Oui Pot Crochet Hangers

Often you will find me sitting in the center of the living room organizing my yarn basket. While most crochet addicts have a whole closet of yarn, I just have a little square storage cube type basket. It works perfect to hold the yarns I need and fits perfectly beside me chair.

I do not stock up on yarn. I buy as I go. It gives me an excuse to visit Hobby Lobby. Most of you can relate. However, I do wind up with a lot of smalls balls of yarn that are not big enough to make a full project. I will normally roll into what I call my scrap ball and will eventually use it to make a crazy multi colored scrap blanket.

I keep my acrylic yarn and cotton yarn separated. Cotton is my favorite fiber to crochet with. I like to keep scraps of cotton yarn to make small things like baby teethers, face wipes or coasters but I found something new to make with my scrap pieces.

Oui Pot Crochet Hangers


I am obsessed in these cute little crochet hangers. I'm thinking of adding some to my Etsy shop. They are just so darn cute. Can you imagine some cute little succulents in them? Oh my!


I have several Oui yogurt glass jars. Oui is a French yogurt by Yoplait and is delicious. You can find them at most grocery stores in the yogurt section and are usually only a dollar each and have several flavors to choose from. I always keep a few of these empty glass pots in the cabinet because they make great candle holders, and plant starters. You can actually purchase special lids from the Oui website if you want to use them to store things. They also have some other crafty ideas you can use these little pots for.


These crochet hangers are quick and easy. The original pattern can be found HERE.

Artificial Nest

As soon as my friends on Facebook caught a news story of the local Carolina Waterfowl Rescue needing help from crochet and knitters, they started sending me messages. I sort of felt special that so many people remember that I like to crochet.

As soon as I read the article from the news, I was interested. I contacted them to confirm and make sure they were still needing little nest. I know how places can get an overwhelming amount of support from caring people.

Every year I choose something to donate my talent too. I always feel like God gave me the gift of crochet, so this is my way of giving back. Once, I crocheted fifty tiny baby hats for an orphanage in Haiti. I have also donated crocheted baby hats to local hospitals for their preemies. Last year I donated a box of red hats for "Little Hats, Big Hearts". It's a charity that provides resources and raises awareness about congenital heart defects and hospitals all around give each baby born in February a little red hat to wear. Here is the post.

So I was happy to find something else to donate too. The waterfowl rescue is reaching out to crocheters and knitters to supply them with some artificial nest for tiny birds they rescue. I found some wool yarn at the dollar store and thought it was perfect for this project as it was a natural fiber and natural colors.


I am allergic to wool so I have never made anything with wool fiber but I could not resist. Fortunately, the wool did not irritate me at all while making these. The texture is cotton soft but the structure is hard and stiff. Like a rug. 


They are not made perfect and even have a few flaws, but I think that adds to the nature of the purpose. They only asked that the nest be crocheted using two strands of yarn and stitched tight so the little bird legs would not fall through the holes. I whipped these up in just a few hours and shipped them to their location. I hope they can be of use.


Looking at these make me think of little nesting bowls. Well, that's exactly what they are.


If you crochet and would like to help. Click HERE.


Crochet Halters

Today your getting another crochet post. In case your wondering what I have been working on lately,....Com on, I know you have...

Well, I wanted to make some socks....and I did but, Oh my gawsh! While they are cute, they are not something I enjoy walking around on hardwood floors in. Talk about rough on the feet. I felt like I was turning my heels into waffles.

Needless to say, my crochet socks were a fail. Knitted socks are way more comfortable so if anyone would like to make me a homemade pair I would love you forever.....I'm serious.....I'll send you my mailing info, just ask.

So, I decided to crochet these cute little Simple Summer halter tops.


No, silly, not for me.
At 49 (almost 50) years old, I do not think I can rock a halter top.....Ok maybe I'll try this summer who knows. But for now, I just hope to sell them in my Etsy shop so I can have some beach money.


They are simple to make (says the fiber artist). I found a basic pattern and added a few of my own special touches. I also played around with a different stitch..

I made a granny square halter a while back. It still sits in my shop waiting for an owner. Again, I can't pull the look off, but some cute little beach babe or boho chic could.


I think they all turned out adorable and were fun to make. I would pair them with a pair of shorts or boyfriend jeans.


Handmade halters and more at LiLiDi on Etsy

Distressed shorts- Rue21.
Earrings- Sashka Co.
 Fedora- Ebay

Free Pattern to the Original Simple Summer Halter can be found at


Oversized Crochet Sweater

So far we have had a pretty mild Winter here in North Carolina. We had one snow fall back in December that slowed the city down for a day and that's it. Our average temperatures for January have been in the 50's. However, we have had a lot of rain. I think it has rained almost every day since August with only a few peeks of sunshine. The grounds here are saturated and cars are dirty. I’m beginning to feel like I live in a mud hole.

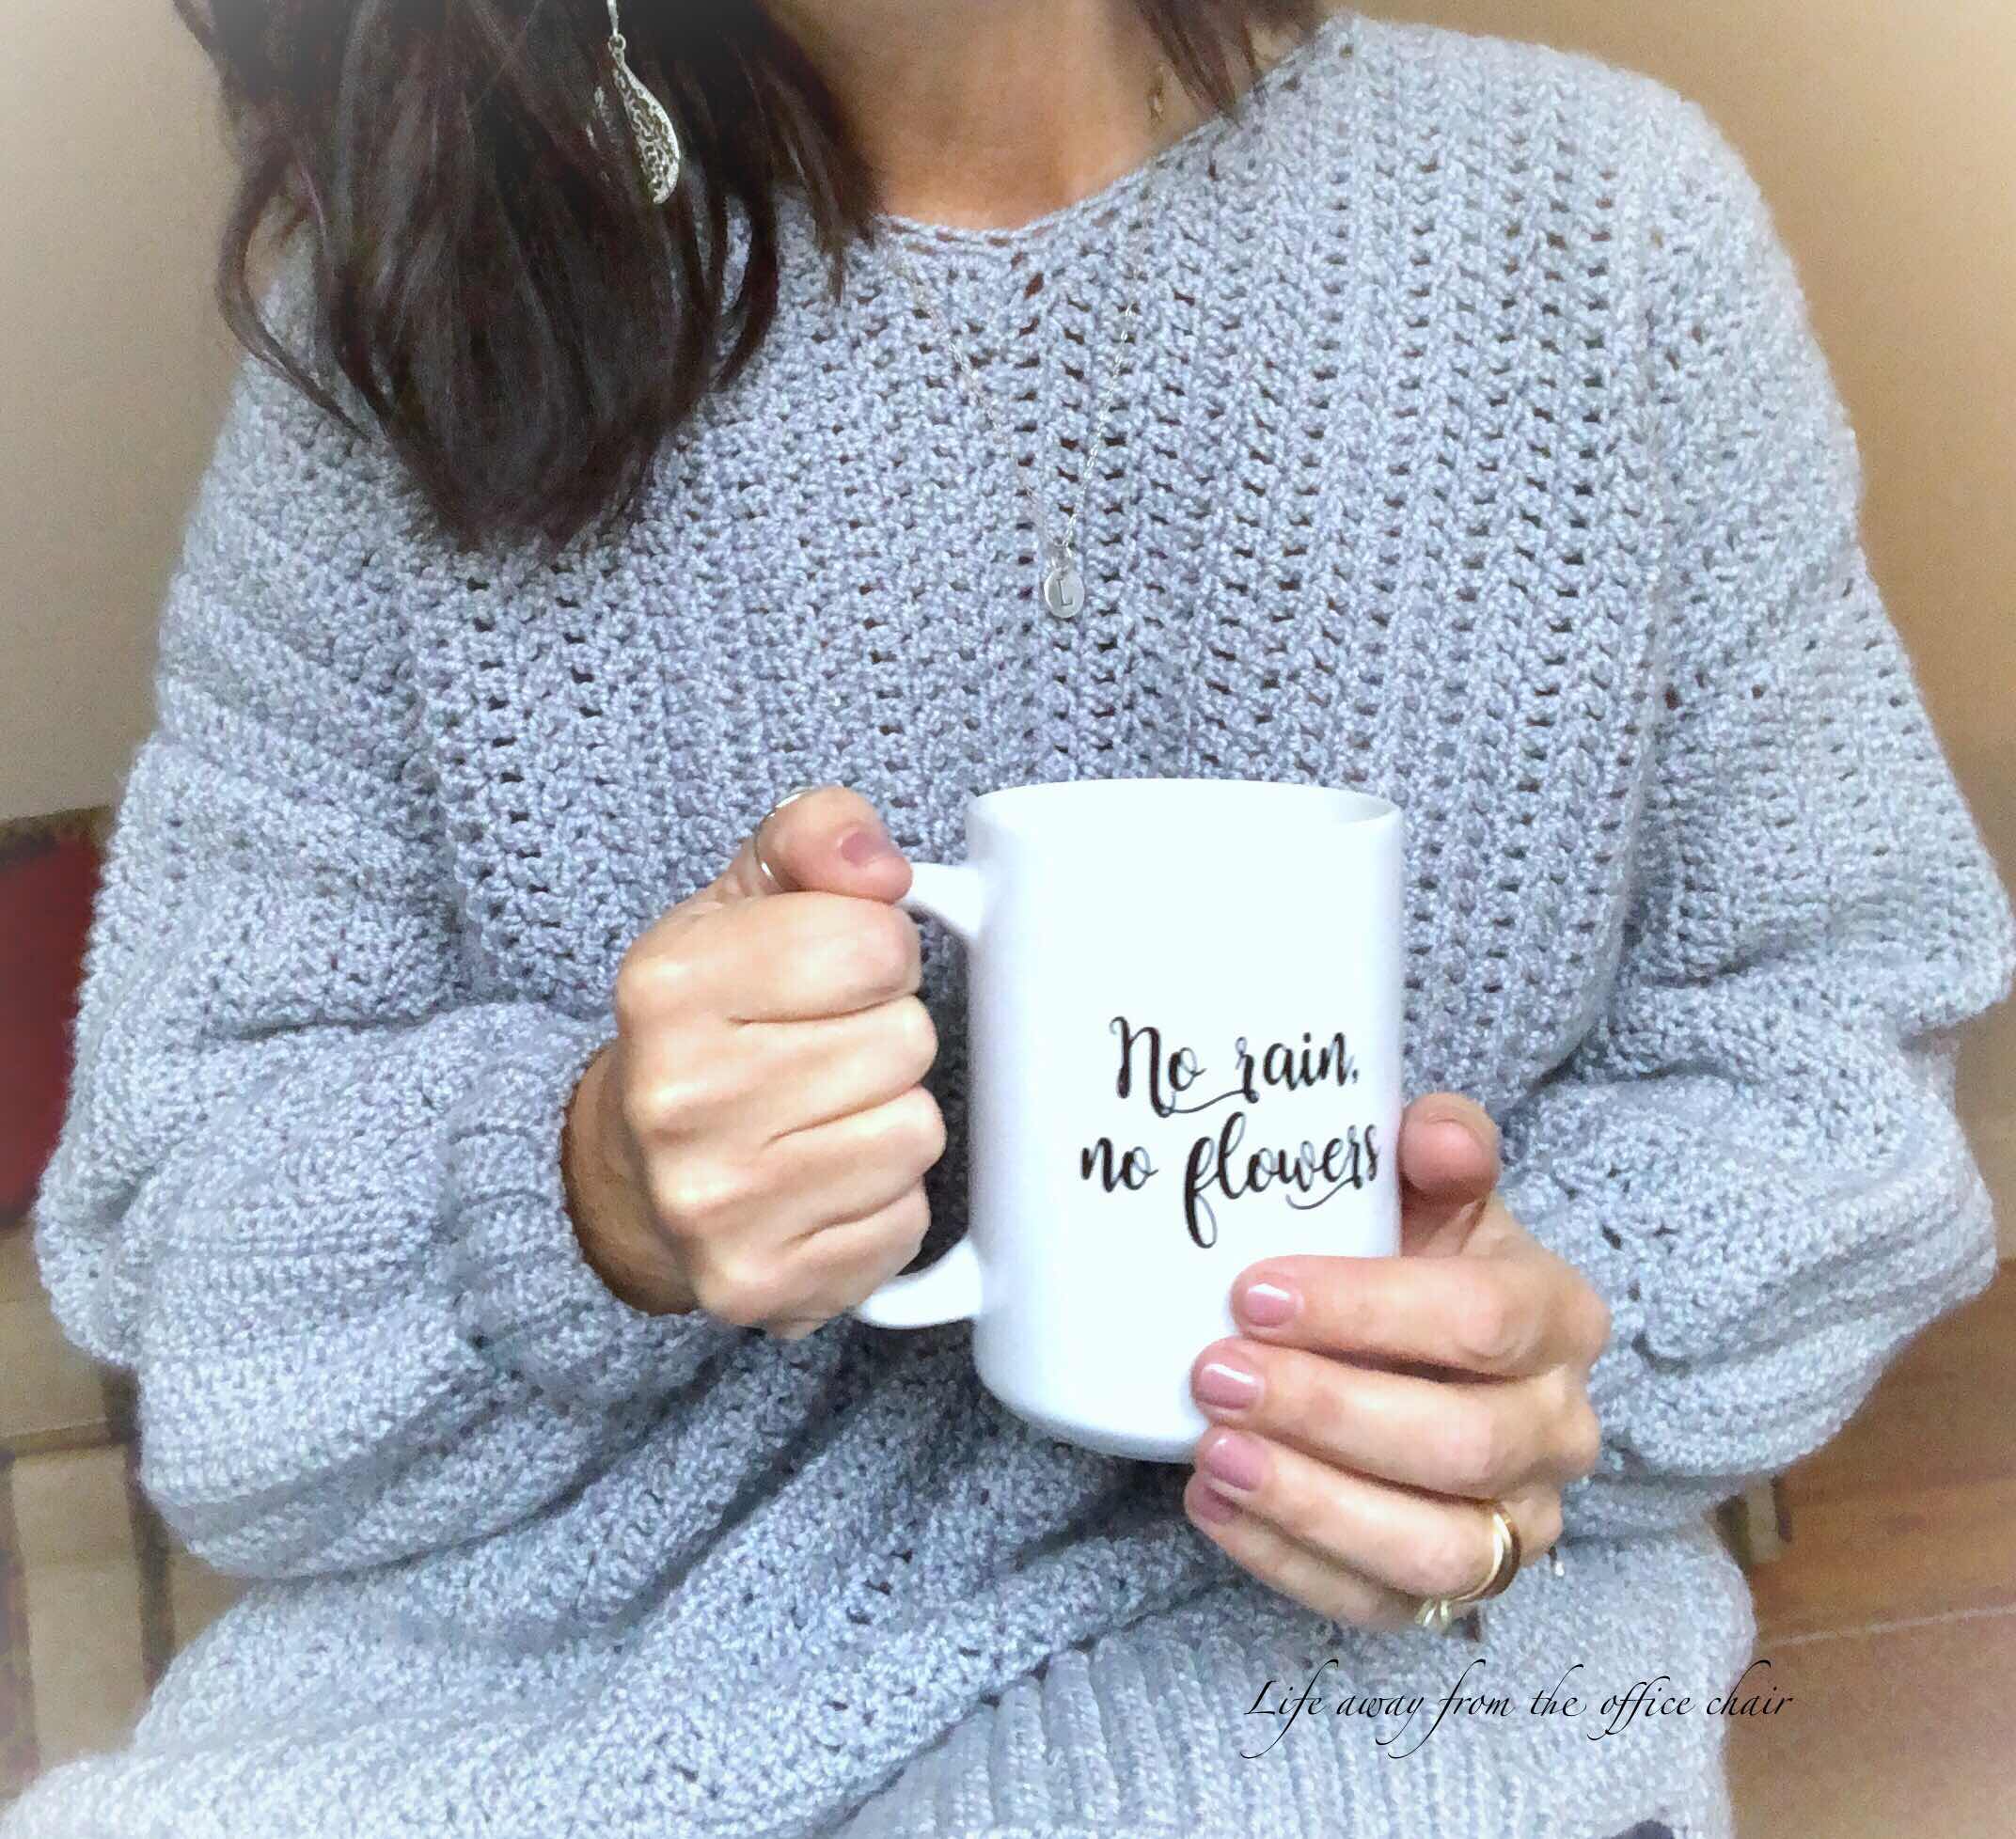
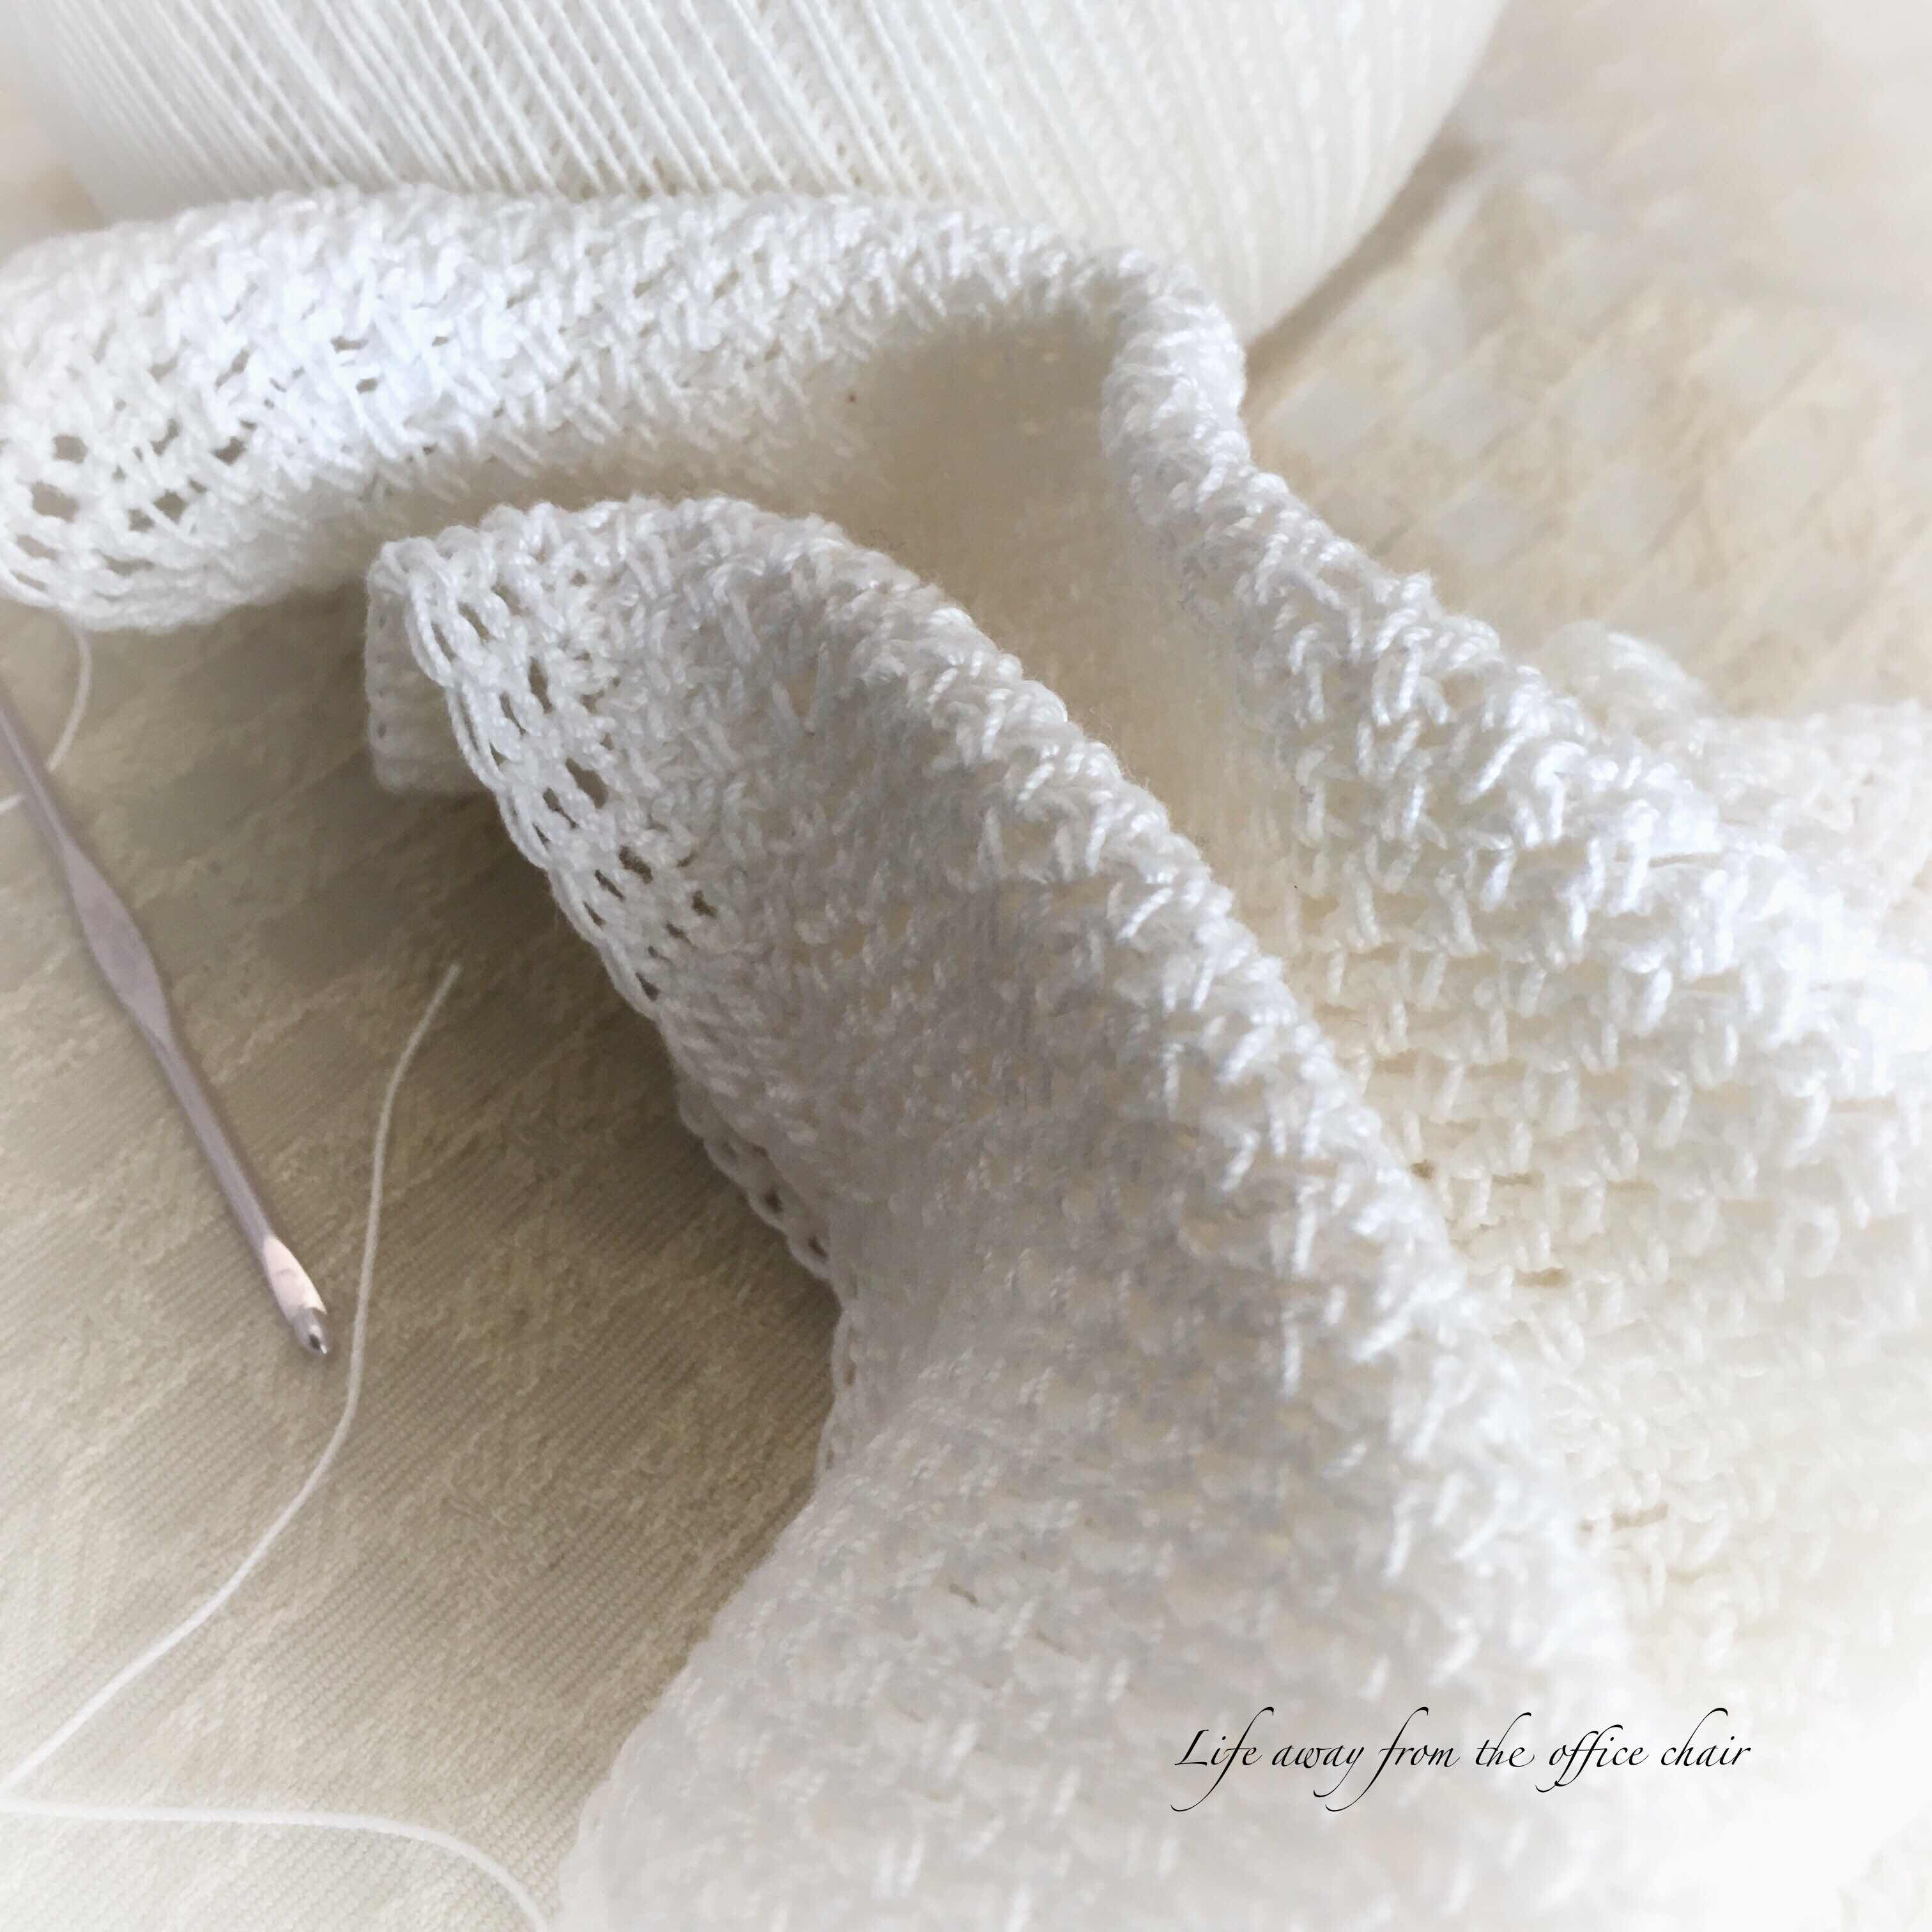
Though it has been rather warm around here for now, I believe Winter will finally hit us in February. Looking back, February is the month we have always had our biggest snows. I do not like being out in temperatures lower than my age. I also do not like wearing layers of clothes and I am not a fan of coats. I’d rather wear light sweaters. Speaking of sweaters, with a cold spell in mind, I’m sucking it up and decided to take a shot at making my own crochet sweater.


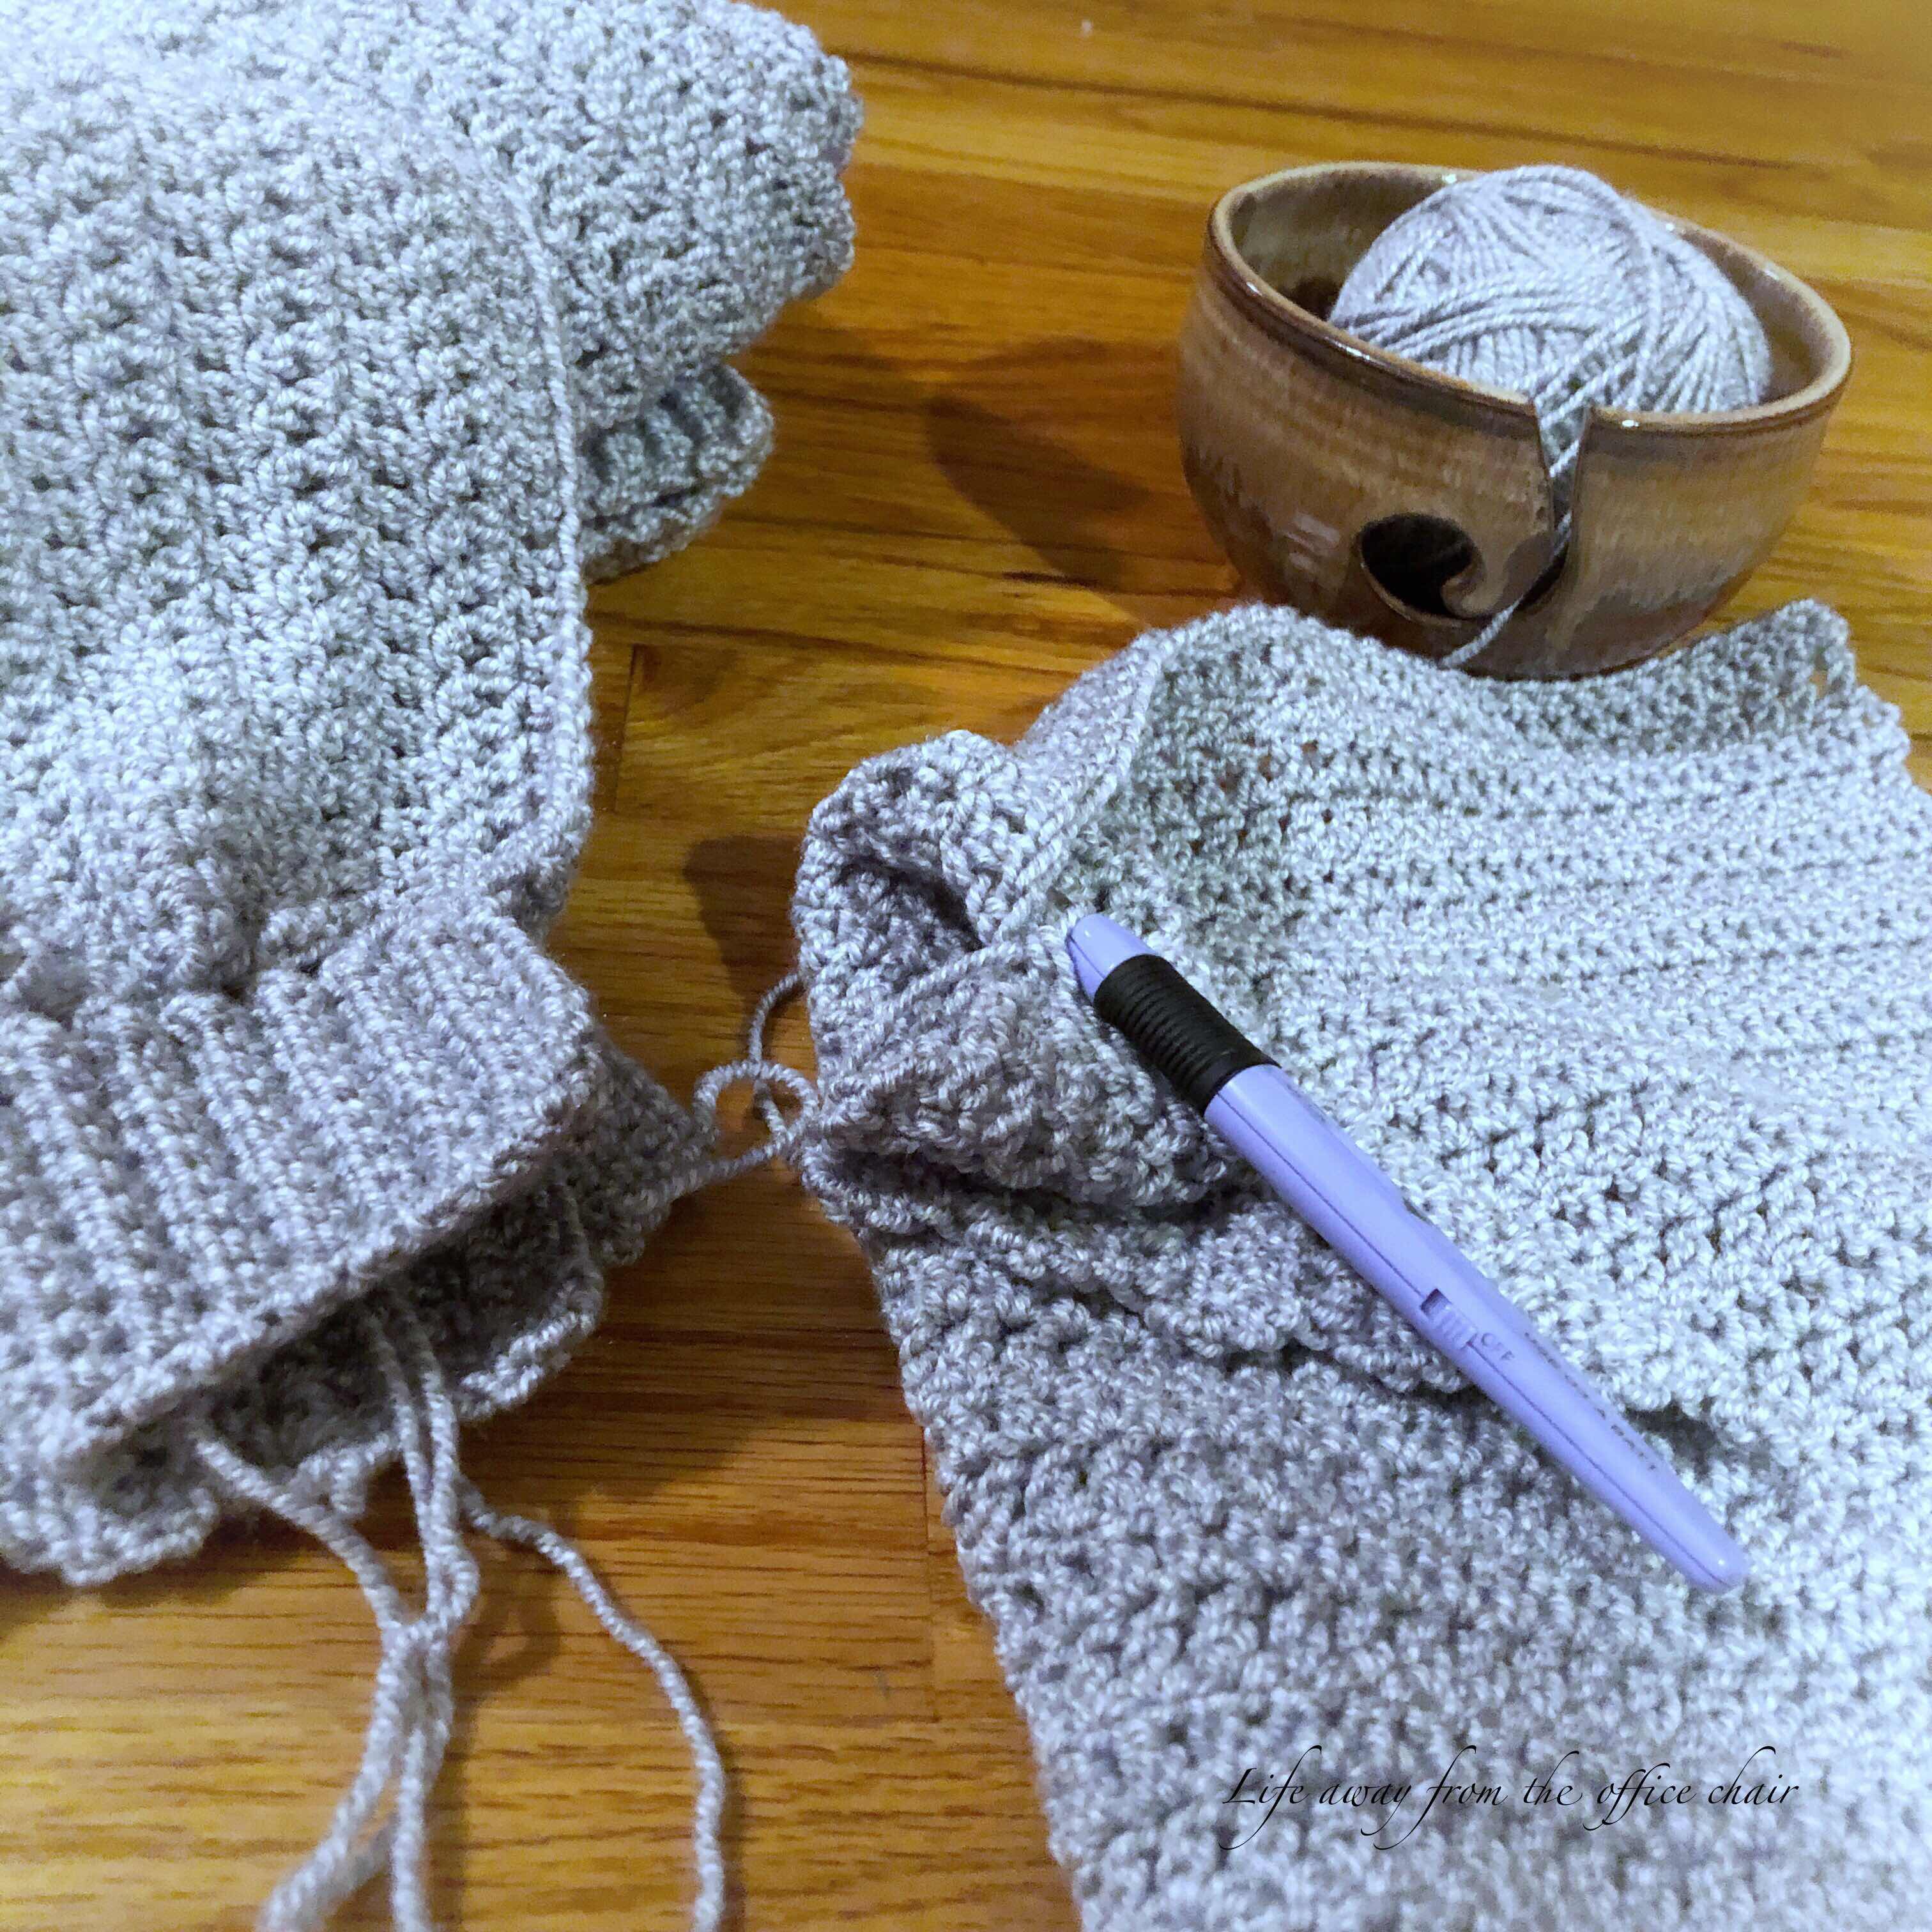
I limited my crocheting to only an hour a night since this project was for me and there was no rush. It was more enjoyable not having a deadline and just work on it a little each night while watching. Six skeins of yarn and a few nights later, I had made my very first sweater. Something I can actually wear. 


It was crocheted using a double crochet stitch in five sections with added crocheted ribbing to each; two front half panels, one back panel and two sleeves. 
Then sewn all together. There were times I thought I was creating a monster because it just seemed so big! I’m used to crocheting little things.

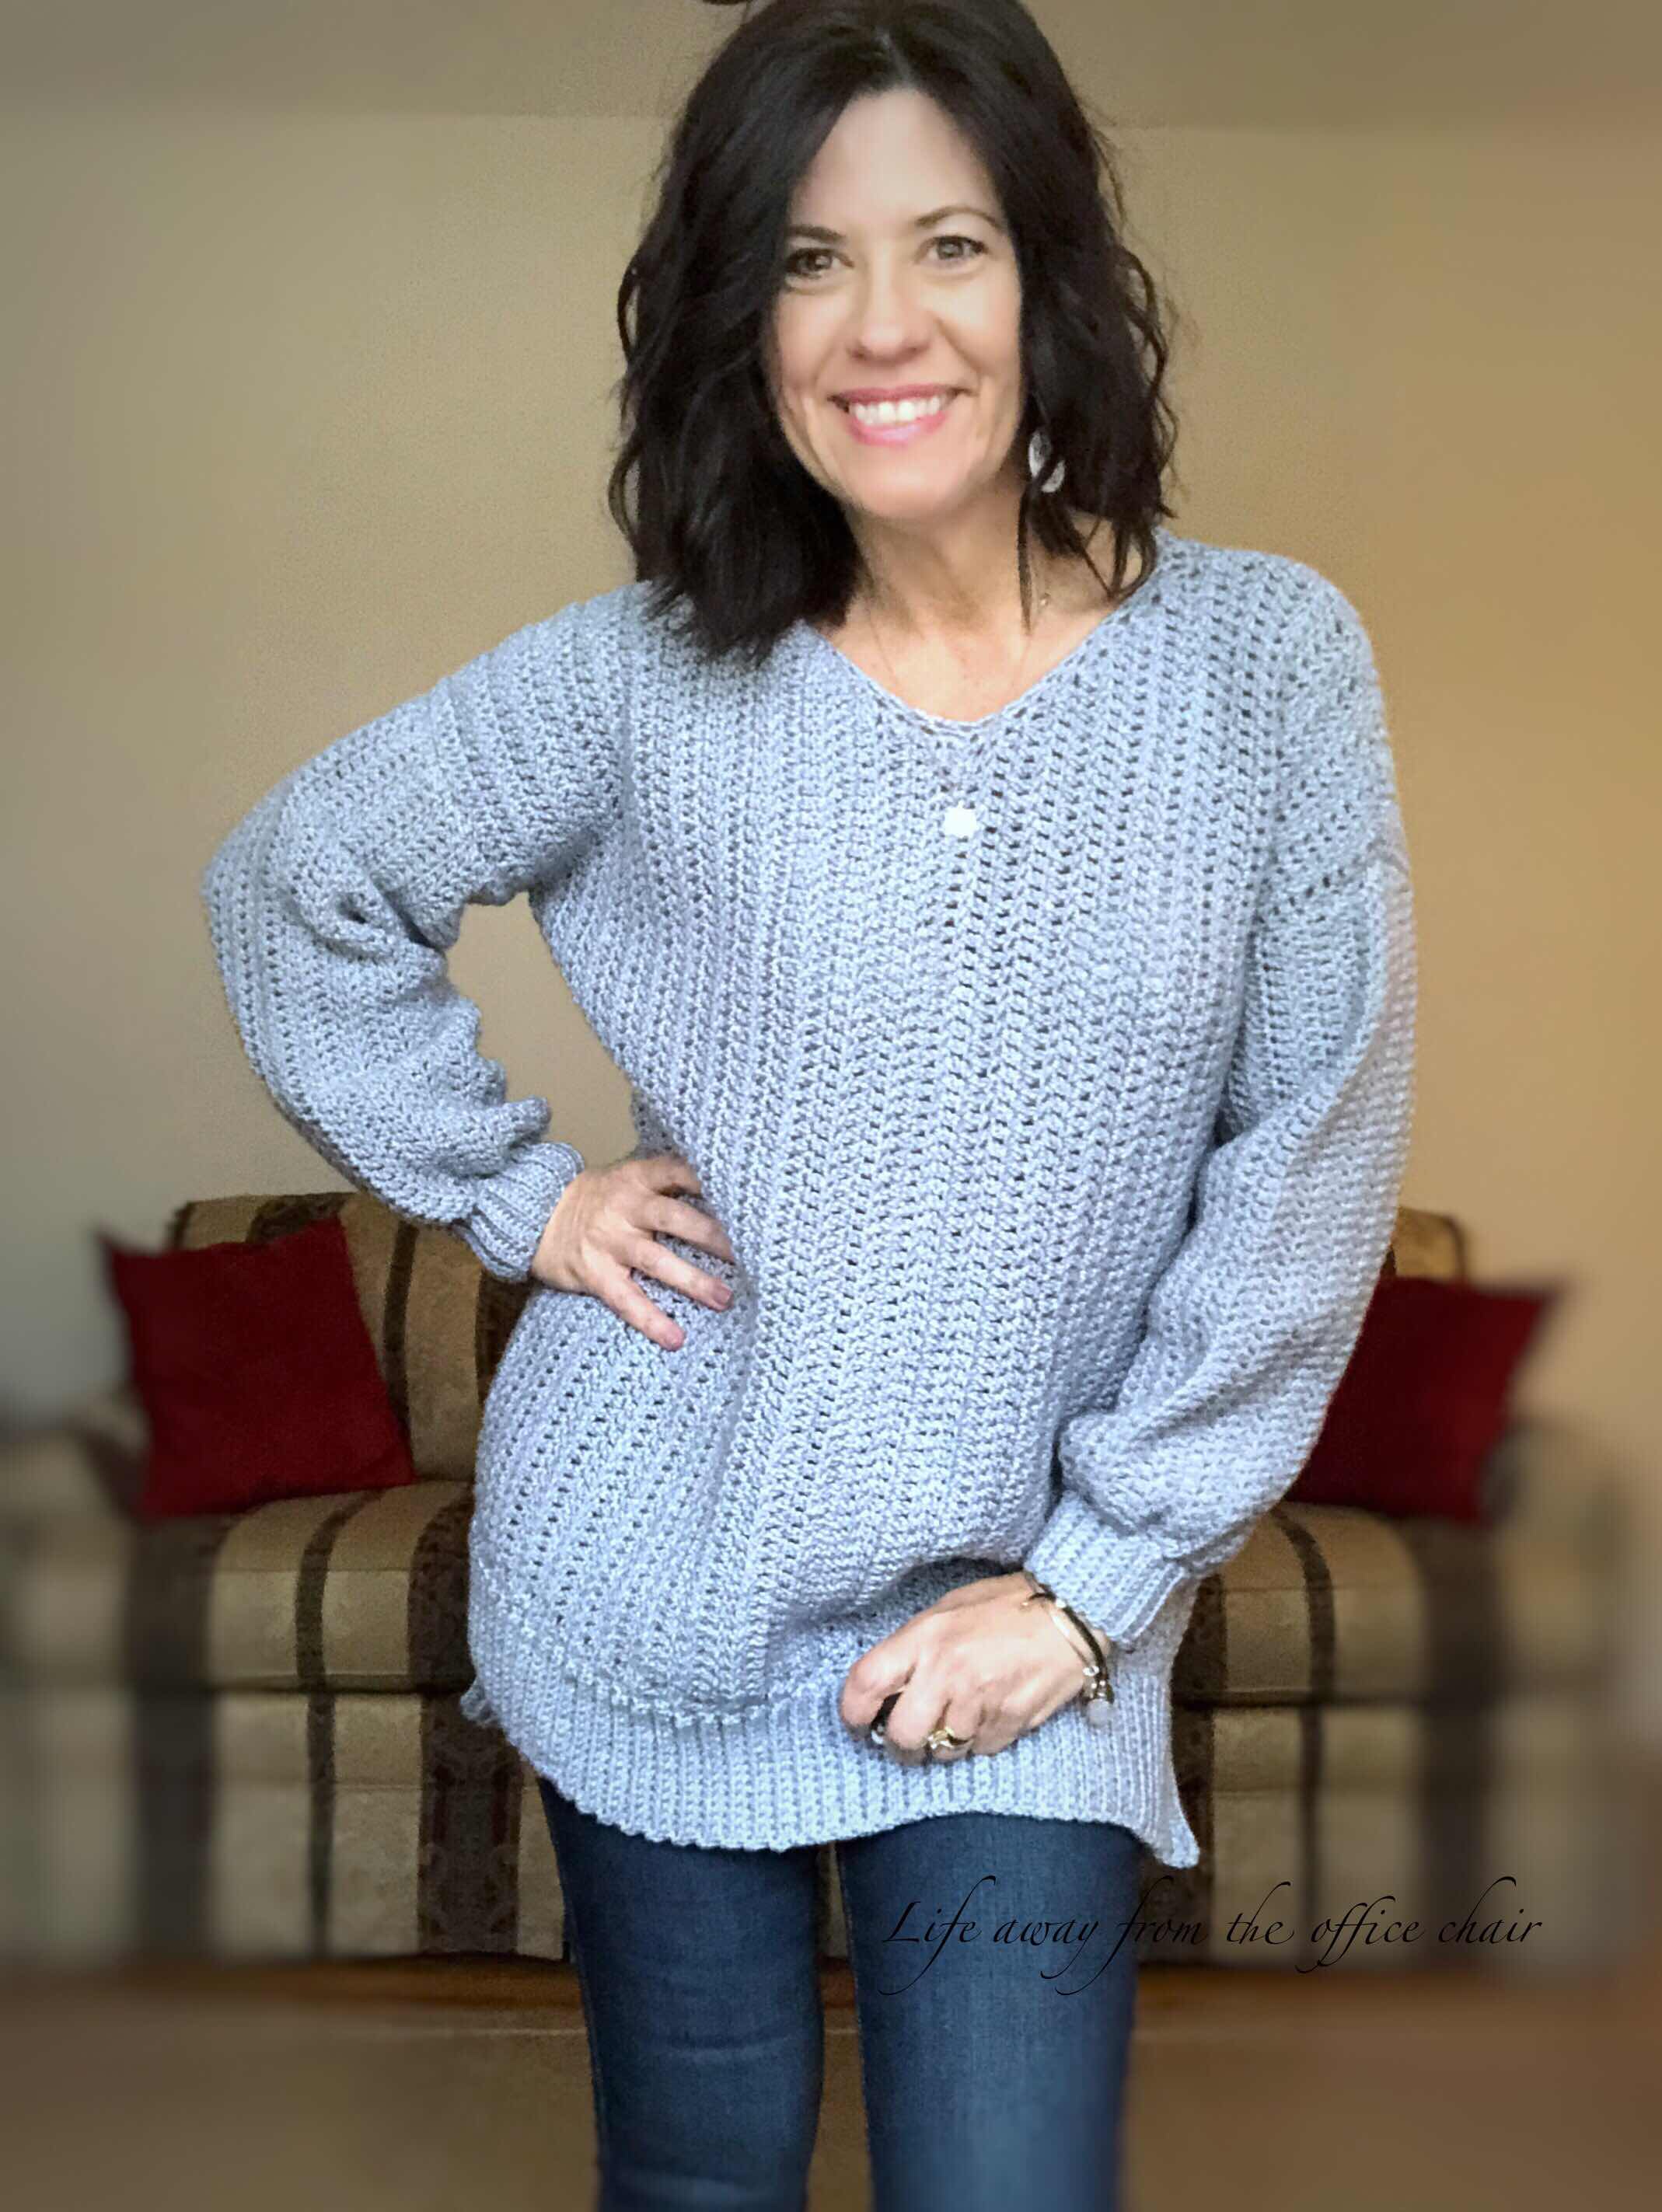
At first I thought it was too heavy and bulky, but after a regular cold wash in the washing machine and tumbled dry, It turned out soft and comfy. 
This sweater can be worn alone or as a pull over with a shirt underneath. I love the tunic length and the puffy sleeves. 


If there was anything I could go back and change (which actually I could but I’m too lazy) is to make the neck a little bigger so it would hang off the shoulders. This sweater will be perfect for the cold weather that could possibly arrive next month. 

There is no printed pattern for this sweater. I actually found a video tutorial online and wrote the instructions down. If you would like to make this sweater, you can find the tutorial video HERE

Yarn- Acrylic
Color- Silver Mist
Brand- I love this Yarn
Mug- Gift from Nutrisystem
Nail Color- Strawberry Latte (gel)

Meet My Gnomies

I did not do a whole lot of crocheting for my Etsy shop this Christmas season. I wanted to take a break. During December, I am usually swamped with orders, so when I get off work, I hardly have time to do anything else but create and fill orders.
I worked on my own time this season. I still sold a lot of things out of my shop but no custom orders were made except one thing for my sister. It was nice not having any demands.

For fun I created some little crochet gnomes. They were easy and I was able to make them using scrap yarn that was not enough to make anything else. They only took a few hours to make so I crocheted while watching Hallmark movies. I picked up the crochet hook and began single stitching using my imagination.


I crocheted in rounds and increased until I got the width I wanted for the bottom. Then I continued crocheting around and around until I got the depth of the body and then began to decrease the stitches to close it up. Before closing it all the way, I filled the body with rice and finished it off.


For the hat, I also crocheted in the rounds but increased every couple rows to give it the cone shape until I reached the length I needed. But the fella needed a beard so I looped on strands of yarn to the crochet of the body and unraveled the yarn to created a puffy beard. Then I sewed the hat to the body covering the knots where the beard was attached. Oh and then I made a little nose.


If you do not crochet this just sounded Greek to you, but are they not the cutest little creatures? Gnomes were all over the stores this season and this gave me the idea to make a couple. I have one left in my shop and may make a few more when I get some free time.

My sister asked if I would make her a gnome.
This gnome is slightly smaller than the other ones as it too was made from scrap yarns. Once I completed it, I added some special touches to it.


My sister loves butterflies so I crocheted some tiny butterflies using crochet thread and sewed them on the nose and hat. 
She seemed to love it and named it Scrappy.

I did not follow any pattern but if you would like to make one of these for yourself. Below is a link that will lead you to the pattern that inspired me.

Crochet Chapstick Cozy

I took a break from big crochet projects to do some small things. I have been busy Christmas shopping, wrapping gifts and tidying up the house for Christmas.

Speaking of wrapping gifts, every year I wrap up some little gifts for the girls.
“The girls” are my daughters friends. One is her roommate and one is her best friend from college. The three are inseparable. Every year they pick a night during Christmas to set out a little tree , pull out the Christmas movies and bake cookies. I make sure they have some little gifts under their tree to have fun opening. They are addressed "from Santa". 

This year I got each one of them a planner, some beauty accessories then added a chapstick to top it off. My daughter is always looking for her lost chapstick, so an idea hit me. I decide to crochet each of their chapsticks a little chapstick cozy (aka holder). 

I told Nick my plan and he gave me a funny look. “You just watch me” I said as I flipped open my iPad and searched for a pattern.

Bingo! I found several different patterns, so I had to decide which worked best for me.
After fiddling around with my yarn and crochet needle, three tiny chapstick cozies were born. 


I showed them to Nick and he was surprised. He thought they were rather cool.
I finished the cozies off by adding a key ring to the top and packed them neatly with each gift. 


My daughter texted me once they opened their gifts. They giggled and thought the crochet cozies were the best. 

It was just a little something fun to add to the mix. Now maybe my daughter can keep up with her chapstick and leave mine alone. 


Crochet Chapstick Cozy (free) pattern can be found HERE.

Crochet Holes

I enjoy wearing my holey distressed jeans. If you follow my blog, you may have read how I distressed my own jeans. I will go shopping for new jeans and can’t hardly find any that are not full of holes and look like they have been in a bull rink. I just refuse to pay high prices for ripped jeans. But then, again, they are my favorite. Go figure.

Last night as I was itching for something to crochet. I seen my jeans laying in the stack of clean clothes that my husband had just folded. Yes I have a wonderful husband that does the laundry a lot. He also washes dishes. We are good at sharing chores.

As I was looking at my worn out jeans, A thought crossed my mind of crocheting a patch on one of the bigger holes. When I get a thought, I have to attempt the process or it will drive me crazy. I found some instructions online then pulled out my yarn and hook and crocheted a hole. 
[Husband rolls eyes]. 


I like how they turned out and it gives them some unique character. Distressed and holey jeans are fun to wear when the weather is too warm for pants but too cool for shorts. 


I remember back in the day we would wear holes in the knees of our jeans and mom would sew patches on them. We did not go anywhere with holes in our pants. We also used to wear our jeans until they were too short, then mom cut them off to make shorts. The cut off part would go into the scrap barrel and used for more patches in the future. 
Clothes were not thrown out and wasted like they are today. 


Crochet pattern can be found HERE.


Crochet Peppermint Coasters

I haven’t been doing a lot of crocheting this season. Last year I was over loaded with making bun beanies by requests. I may make a few more but right now I am fixing to get busy crocheting some baby blankets for little nieces due the first of the year. yes my family continues to grow. I love it. 

But first I decided to make some cute mug coasters. I always use coasters under my cups. I do not like to hear my cup hit the hard table when I place it down. If I do not have a coaster handy, I will grab a napkin to use. I have made myself several coasters with cotton yarn. I like that I can just toss them in the washing machine when they become dirty.  

When I found a pattern for these peppermint coasters, I knew I had to make few. 


I love how they came out and were really simple to make (if your a crocheter of course). Jack over at Shipslog once said. “You guys always amaze me I can never see where you start or end the task”. 
I take that as a compliment. It means I’m doing it right. With these disk shapes, the start is in the center and the end is on the outer edge. Once finished, the yarn is tied off with a crocheters knot and the yarn tails are weaved in and out of the stitches to hide. 


I made a couple of these coaster for myself to enjoy during the Christmas season and I have a listing for them in my Etsy shop. I think they are going to be fun to use around the house as I will be decorating in reds and whites this year. 


You can find these ready to use coasters and more in my Etsy shop at LiLiDi

For all you crocheters out there, here is a link to a free peppermint coaster Pattern.


Acorns

Acorns are one of my favorite Fall reminders. They fall from the trees and bonk us on the head to remind us Autumn is just around the corner and then the squirrels will scurry around for the best acorn nuts to stash away for Winter.

I remember as a little girl before my teenage years, my daddy would give me pocket knives. I loved to go out into the yard and find giant acorns of many colors. They were so many swirling with colors of Autumn. I would sit on the steps of our front porch and twiddle out the centers of the acorns with my tiny pocket knife. I was extra careful not to cut myself or mom would take the knife away. I would then string the acorn beads to make a necklace. 

Well, Fall is just around the corner so I thought it would be fun to share some ideas of ways to decorate with acorns. 

BUT FIRST!....Rick over at life101 blog, made a comment the other day saying he thought I should make some acorn earrings and had no idea what made him think of that. I responded to him “ don’t tempt me”. Well Rick, here they are (modeled by my daughter). You gave me the idea and I did it. Haha. 

I made these crochet acorn earrings and kept the natural acorn tops. 
These are one of a kind. I may be making more depending on the interest. 
Buy them here: LiLiDi’s on Etsy 


I love these Adorable wooden acorns
They would look so pretty displayed inside or outside and you do not even have to worry about the squirrels stealing them from you. 
Find them here: The Holiday Barn


How about these cute acorn napkin rings
They can bring Autumn to my dining anytime. (Except Spring of course). 
Learn to make these here: NewEngland.com


Acorn Marble Necklaces are something I have done in the past but they did not turn out nearly as darling as these little sun catchers.
These would be perfect party favors or used as ornaments too.
Step by Step video at:  Rhythms of Play


How about pulling out a book with you favorite page marked with this fuzzy felt acorn book mark. 
Buy here: Vart on Etsy


I start decorating for Fall on the last week of September. 
During October, I will just add few spooky things to the mix until its over then back to just the Fall look through Thanksgiving. 

How do you like to decorate for Fall? 

Yellow Gingham

I finally finished the crochet blanket I started back in March. I fell in love with the gingham print over the Winter and was inspired to create this yellow Gingham check baby blanket.


I could have gotten this blanket finished in about three weeks if I would have put more effort into it. Spring came. The warmer it got, the less interest I had in making it. This was an easy crochet as it only consist of a single stitch and double stitch throughout, rotating the colors every ten stitches. I worked on it a little each week and sometimes I would let two or three weeks go by before I would pick it up again. I get bored and often loose my patience with long projects.


This blanket was crocheted using the griddle stitch. It turned out to be 38 x 38 inches. I really started making this blanket for myself just to see if I could do it. It came out smaller than I expected so I added it to my Etsy shop. I do not know what I was thinking. 


My daughter called it a popcorn blanket as is had all the colors of hot buttery popcorn. I thought it looked like a sunny day.

I'm pleased with how well it turned out. It is soft and warm and would be perfect for a baby. Though I think it has the perfect Spring look, It would be great for any season.


This Pattern can be found at: daisy farm crafts.
Completed Blanket can be found at: lilidi on Etsy


Pineapple Earrings

I’m feeling a little fruity after noticing fruit designs and styles in the stores this summer. I’m starting to actually like it. I see a lot of lemons and pineapples on everything from dishes and decorations to hats and underwear. I have even seen men suits printed in crazy fruity prints (that's where I draw the line).

Well I have joined in and made some fruity fashion to share.


I had this bright idea to make a pair of pineapple earrings so I hopped on Pinterest and began searching for ideas. Then suddenly I came across some adorable little crochet earrings so I had to make a pair. You can find this free pattern at  Winding Road CrochetBe sure to pop over to her blog and check out some of her other crochet creations and patterns. 

Mine are just a little different though. I didn’t add as many layers and went different on the beads. (Didn't my husband do a great job getting this close-up photo?). I plan to keep this pair and made another pair for my shop.


I didn’t stop there! I had so much fun making these earrings that I decide to come up with my own little version. 

I didn't use a pattern, I only used my imagination. I really like how these turned out too, as they are a bit smaller and seem more boutique.  What do you think?


I think these pineapple earrings will go great with shorts and tshirt or a sundress. 

If you would like a pair of these, be sure to head over to LiLiDi’s before they get away. While your there, be sure to check out some of my other items.


Wild Things- Crown

A mother that attends my church asked me the other day if I could crochet a gold crown for her daughter's first birthday.

The theme of the party: "Where The Wild Things Are". 
A 1963 Childrens Picture book.


Where the "Wild Things Are" is a story of a young boy named Max who runs away from home (in his dreams) to an island full of wild beasts. The beast eventually crown him king as they see him being the wildest of them all. (something like that). I just read this somewhere, I never saw the movie nor read the book.

The book was actually banned for libraries in 1964 for being too dark and having supernatural Themes. 

Well, Now, somehow this story has resurfaced to be a big hit with children between the ages of 1 & 3. My niece recently had a birthday party using the same theme.

So, When this lady asked me to make her daughter a "Wild Things" inspired crown, I didn't hesitate to say yes. I have crocheted crowns before so I knew it would be an easy task. 

Within an hour, I made the "Wild One" a crown. 
I had to guess at the size by placing my hand on the childs head. My guess was right. It fit her just perfect and she looked like she enjoyed trying it on. I would show you pictures of  how cute she was but I do not have her permission and I'm sure the Mom wants to be the one to post them. 

But I can show you my creation. 


What do you think? I love how it turned out. I even cut out a felt "number one" to add to it if she wanted too. 


Tiny Crochet

I took a break from crocheting a gingham check blanket to try something different.
Remember the lot of vintage crochet thread my mom gave me a while back? Well, I wanted to see what it would look like if I actually crocheted a dish towel out of it. 

I pulled out me tiny crochet needle and the large spool of thread to see what I could do. 
I chose to crochet using the moss stitch as its makes a tighter weave look. 


Oh my gosh! It took like for..ev...er! After a couple rows I wondered what in the world had I started. I refused to give up and kept on crocheting. A few nights and several TV programs later, I created a small dish towel. I’m pretty sure that after its washed, it will be the size of a washcloth as it’s made with 100% cotton thread. Well, see.  


My husband felt of it and like the texture. It’s soft and thin. It was almost like gauze. If it comes out as a washcloth, we can still get some use out of it. 


Now I will get back to working on the gingham check blanket. I have really been taking my time with it as its boring me. The warm weather is among us now too, so it makes crocheting a blanket less appealing. 

I also have another project in the works that I can’t wait to show you. 
So stay tuned. 

Crochet Bath Pouf

Some call it a bath puff. Some call it a bath pouf,  and some call it a loofah. Whatever you want to call it, it’s a washy thing.


I usually purchase a two dollar nylon bath puff at Walmart. I love them. They are easy to use. When I'm finished washing, I rinse it out and hang it to dry until the next wash. After a few weeks, I can toss it out and get a new one. 

I had a request the other day. After seeing one I made in my Etsy shop, a customer asked if I could make another color? “Sure!” I said. 
Then she responded, “Great, I will need four plus 4 matching washcloths by March 16th”. I did a face plant in my hand and looked over at my husband. ‘I have a crochet request for a batch’. He smiled and said “thats a good thing “right?” Well, yes and no. Yes I'm thrilled by the request, but there is no way I can get the order filled in a week. Heck, I don't even remember how I made the bath puff that’s been sitting in my shop for months. I thought she just wanted one. Working full time only leaves me with a couple hours at night to get any crocheting done. I had to decline the request. 


Later the next evening I grabbed a ball of yarn and began making a bath puff. I figured I needed to refresh my memory on how to make one and how long it will take. It took me three evenings to complete this bath puff! It is super easy to make but time consuming. I thought I was never going to get to the end of the last row and ran out of brown yarn half way through and had to add another color I had on hand. Now not only do I remember how to make one, I also remember why I never made any more. Ha!


These are better than the store bought kind as they hold up longer, suds up better and can be thrown in the washing machine instead of the trash. This saves money. But then again, what’s two dollars right?  I’ll stick to buying the cheep kind and put this one in my shop. Maybe it will sell. I might make more if I get bored or have some time on my hands, but I am currently working on a blanket.  


For the fun of it, I’ll share the pattern for this puff. 
I consider this a large one as it is approx 17 inches around.

You can use cotton yarn which is my favorite because I love all things cotton, 
but I used Acrylic for this one. Acrylic will not mildew, dries faster and is light weight. 

If you can read crochet,
Here goes:

Crochet Bath puff
Size I crochet hook.

Make a magic circle then chain 40 ( this will be your hanger). Sl stitch into the magic circle.
20 SC in the magic circle. (20).
Ch3, 3DC in same stitch, 4DC in each stitch around, Join. (80)
Ch3, 3DC in same stitch, 4DC in each stitch around, join. (320) 
Ch3, 3DC in same stitch, 4DC in each stitch around, join. (1280)
Tie off, weave ends.

Do you like the one I made here? If so, you can purchase it from my Etsy shop
I can make other colors.....Maybe.


I have shared this at