Showing posts with label Art. Show all posts

Floral Beauty from Silk Plants Direct

Flowers are great to send and receive for any occasion. It's not too early to even think about Mothers Day. It will be here before you know it. This is a good time to start thinking about what to get Mom to brighten up her day. If it’s flowers she likes, skip the real ones and get her something that will last longer than a week. Not sure where to find high quality real looking flowers? Look no further than Silk Plants Direct. They offer a huge selection of realist silk flowers, so whatever flower is her favorite, you will be sure to find it. You can choose from single stem flowers to beautiful arrangements. 

Silk Plants Direct is also the place to go if you need to brighten up your business or office. They have over 500 varieties of silk plants, trees, flowers, and more. You may see their products in places like hospitals, hotels, shopping centers, restaurants and other spaces as they offer commercial options too. 


This product was provided free of charge in exchange for my honest review.
All opinions are my own.
Color shades in photos may vary due to change of lighting. 


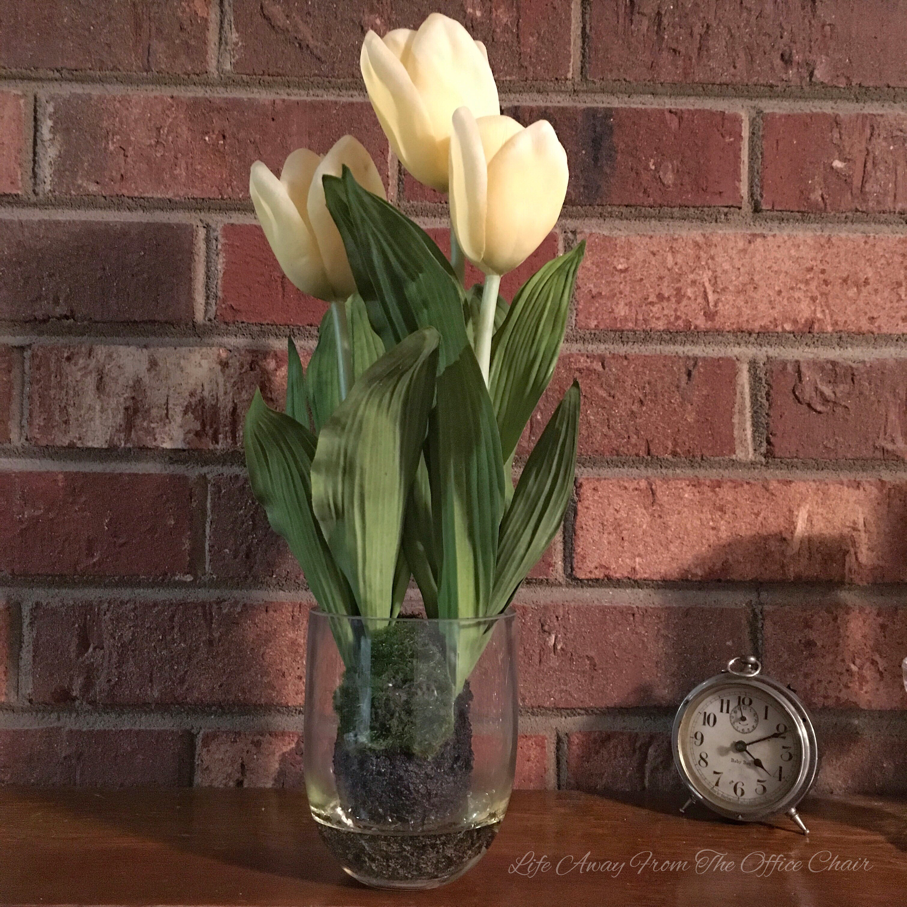
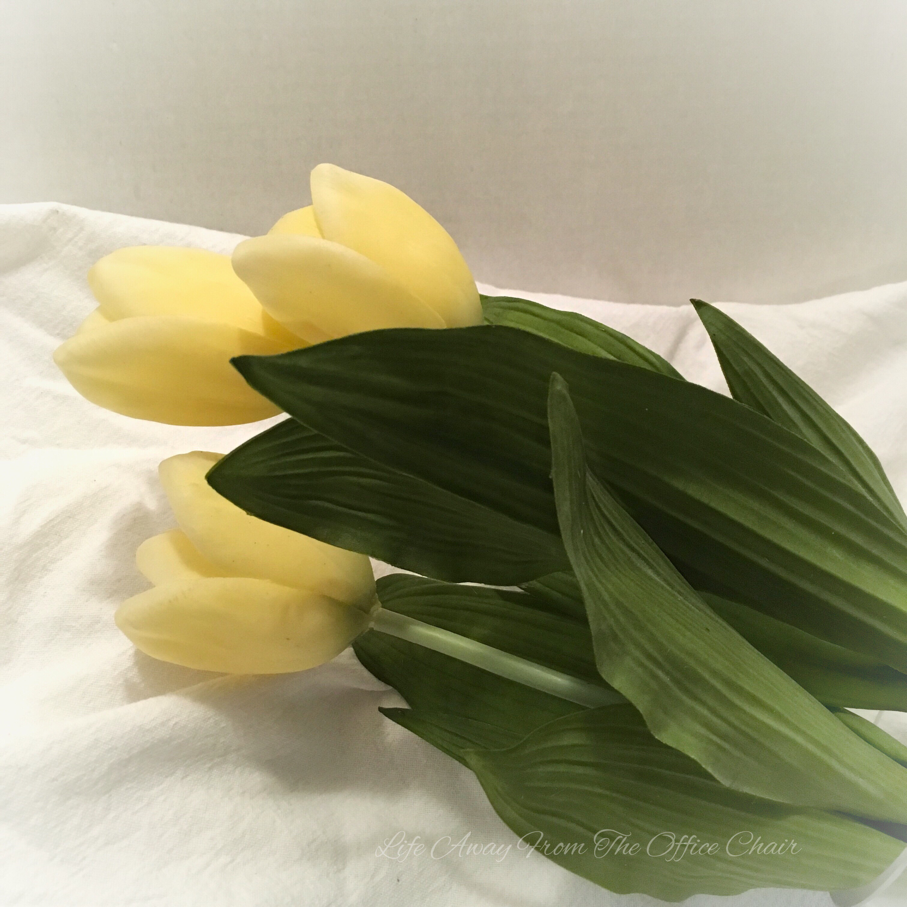
When Silk Plants Direct asked me to choose one of their floral products, I was overwhelmed with the different flowers and plants to choose from. It was so hard to decide on which one I wanted to try. This was a challenge for me because I'm such an indecisive person and all of their selections were so pretty. As I did a face plant in the palm of my hand, I decided to go straight to my favorite flower. I chose the yellow Tulips in a glass container.

It just screamed Spring to me. I thought about how pretty these will look during the Spring and Summer months. I also though about how great these will look on my table at Easter.

The shipping was quick. When my package arrived I was so excited and immediately tore open the box. I’m glad they were wrapped and packed with protection because I dropped the box while opening it. “Whooo” no harm done. They were perfect. I gently unwrapped the packaging and lifted the flowers from the box. I spent the rest of the day placing the arrangement of Tulips all over the house. I wanted to find the perfect spot to show them off.

These Tulips look soft and delicate and even feel real. 


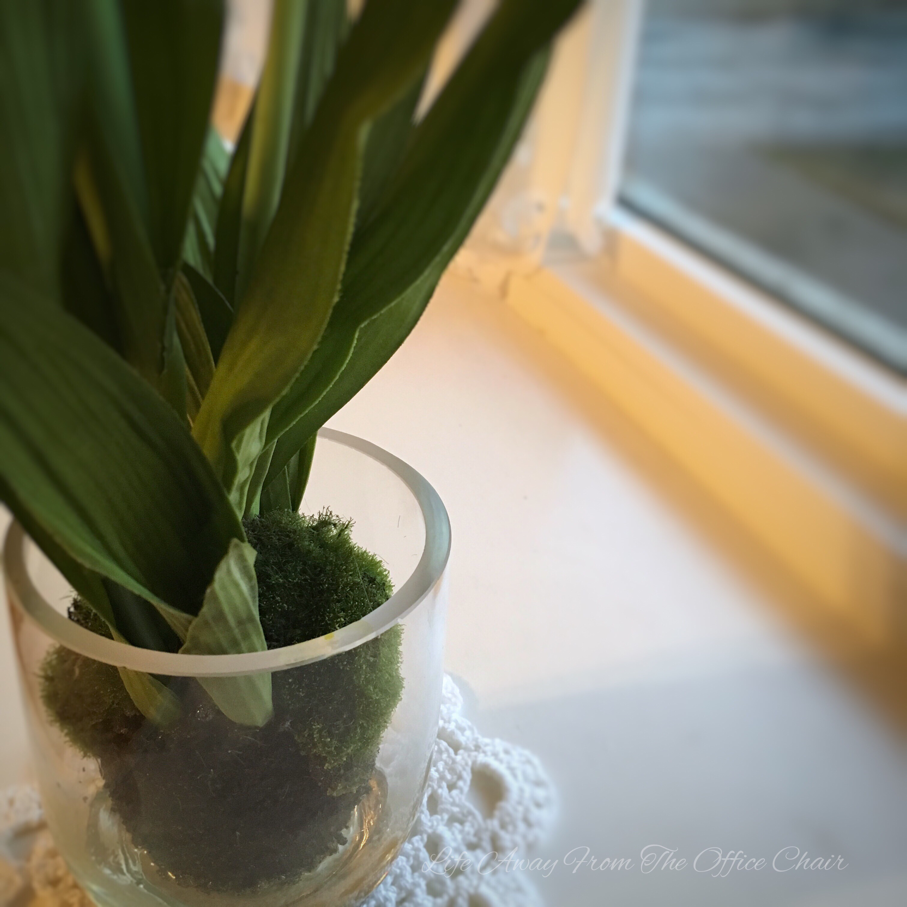
They were perfect from the petals to the cute moss that blanketed the bulb. If you look closely you will see these Tulips are sitting in an illusion of water. This means I will never have to water them. Yes, that's my kind of flowers. 


With the affordable prices and quality products, I plan to shop at Silk Plants Direct for any future plants. I’ve already got some ideas in my head for my future beach house. Did I mention, they have Palm Trees too?

Start shopping today for the best silk flowers, plants and more at SilkPlantsDirect.com
Use code: BLOGGER10 and get 10% off your purchase (excludes custom orders).


New Blog Look

Guess what? I won! Yes I entered to win a free blog make over at over at life and linda and two days later I got the memo that I had won!


I now have a "My Fairy Blogmother". 

So, what do you think? 

It was about time It got a face lift and I was planning on eventually giving it a redo but there is only so much you can do from Blogger itself. They have some nice templates but I like my own personality to show through mine. Frankly, I was just too lazy to mess with it. 

Linda contacted me via email and got some ideas of the look I was going for and it took off from there. 
I even learned a few things along the way. 

Did she make it look great or what!? Be sure to visit her site and see example of her other blogger designs.

My blog is not the only thing that got a new look today. My butterfly bush got a nice trim and decor. My daughter came for a visit and we made an Easter tree. We also baked cookies.


My daughter is an adult and lives out on her own. Living 30 minutes from us, she manages to visit every few weekends. When she comes home, my mommy engine goes full throttle. I fix her meals to eat, we bake, shop, tell stories and laugh a lot.... And yes, I have to throw in those life lectures (maybe to much). No matter how old she gets, I somehow can not let her grow out of those fun childlike traditions we have during the holidays. 


A little Vintage Decor

Ive been away from blogging like Id like too. It wont be long until I get back into the swing of things. I have had a lot going on and a few projects to complete.

It started in October when my daughter decided to move out on her own. Its put me in empty nest mode. Its different now at the house with her not here for me to tuck in at night and sharing our talks in the mornings. But I seem to be doing fine now. In fact, my husband and I have decided to redo her old bedroom and make it into a guest bedroom her a new bedroom. Im doing it in some of my imaginative ideas and colors of coral and tan. We actually sold her really cute french provincial bedroom suit and put our antique bedroom suit in its place. We will be getting a new one...Finally.

While all of the moving around the rooms is still under construction, I decided to do some decorating here and there to see what style I want to go with. I like the shabby chic look but not to frenchy. I like the modern look too but the furniture is old. So, I decided to mix it up and pull these looks into one.

One decoration I added is this vintage camera my father-in-law gave me. Ive had it put away and wanted to display it and found the perfect place. I love it. I also found a blue mason jar. I have been looking for a few of these. They are so pretty used as vases.


I called up my sister-in-law and asked if I could have some pom poms off her hydrangea bushes. I wasnt sure how dead they would be but after the ok, I drove over to cut some. I was was afraid they were too gone to use but took my chances.

Yes, they were really dried up. However, I think they added a special look to this little décor. To my husband, they are just dead flowers.
When the plants bloom in the spring or whenever they bloom. I will change them out with some colored ones.


So far thats all Ive got besides vintage suit cases I plan to use as a bed side table.

Words from my daughter- " That's enough old stuff. Any more, and it will look like a grandmaw room".
I think not. I think of it as shabby chic, modern vintage and I like it. As for the master bedroom, It will be different. But as long as I have an empty little girls room, I'm dolling it up.


Ive shared this at:
thursday-favorite-things-blog-hop at katherinescorner
show-and-tell-friday at romantichome
weekend-bloggy-reading-link-up at serenitynowblog


Crochet Beach Theme Cozies

I'm getting excited for summer. That's when I take several beach trips. We will be heading down to the coast in a few days. While I was crocheting last night, thinking of something new to add in my shop, I definitely had the beach on my mind. I crocheted these cute little mug cozies.


Each one was created using a different stitch. I'm feeling happy enough to tell you how I made them so if you crochet you can make one too and if you don't crochet, then head over to my shop and grab one of these cuties.


Sorry I'm not good at writing patterns so I'll just tell how I did it and hope you get it.
I used an H hook. But there is really no rule.

The little camper cozy:
  • chain 9
  • (starting 2nd chain from hook), sc/dc in stitch, skip, sc/dc in stitch, to end, sc in last stitch. ch2 turn.
  • dc in same first stitch, skip, sc/dc in next, to end, last st, sc, ch 2 turn.(you will be doing the sc/dc in the skipped stitch of each row).
  • Repeat rows and continue until you have approx. 8 inches long. ch1 turn.
  • sc 2together, sc, sc, sc 2together. ch1 turn
  • sc each row for 2 more inches (total length of cozy should be approx. 10 inches long).
  • on the last sc row- sc, sc, ch2, sc, sc (this makes the button hole). do not finish off
  • sc all around the cozy, finsh off, weave ends. sew on button.

    Sail boat Cozy:
    • Ch 10
    • starting 2nd ch from hook, hdc in each ch, ch1 turn
    • continue until you have approx. 8 inches long. ch1 turn.
    • sc together two times(using up 4 sc), sc across, sc together two last times (using up last 4 sc) ch1 turn
    • sc each row for 2 more inches (total length of cozy should be approx. 10 inches long).
    • on the last sc row- sc, sc, ch2, sc, sc (this makes the button hole). do not finish off
    • sc all around the cozy, finish off, weave ends. sew on button.
    Cut out any shape from a piece of felt and stitch on the cozy. Be creative, make it your own. It does not have to be perfectly placed or stitched. This will be one of a kind. Any flaws will make it a unique master piece.

    I have put these in my Esty shop and are ready for purchase.
    What are some new things you have been putting together lately?


    Ive shared this at:
    cityofcreativedreams
    dwellings-theheartofyourhome
    create-with-joy
    jaqsstudio
    something-fabulous-wednesday at roubinek
    worthwhile-wednesdays at thecraftiestallie
    submarine-sunday at usscrafty
    2crochethooks
    monday-handmade-linkup at judyscardmakingandpapercrafts
    inspire-me-monday at create-with-joy
    mix-it-up-monday at flourmewithlove.  


    January Daisies

    Its been a while since I did some artwork. I have been so wrapped up in crocheting and the holidays, that I nearly forgot about the relaxation of painting.

    One afternoon after all had settled down, the house was cleaned and crochet orders were caught up, I decided I wanted to paint a while. I didn't have a new blank canvas so I took an old ugly abstract painting I did a couple years ago and painted over it with a new look. That's the fun of acrylic!


    "January Daisies"

    I knew sort of what I wanted to paint. I needed a picture for my bathroom to coincide with the colors of the curtain and rug. I grabbed just three colors plus white and began my masterpiece. I was not sure what to paint or how to do the colors so I just began using the brush on the canvas and adjusted and blended as I went. once it was completely dry, I randomly drew long stem daisies blowing in the wind.
     
    I plan to do some more paintings as soon as I get more time. Painting is so relaxing.


    Ive shared this at:
    create-link-inspire at thecraftyblogstalke


    Boot Cuffs

    I have been wanting to make some cute little boot cuffs. Its something you practically have to buy hand made. I cant seem to find them in any of the store around here in North Carolina. But then again, its 70 degrees in December.

    I went to Pinterest to find some ideas on a pair. I attempted a couple but just couldn't seem to get them right so I gave up.

    Then I got a few request for some and thought Id give it another try. I ended up making up my own pattern and made a couple pairs. I like the way they turned out.


    The first pair went to one of my best friends and the other pair went to my daughter. If you would like a pair, you can special request them in my Etsy shop or if you can crochet here is how I did them.

    NOTE: I'm not good at writting the patterns. Just hope you can uderstand how I explain the process.

    BOOT CUFFS
    chain 13
    sc across (12)
    ch 1 turn, sc in back loop only
       *repeat (ch 1 turn, sc back loop only) until sized to go around your calf. (I did 40rows)
    fold and slip stitch together (this is your ribbed cuff).
    ch 1, sc in rounds until desired length. ( I did 12).
    Tie off and garnish with a button or bow.


    Not only are these things stylish and warm, but they will also keep critters out of your boots while your outside playing.


    Lucky Me

    I can't normally call myself lucky. I have the worst luck in the world. I can't even win a prize out of gumball machine. It's that bad.

    I entered a give-away to win a beautiful ceramic message board from Botanic Bleu. I will sometimes enter different blog give-aways but never think I will be a winner. I went home that afternoon and told my husband about the give away I entered and already planned a place for the message board if I win.

    I was going to go out and buy a little chalk board for my kitchen, but now I put that off because....

    I WON! I won the lovely fleur-de-lis ceramic message board.


    I plan to use it in my kitchen. Not sure what I will be writing on it yet. The possibilities are endless. I can use it to display a doodle, dinner menu, love note to my sweet husband or daughter, holiday inspriations, or simply to welcome you into my kitchen.


    Now, go check out http://botanicbleu.blogspot.com/. Its a French country home and garden blog that is sure to make you feel warm and fuzzy inside as she displays so many of her photos and decorations. This is just another reason I love her blog. I would love to visit France one day so in the meantime her blog is the closest Ill get.


    Thank You Botanic Bleu!

    DIY Cork Stamp

    Here's a cute little idea for you stamp lovers. Make your own...I know, I know, there are some really great kits and supplies to make a more perfect stamp but why not be unique and imperfect and make one yourself by just using a wine cork.

    I have actually be collecting corks for a project I plan to make one of these days. It will take a lot of corks, therefore meaning a lot of drinking, and well, for me, it will take forever to collect enough corks to make what's laying on my mind. But time will tell. I have asked friends to collect them for me in the meantime.

    I sacrificed one the other night just to try this little project.

    A CORK STAMP

     
    All you need is a cork, pen, razor blade, and ink.
     
     
    Draw your design

     
    Now chip away. I ended up using a pairing knife. I'm sure I would have cut my
    finger off with a razor blade so be very careful and don't let your children do this. As a matter of fact, don't let your teenager or spouse do it either. Only you. The creative one.
     
    Grab and ink pad and begin stamping.
     
     
    For this one, I actually only used my pen to color and stamp. I cheated.
    I didnt even take the time to grab paper. I was so excited I just used a paper towel.
     
    Now you have your very own, one of a kind, imperfect little stamp. Now get creative and make you one. Just be a little more creative than I was on this one. The possibilities are endless.
     
     
    I've shared this at:


    Ready for Business

    I have been wanting some business cards to promote my Etsy shop and now I have some thanks to Allison Marie Designs.  She is a new graduate of Gardner Webb University with a degree in graphic design. Some of her work include announcements, invitations, menus, etc. I thought why not let her do these for me and give her some more experience. After all, she is also my daughters friend and neighbor. :)

     
    She did the design and I used vistaprint to have them printed.

    I can now include a card with the items I sell out of my shop.

    I had my blog address added to them too. Well, just because my blog has such a long name, no one can remember it by the time they get back to their computer. So, now I can also promote my blog as well. Cool huh?


    It didn't stop there. Vista print asked if I wanted to use the design on a pen too? Yes, why not. I can always use a pen.  I'm pleased with how they turned out and can't wait to use them.

    THANKS ALLISON!

    DIY New Year Wreath

    My door is bare now that I have taken down all my Christmas decorations, so I wanted to make something to hang on my door to replace the Christmas wreath and its not time to hang up Valentines Day decor yet, so I decided to make me a new years wreath using Christmas tinsel and party favors. I usually buy party favors and set them out on new years day for the kids that come over for dinner but that sure can turn in to an annoying sound of clacker and horns, so I'm using them for decoration this time instead.


    I started with a foam wreath from the craft store and wrapped and glued until it look right. Then I took two plastic champagne glasses to give it that toasty look.


    I got it all from the dollar store but if I would have taken the time to look through my closets, I probably could have found last years left overs. So you could probably make one of these for nearly nothing.


    I found the idea from searching new year wreaths on Pinterest. There are so many unique and talented people out there. It just amazes me.

    Ive shared this on make-it-yourself-monday at anoriginalbelle

    Graffiti Train

    Coming home the other day, I noticed beside me across 4 lanes of traffic was this train going really slow with some amazing colors painted on the sides of most carts. They were vibrant in color. Some had words, some had pictures and couple cars were 3/4 covered with cartoon type pictures. The cartoon characters reminded me of the kids on the old Fat Albert show. (telling my age here).

    I thought this was a great opportunity for a photo, so I quickly found a place to turn around and go back so I could pull over somewhere and get some pictures. I missed the good ones but was able to snap a few shots of some toward the end of the train.


    I always loved looking at trains go by simply because of all the graffiti on them. I think its a unique art that somehow expresses someones thoughts or opinions from somewhere. They use any flat object as their canvas.  Id like to know more about it and what alot of it means and how to tell where it came from.


    Graffiti has existed since ancient times, with examples dating back to Ancient Greece and the Roman Empire. Graffiti means writing or drawings scribbled, scratched, or sprayed illicitly on a wall or other surface in a public place. Gangs use graffiti to mark there territory. I still thinks its interesting. Id love to see this train come by again so I can get some shots of the really good stuff I saw. But until then, Ill have my camera loaded and ready.

    How do you see graffiti? do you see it as art? or vandalism?

    Weekend Pinterest Fails

    I'm a big fan of Pinterest. There are unending possibilities and so many creative artists, crafters and cooks out there!  I love getting ideas and trying them, and if at all possible, I will try to make it just a little different so the maker can still be original.

    I came across a recipe and a craft I could not wait to try and then share in my blogging world.

    First- The recipe was for "crab ragoons". This is one of me and my daughters favorite things at the Chinese restaurant. So I got the stuff for this easy recipe and did it exactly the way it said to do it. I didn't even add my own trick because this one looked so perfect already.

    FAIL!
    The cream cheese and crab mixture was perfect and wrapping them into little won tons was easy but cooking them up was just a mess. They didn't want to brown pretty and crispy except around the edges and those ended up being really tough. It could be the brand of won ton wrappers I used or the way I fried them. Maybe and deep fryer would have worked perfect. I still want to eventually ace this one because except for the texture, the taste was there! We ended up eating them anyways.

    How mine turned out.

    Second-I found this craft idea and shared it with my daughter who is always looking for ideas to do with her sorority sisters. "Write on a white plate with a sharpie marker and bake in oven at 150 degree for 30 minutes and the marker will never come off".

    FAIL!
    As soon as the plates cooled, I washed them and the writing came right off! disappointment here. She was really excited about this one.

    Her plate looked really cute.
     
    
    Have any of you had any experiences like this? I do not doubt the original creator of this recipe or craft, Its just that I could not pull it off. 

    Set Sail

    If you have been keeping up with my blogs, you may remember me mentioning the Piece of drift wood  I found on the beach during my vacation.

    I finally got around to creating the idea I had for it. A little sail boat.

    My husband found me the perfect stick, and from some scraps of cloth my mom gave me, I was able to create the sailboat I had in my mind.

    I love nautical themes and items. I guess that goes along with my love for the beach. This little thing really floats too. I like the way it turned out. I didn't want it to be perfect. I just added a sail to it and let it become what it wanted to be. I added the number to it of a special year.


    "You need not sail unaided.
    Give Jesus His rightful place,
    And through the seas of life
    You will be sailing by Grace"


    Ive shared this at:

    Dorm Room 1011

    Well, Its that time of year. The time where we pack up all of my daughters clothes and school things and take her back to school. She is only 30 minutes away so its not all so bad but I still get that upset, lost and lonely feeling on the way back home from moving her in.

    This is her last year of college so we didn't want to spend alot of money on new dorm room items and decided to just reuse what we had. She lives in an on campus apartment shared with 3 other girls. They all have there own room and share the common areas. We have to make do with fitting everything in a 9x12 room.

    She likes to go with a color theme. The first two years of college, she used alot of pink.
    For the 3rd year, she decided to go with more mixed citrus colors such as green, orange, pink and yellow.

    Here is a look at last years room....


    Its really bright. I liked this one the best and check out the peacock she drew to hang next to her bed.

    and here is a look at this years room.


    Since joining a Kappa Delta Sorority, she has grown fond of the color green. So we took out the fruity colors of last year and just stuck with mostly green. I love the pink and green monogram artwork she painted for this room.


    She simply hung it with a ribbon.

    She also got a little creative with her plastic drawer tower by using some scrapbook paper to cover the inside of the clear drawer fronts.


    It added a great look to match her room while hiding the contents.

    Here is what the common areas of the apartment look like until they decorate it a little.

    Living room
     Dining room
    Kitchen
    A look down the hall that leads to a bath room, shower and 4 dorm rooms


    I just wouldn't feel right moving her in without making some delicious brownies to share with the other three girls that will be living in the apartment.


    We wish her the best this year and can't hardly wait til she graduates!
    wait.....Did I just say that?

    Paint Party 3

    I have been to three Madhatter paint parties. You can read about my first class and what a Madhatter paint party is  HERE . The most recent one I attended, I believe was my favorite one so far. We painted a cubism style picture of wine bottles. We had alot of fun. It was a pretty small class this time of only five of us and the two art instructors..

    I love to do pencil drawings but Im getting used this painting on canvas thing pretty quick.

    The first thing we did was drew a rough sketch of our painting. We normally do not draw the picture first, we just paint it but with this style of painting it was easier.


    Eat a cookie, sip a drink....then ....


    Eat a another cookie, sip some more....then


    Its finally looking like something.

    Ya known, when you get several girls in a room painting, you get alot of silly stuff.
    While everyone is busy painting, we tell stories, talk about songs, things going on around us and joke around. You may even learn a new word or two like, "swirly dizzle" or dibble dabble".  I even learned what a Tangent was. I also learned that when someone is asked to paint a "woody" they mean a style of car. Ha!

    Wah Lah!
    My painting is complete.

    I'm no Picasso but it goes pretty good in my kitchen along with all my vineyard and fat chef decor so I'm ok with it...all except the black mark on the left hand side where I dropped my brush on it at the end. pfpffhh.