Showing posts with label Crafts. Show all posts

Pineapple Earrings

I’m feeling a little fruity after noticing fruit designs and styles in the stores this summer. I’m starting to actually like it. I see a lot of lemons and pineapples on everything from dishes and decorations to hats and underwear. I have even seen men suits printed in crazy fruity prints (that's where I draw the line).

Well I have joined in and made some fruity fashion to share.


I had this bright idea to make a pair of pineapple earrings so I hopped on Pinterest and began searching for ideas. Then suddenly I came across some adorable little crochet earrings so I had to make a pair. You can find this free pattern at  Winding Road CrochetBe sure to pop over to her blog and check out some of her other crochet creations and patterns. 

Mine are just a little different though. I didn’t add as many layers and went different on the beads. (Didn't my husband do a great job getting this close-up photo?). I plan to keep this pair and made another pair for my shop.


I didn’t stop there! I had so much fun making these earrings that I decide to come up with my own little version. 

I didn't use a pattern, I only used my imagination. I really like how these turned out too, as they are a bit smaller and seem more boutique.  What do you think?


I think these pineapple earrings will go great with shorts and tshirt or a sundress. 

If you would like a pair of these, be sure to head over to LiLiDi’s before they get away. While your there, be sure to check out some of my other items.


Cactus Rocks

Well what do ya know? I found a plant that I can’t kill. That's right. I do not need to water it or feed it. It’s cactus rocks!

I saw this cute little idea of painting rocks on Pinterest the other day and since I like to paint and do crafty stuff, I thought I’d give it shot.

Francilina stole three rocks from the Wendy’s parking lot and the fun began. 
(Name has been changed to protect the guilty).


I took these rocks outside one 98 degree day and painted away. I never even broke a sweat. (I ran a 5k a few weeks ago and didn’t break a sweat then either, but that's beside the point). Our large dogwood now hangs over the patio enough to give it a nice afternoon shade. I enjoyed my time alone painting rocks. However, it was not easy! 


The base color was easy but trying to paint the tiny prickly hairs that cactus have was ridiculously hard. Oh and by the way, don’t use paint brushes from the dollar store. The bristles kept coming off in my paint making them look hairyeeeee....Wait, I just had an idea. I should have just glued the tiny brush bristles onto the rock to really give a prickly look. Oh well, it’s too late now.
.

I know, I know, they look terrible, but from a distance I think they are ok. Sort of adorable actually. I think I will take them to work and put them up on a shelf in my office.


This would be a great idea for moms, teachers or babysitters. You can create many cactus rocks of different sizes and shapes. Purchase some small planters or cups along with some pebbles from the dollar store. The kids can have fun creating their own little cactus gardens over and over. I mean, it’s not like they will break. They are rocks! Just make sure little Johnny doesn’t stuff the pebbles up his nose. 


Red Tassels

I hope everyone had a wonderful Fourth of July.

I’m just glad I got the day off! However, my day did not start off as planned. I woke up with a terrible eye infection. It was itching and burning so bad, I was ready to gouge it out! It was red, filled with green puss and swollen. I literally looked like I had been in a fight. The doctors office was closed so my husband skipped his morning walk to take me to the nearest “minute clinic” so I could get started on some medicine. I was diagnosed with pink eye. I was pretty miserable all day.

Later we attended a cookout at my brother in laws. I really hated that I could not pick up my little nephew and get sweet hugs from him. I did not want to chance spreading my eye infection. I was told I would be contagious for 24 hours after I start the medicine. It did not keep me from over eating on banana pudding and fruit cobbler though! 

Before we left the house, I wanted a pair of red earrings to match my outfit. I wore khaki shorts, white eyelet top, a red bandanna in my hair and of course, my new red sandals (mentioned in previous post). I thought for a minute on how I can accomplish making a pair of earrings. That's when it donged on me that I have some red embroidery thread and some earring pieces in my craft closet.


I wrapped the red thread around three fingers twenty times. Then cut the loop to make straight strands. Then I added a little hoop to the earring hooks and put the clump of thread through the hoop then folded and tied it closed. I added an extra little hoop around the tassels to add some glam and also help hold it all together. 
It took me all of fifteen minutes to complete and I was ready to go. 


I took a goofy side view to hide my monster eye on the right side. I’m pretty excited how the earrings turned out. No beads or fancy stuff were added to them. I just wanted some accessories and you can’t go wrong with tassels. 

We never went to see fireworks. Our neighbors were texting for us to hurry home so we could all meet up and watch them shoot some off. They said they had enough to make the cops come! I was all in because who doesn't want to be a rebel sometimes, right? We got home as soon as we could but unfortunately we missed the fun so we sat in the yard and watched over the trees at other fireworks from around the block. It ended up being a nice evening and no laws were broken.  

Camper Coin Purse

I can do a lot of things but sewing (with a machine) is not one them. I can do a simple stitch by hand to fix a hole in a piece of clothing, or sew on a button, but it doesn’t go much further than that. I have a sewing machine my mom gave me years ago. It sits in my craft closet looking pretty and makes a great resting spot for my other crafty things.

Well, the other night I decided I wanted to make some more crochet coin purses that I had made in the past. Then a bigger thought came to mind. I have this adorable piece of fabric with tiny little campers, cars and bicycles on it. I thought,"why not try to actually sew a little coin purse? I mean, they look easy enough". 

Ha! Who was kidding? It would have been easy for a seamstress but it was the ultimate task for me. 
First I searched online for a pattern to use. Most instructions just said to "guess at it". So basically that’s what I did. I drew out a pattern in the shape of a coin purse. Then traced it out on the fabric making sure I got one of the camper prints on the front. At least I knew I needed a front and back. Then there was the lining. I cut out two pieces of those with white material.

After about 20 tries, both by hand and by machine, I finally made a little change purse that looks half way decent. I will not fail to mention, I used up the whole half a yard of fabric trying. 
That’s determination!!


I could not for the life of me figure out how to get the lining inside without the stitched seam showing. But I figured it out. I had to leave a little opening in the bottom of the lining so I could turn it all the right way out and all seams hidden. Then I hand stitched up the little opening.


I showed it to my mom. I think she will like what I did. She is a professional seamstress, so I know she probably sees a lot of mistakes in my finished product. I’m pretty sure she could have also showed me a shortcut to making this easier, but it’s too late now.
However, I am pretty proud of myself. 
I put my mind into making it and I did. So, now I can put this thought away and move on to something else. 


I think Ill stick to crocheting.
What do you think?


I've linked up to theses fabulous parties:
Simple Homestead- Blog Hop / Condo Blues / Fiesta Friday / Fluster Buster / DIY Showoff
Create With Joy / SewCanDo / Run Jump scrap Lets Party

Mother’s Day-The Corsage

Happy Mother’s Day to all past, present and future Mothers! Hope your day is filled with love, happy thoughts and memories.

I remember when I was little, Mom would carefully lay out corsages for me and my sister and boutonniere's for my brothers that My Grandmother made. One by one, mom would pin our corsage to our Sunday outfit and to church we went. I hated it. I despised having to wear that big scratchy corsage that smelled like grandmaws basement! I was too young at the time to realize the reason of her making sure we all had a corsage to wear on Mother’s Day. 

The Mother’s Day corsage started in the 1800’s. Everyone wore one on Mother’s day. The corsage did not indicate that your were a mother, but rather that you are wearing something to honor your own mother. The flowers were usually made with an orchid, carnation or rose. The type of flower was not as important as the color. If your mom is living, you wore a red or pink flower. If your mom is deceased, you wore a white one. 

Sadly the tradition of the Mothers Day corsage has stopped. You will rarely see anyone wearing them anymore. I admit, I have not worn one in years. 


So, this Mothers Day, I have decided to make my own corsage to proudly wear over my heart in honor of my Mother (If it’s still alive).
I am who I am today because of her. She worked hard making sure all four of her children had everything we need. She showed us unconditional love but would also show us what a hickory stick was when we did wrong. She made sure we were in church every Sunday and raised us with Christian values that we still hold on too today. My mom is very pretty, smart, strong and always smells good. 
I made my mom laugh and cry. I have rebelled and hurt her feelings many times. I will always hold that guilt but I know she prayed and loved me through it all. That's what moms do. 

As a mom myself, I find and l learn new obstacles with my own daughter that make me think about the challenges and sacrifices my mom went through. Everyday, I am more thankful for the lessons she taught me and how much she has inspired me. Next to God, she is my foundation. 


My daughter is home this weekend to spend Mothers Day with me. We did some shopping, and crafting and took lots of selfies. I feel so blessed.
This afternoon, the whole family will meet for dinner with our mom. It's a mommy kind of day!!!!

I LOVE MY MOM!


Wild Things- Crown

A mother that attends my church asked me the other day if I could crochet a gold crown for her daughter's first birthday.

The theme of the party: "Where The Wild Things Are". 
A 1963 Childrens Picture book.


Where the "Wild Things Are" is a story of a young boy named Max who runs away from home (in his dreams) to an island full of wild beasts. The beast eventually crown him king as they see him being the wildest of them all. (something like that). I just read this somewhere, I never saw the movie nor read the book.

The book was actually banned for libraries in 1964 for being too dark and having supernatural Themes. 

Well, Now, somehow this story has resurfaced to be a big hit with children between the ages of 1 & 3. My niece recently had a birthday party using the same theme.

So, When this lady asked me to make her daughter a "Wild Things" inspired crown, I didn't hesitate to say yes. I have crocheted crowns before so I knew it would be an easy task. 

Within an hour, I made the "Wild One" a crown. 
I had to guess at the size by placing my hand on the childs head. My guess was right. It fit her just perfect and she looked like she enjoyed trying it on. I would show you pictures of  how cute she was but I do not have her permission and I'm sure the Mom wants to be the one to post them. 

But I can show you my creation. 


What do you think? I love how it turned out. I even cut out a felt "number one" to add to it if she wanted too. 


Destroyed Jeans

I’m on a jean frenzy again or should I say “jean fingy”
Summer is coming so I really do not need a pair of jeans but yet I want a pair. Everywhere I go, all I see are the distressed, torn and ripped jeans. It's the style.
I get it. But I can not bring myself to buying a pair of jeans that look like someone wore them for ten years and decided to return them to the racks. 

Seriously, I really do like the style and are perfect for warm weather, but why are they so darn expensive? Here is a pair I found online since I didn't have my camera out in the store.

They typically range in price from $39.99 to $99.99 depending on which store you shop or how bad they are torn up. I think the more holey they are, the more they cost. 

So, I said the heck with that and dug an old pair of Old Navy jeans out of the closet and destroyed a pair myself.
For free! 


I just made a $20.00 pair of jeans look like an $80.00 pair of jeans by using grandma's old grater and a pair scissors.  

I like them better now and it’s all I needed to satisfy my fashion nerve until....well....until next week. 
I need new summer shoes! 


Ive linked up to these fun parties:

DIY Rain Chain

I don’t know about you but I am ready for Spring to show up! We have warm days, then we have days that feel like the middle of January. Mother nature can’t seem to make up her mind. But, then again, it’s not unusual that we completely skip Spring and jump right into Summer. It’s crazy.

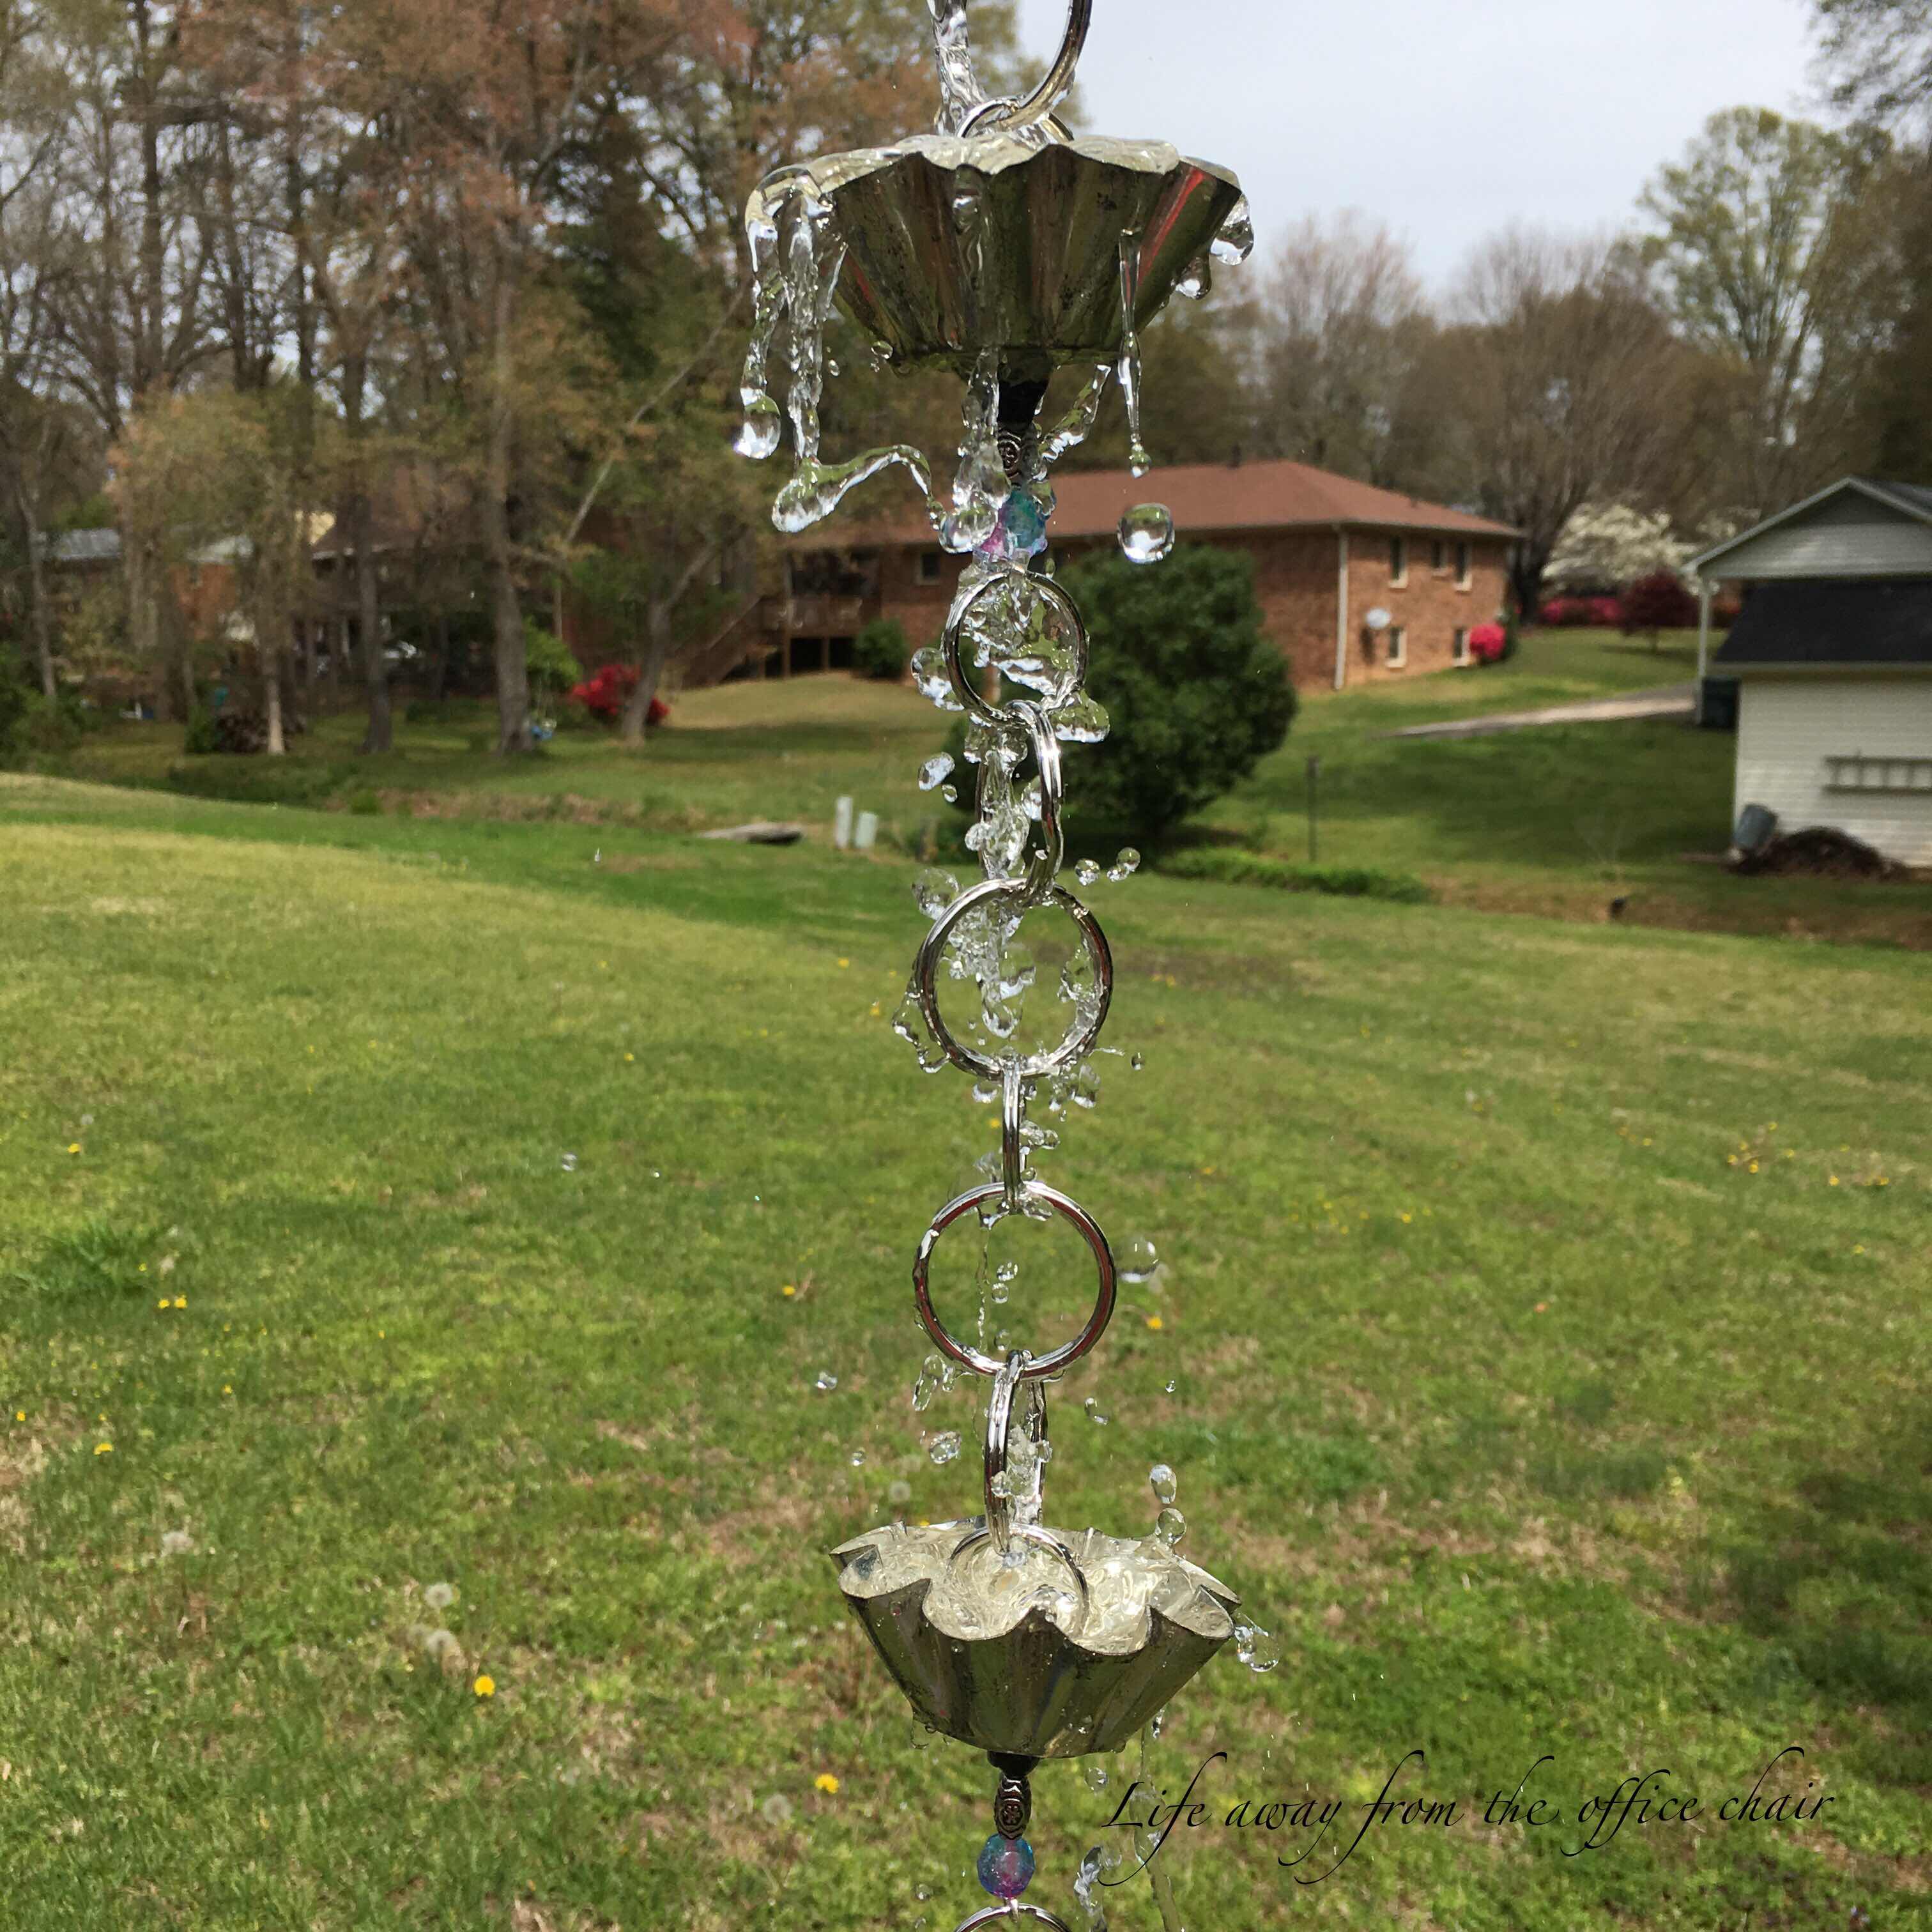
Do you like the rain? I love those short rain showers in the Summer time that bring thunderstorms along with it. You know, the short lasting ones that once they water the gardens, the sun comes back out.

Speaking of rain. I have been wanting  a “rain chain”. 
What is a rain chain you ask? 
Rain chains are a creative, beautiful and functional alternative to gutter downspouts. It guides the rain water visibly down chains from the roof to the ground. It can change the look of a plain down spout into a whimsical piece of art. 


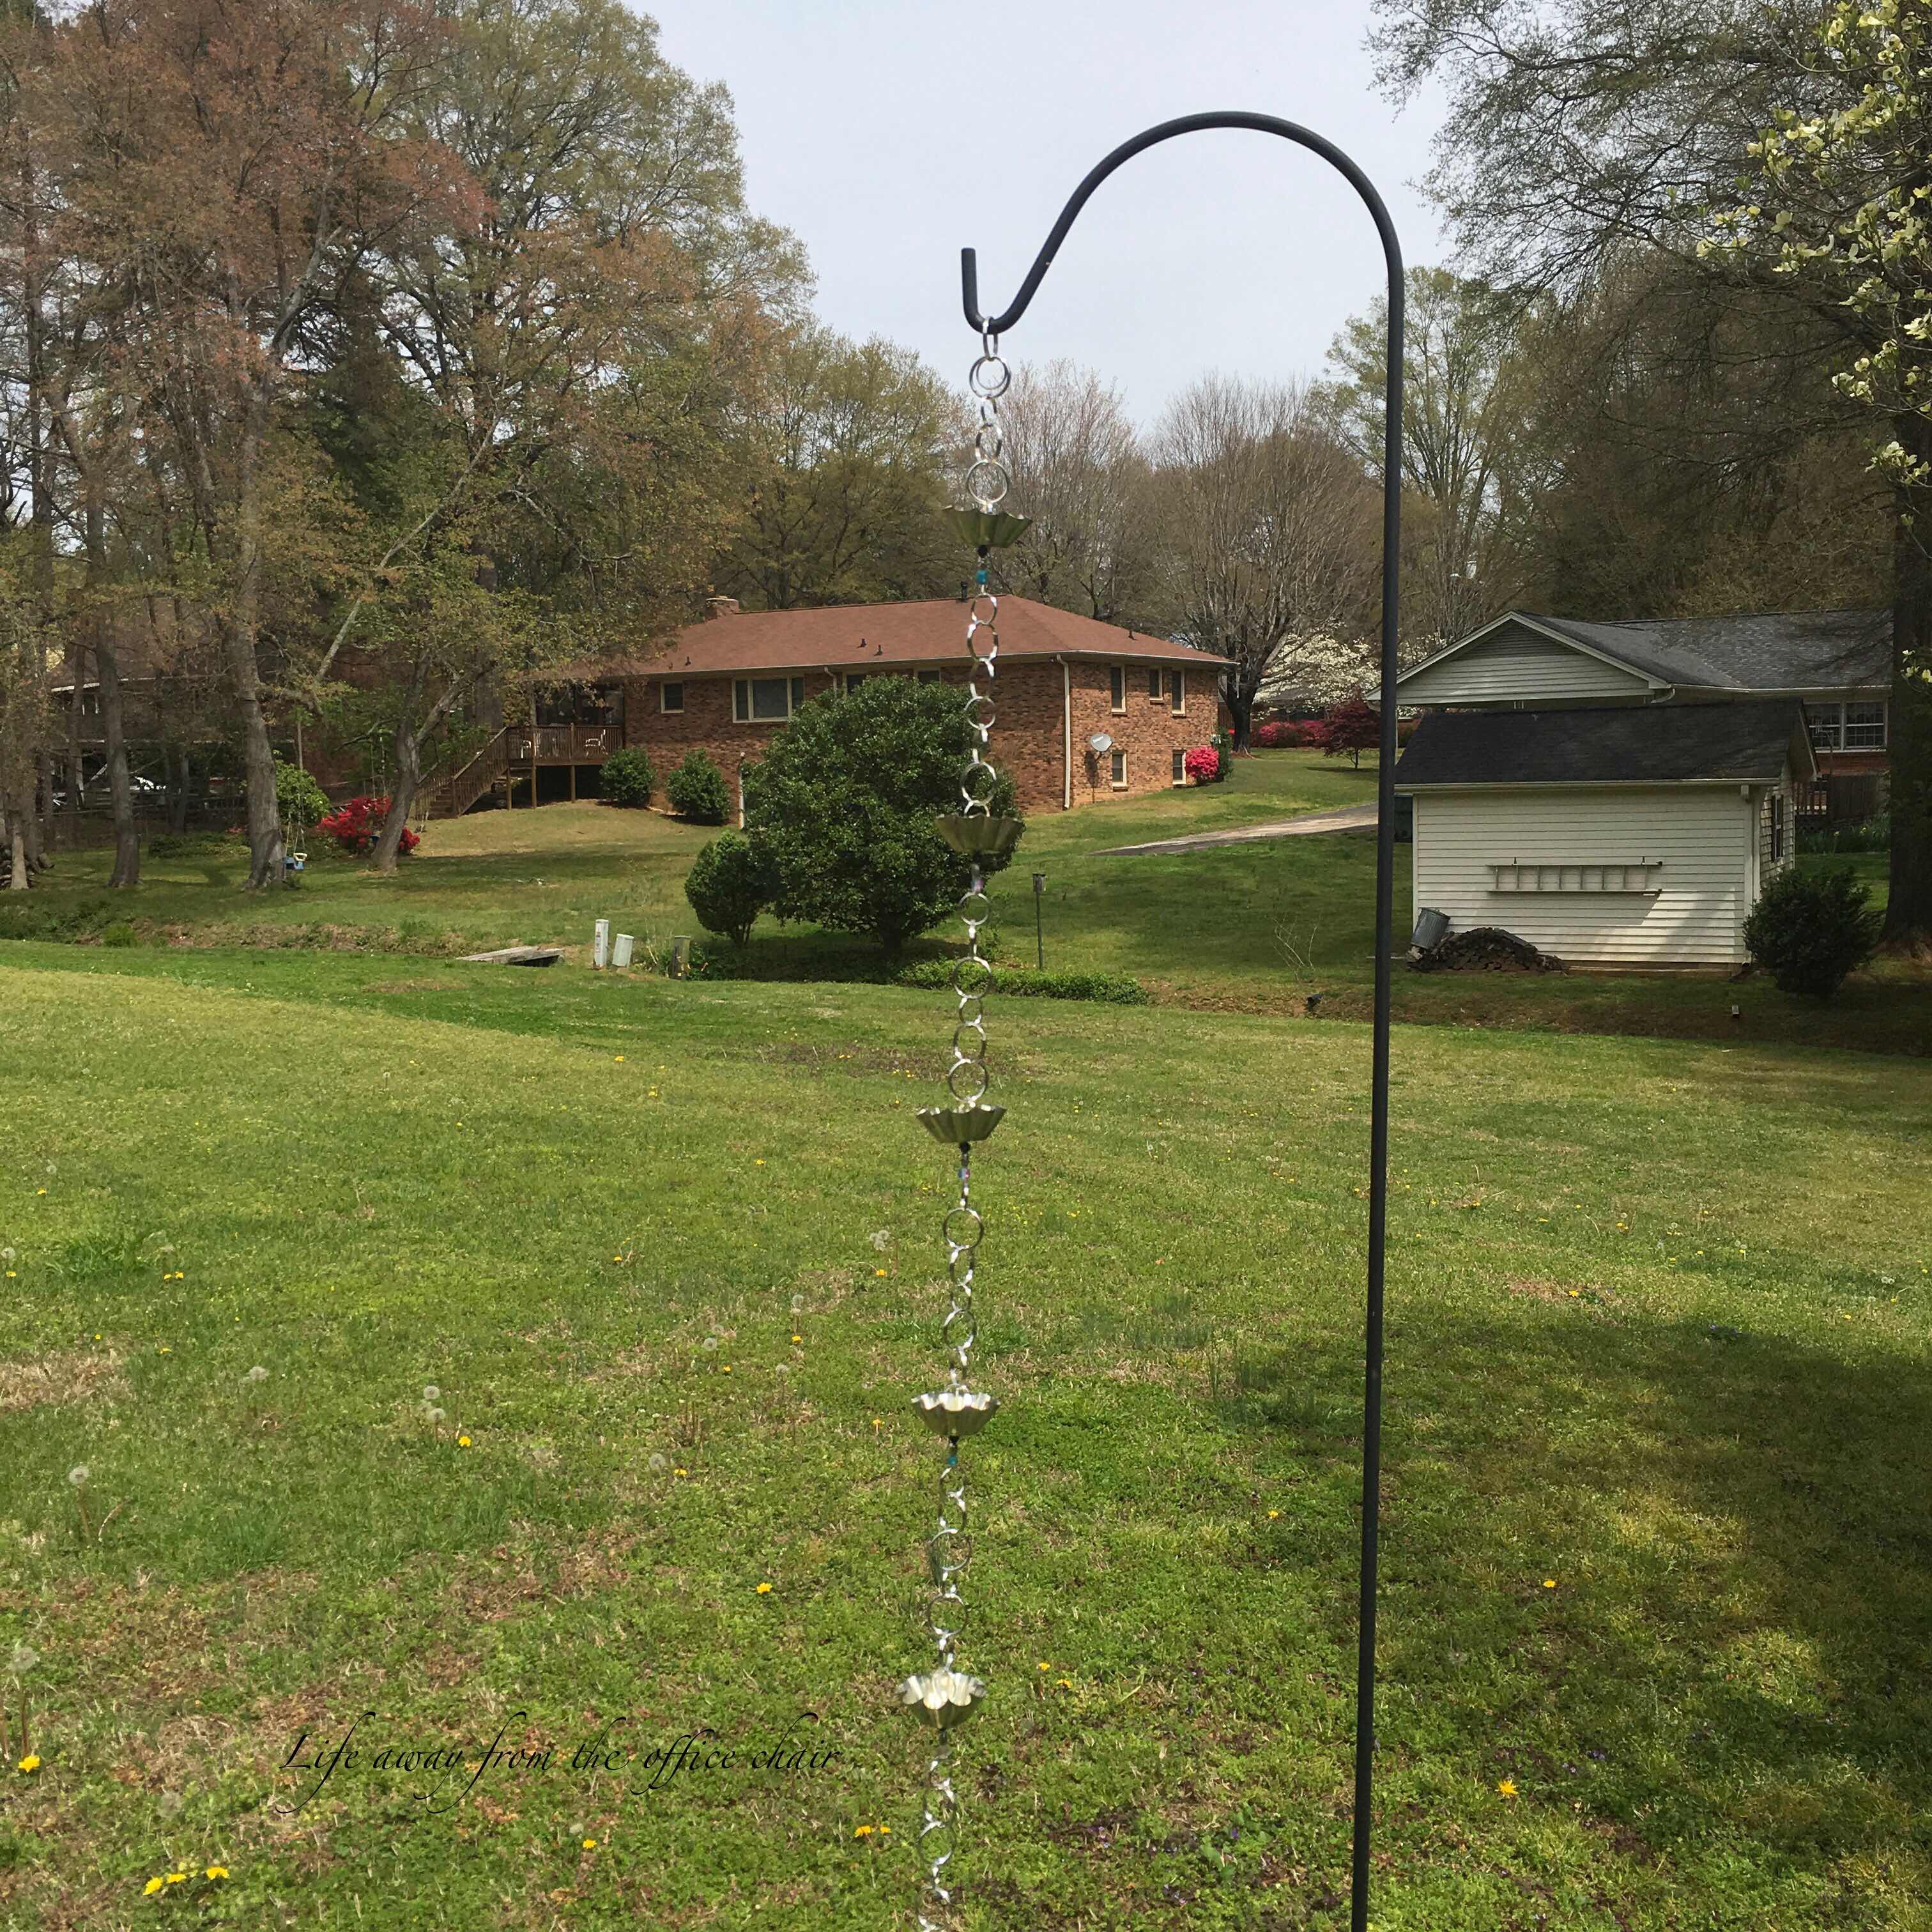
Since I do not plan to actually use a rain chain for a down spout, I chose to add one on a shepherds hook near my patio for fun. 
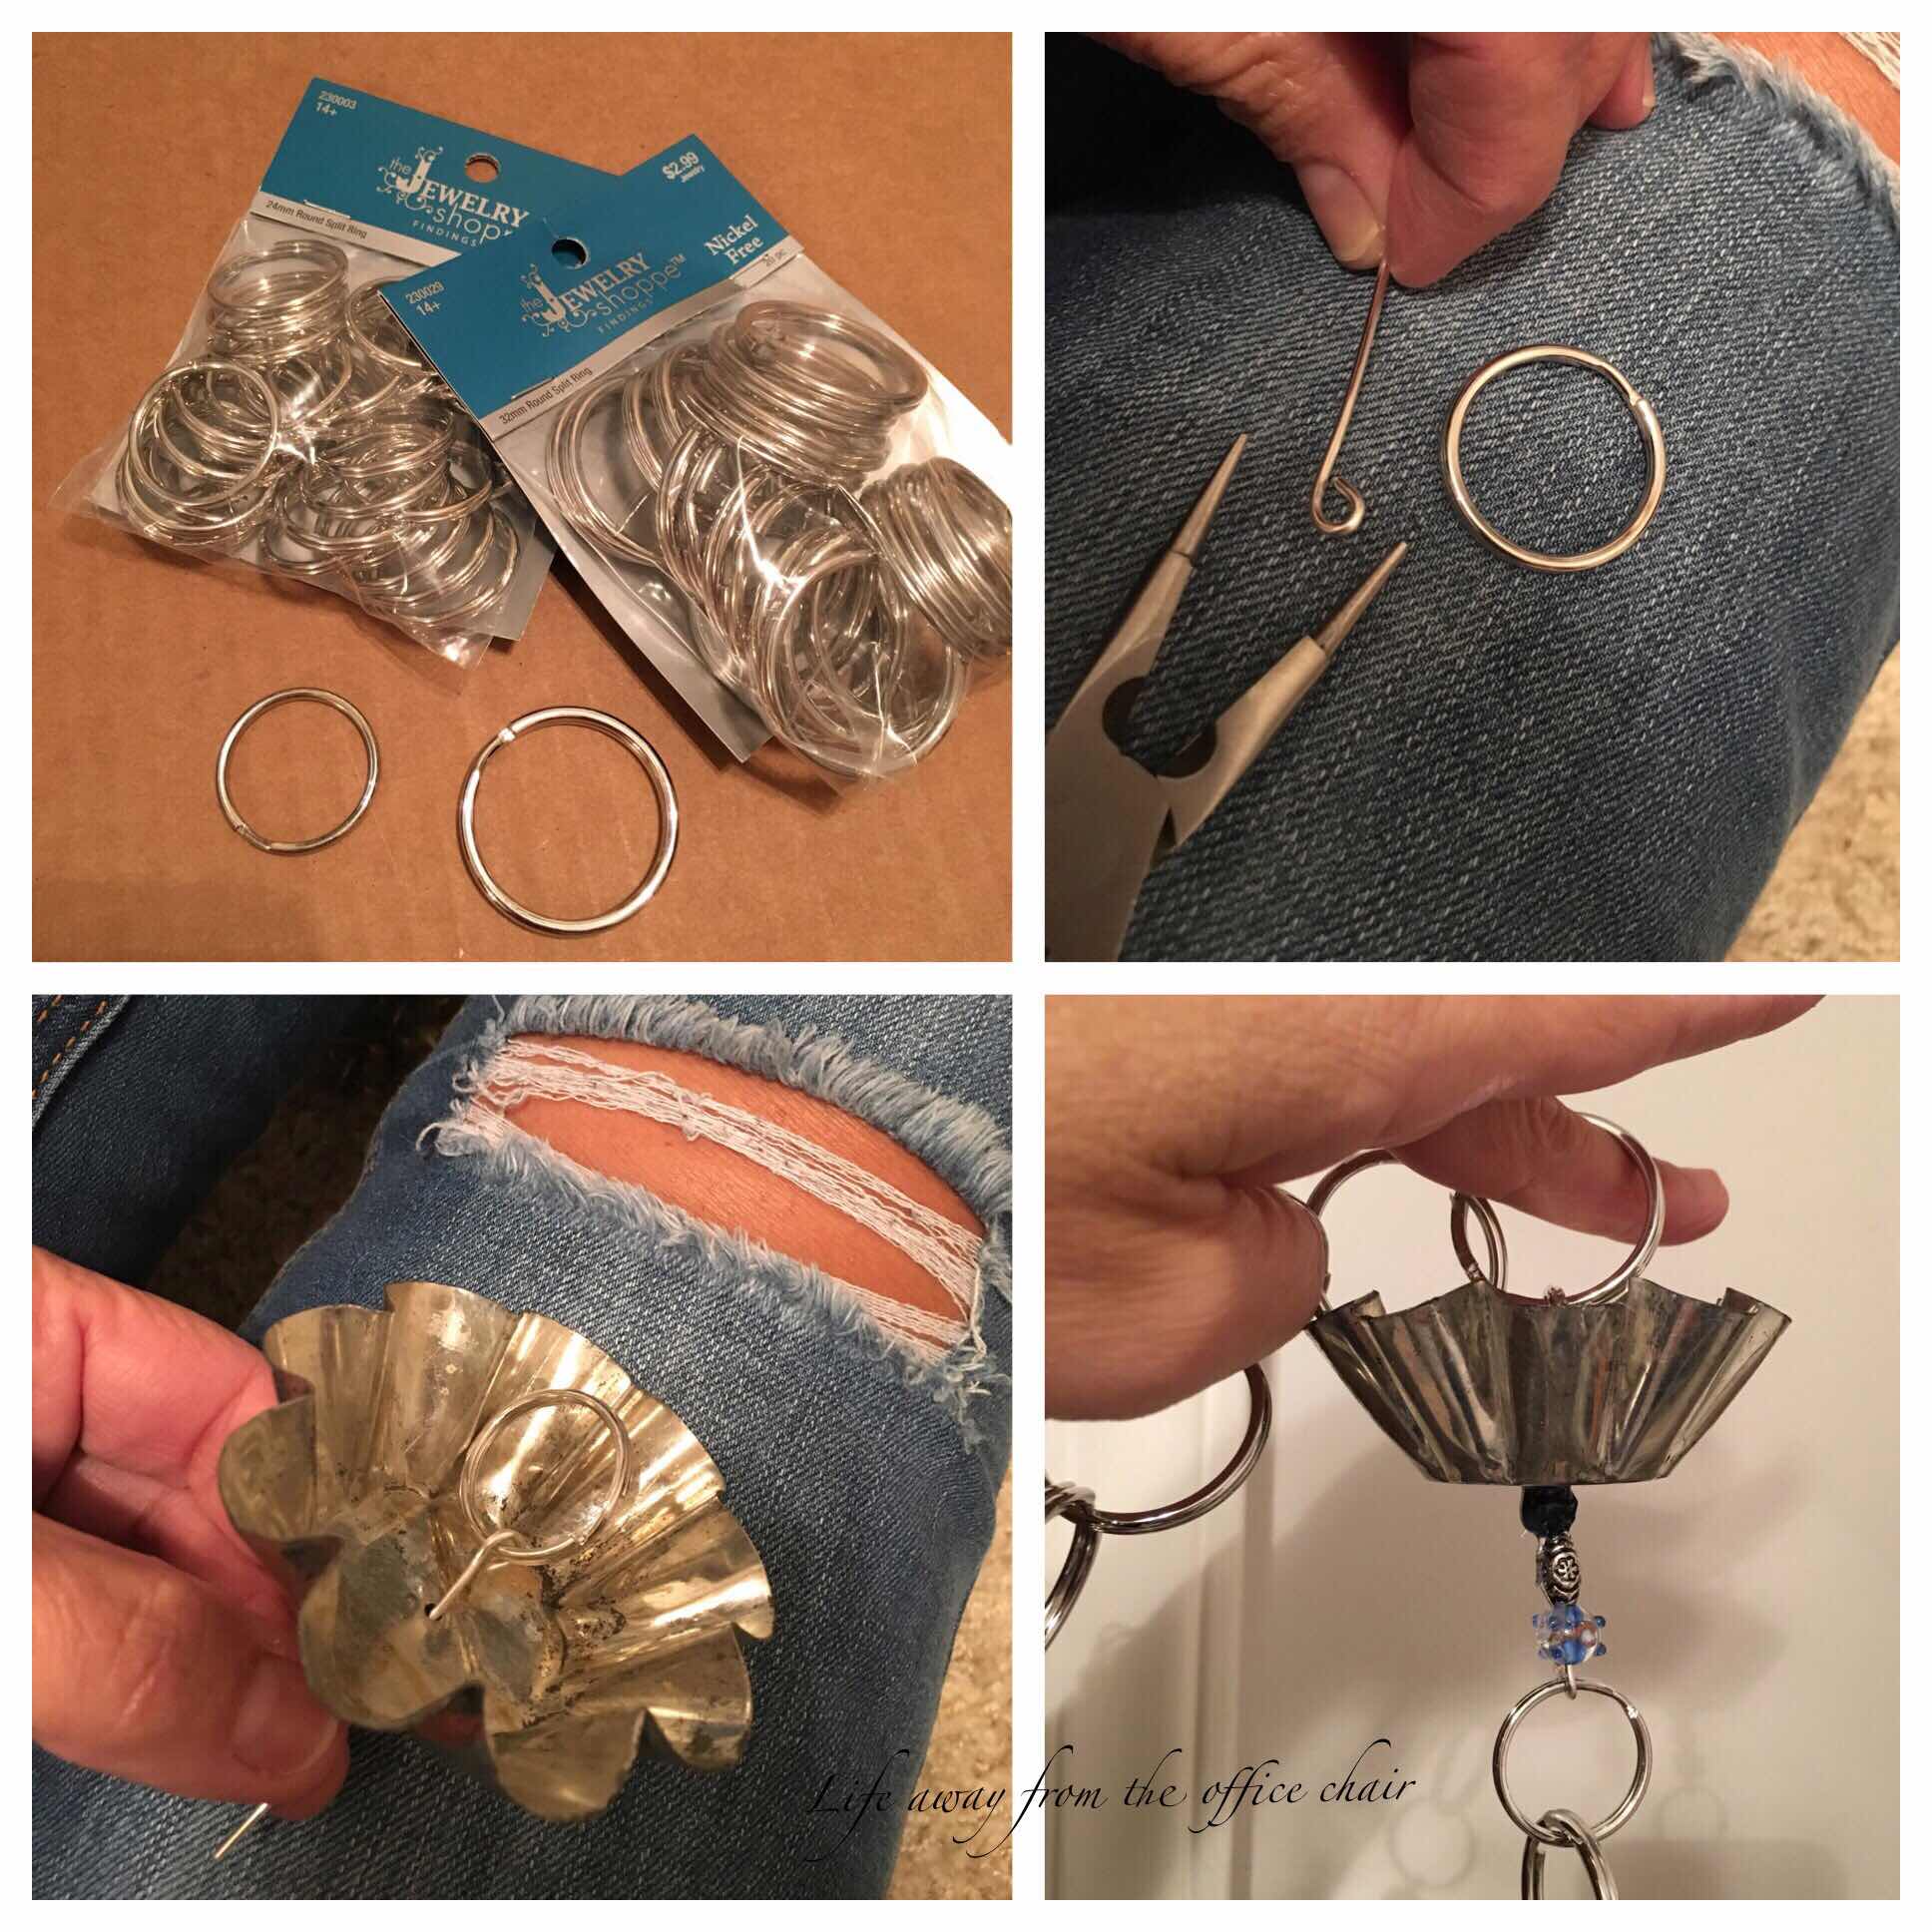
I knew I did not want to actually buy one as they are expensive and looked too easy to make myself. The options to making these were unending. You can just use a chain alone and it will be pretty or you can add extra charm to make it one of a kind.


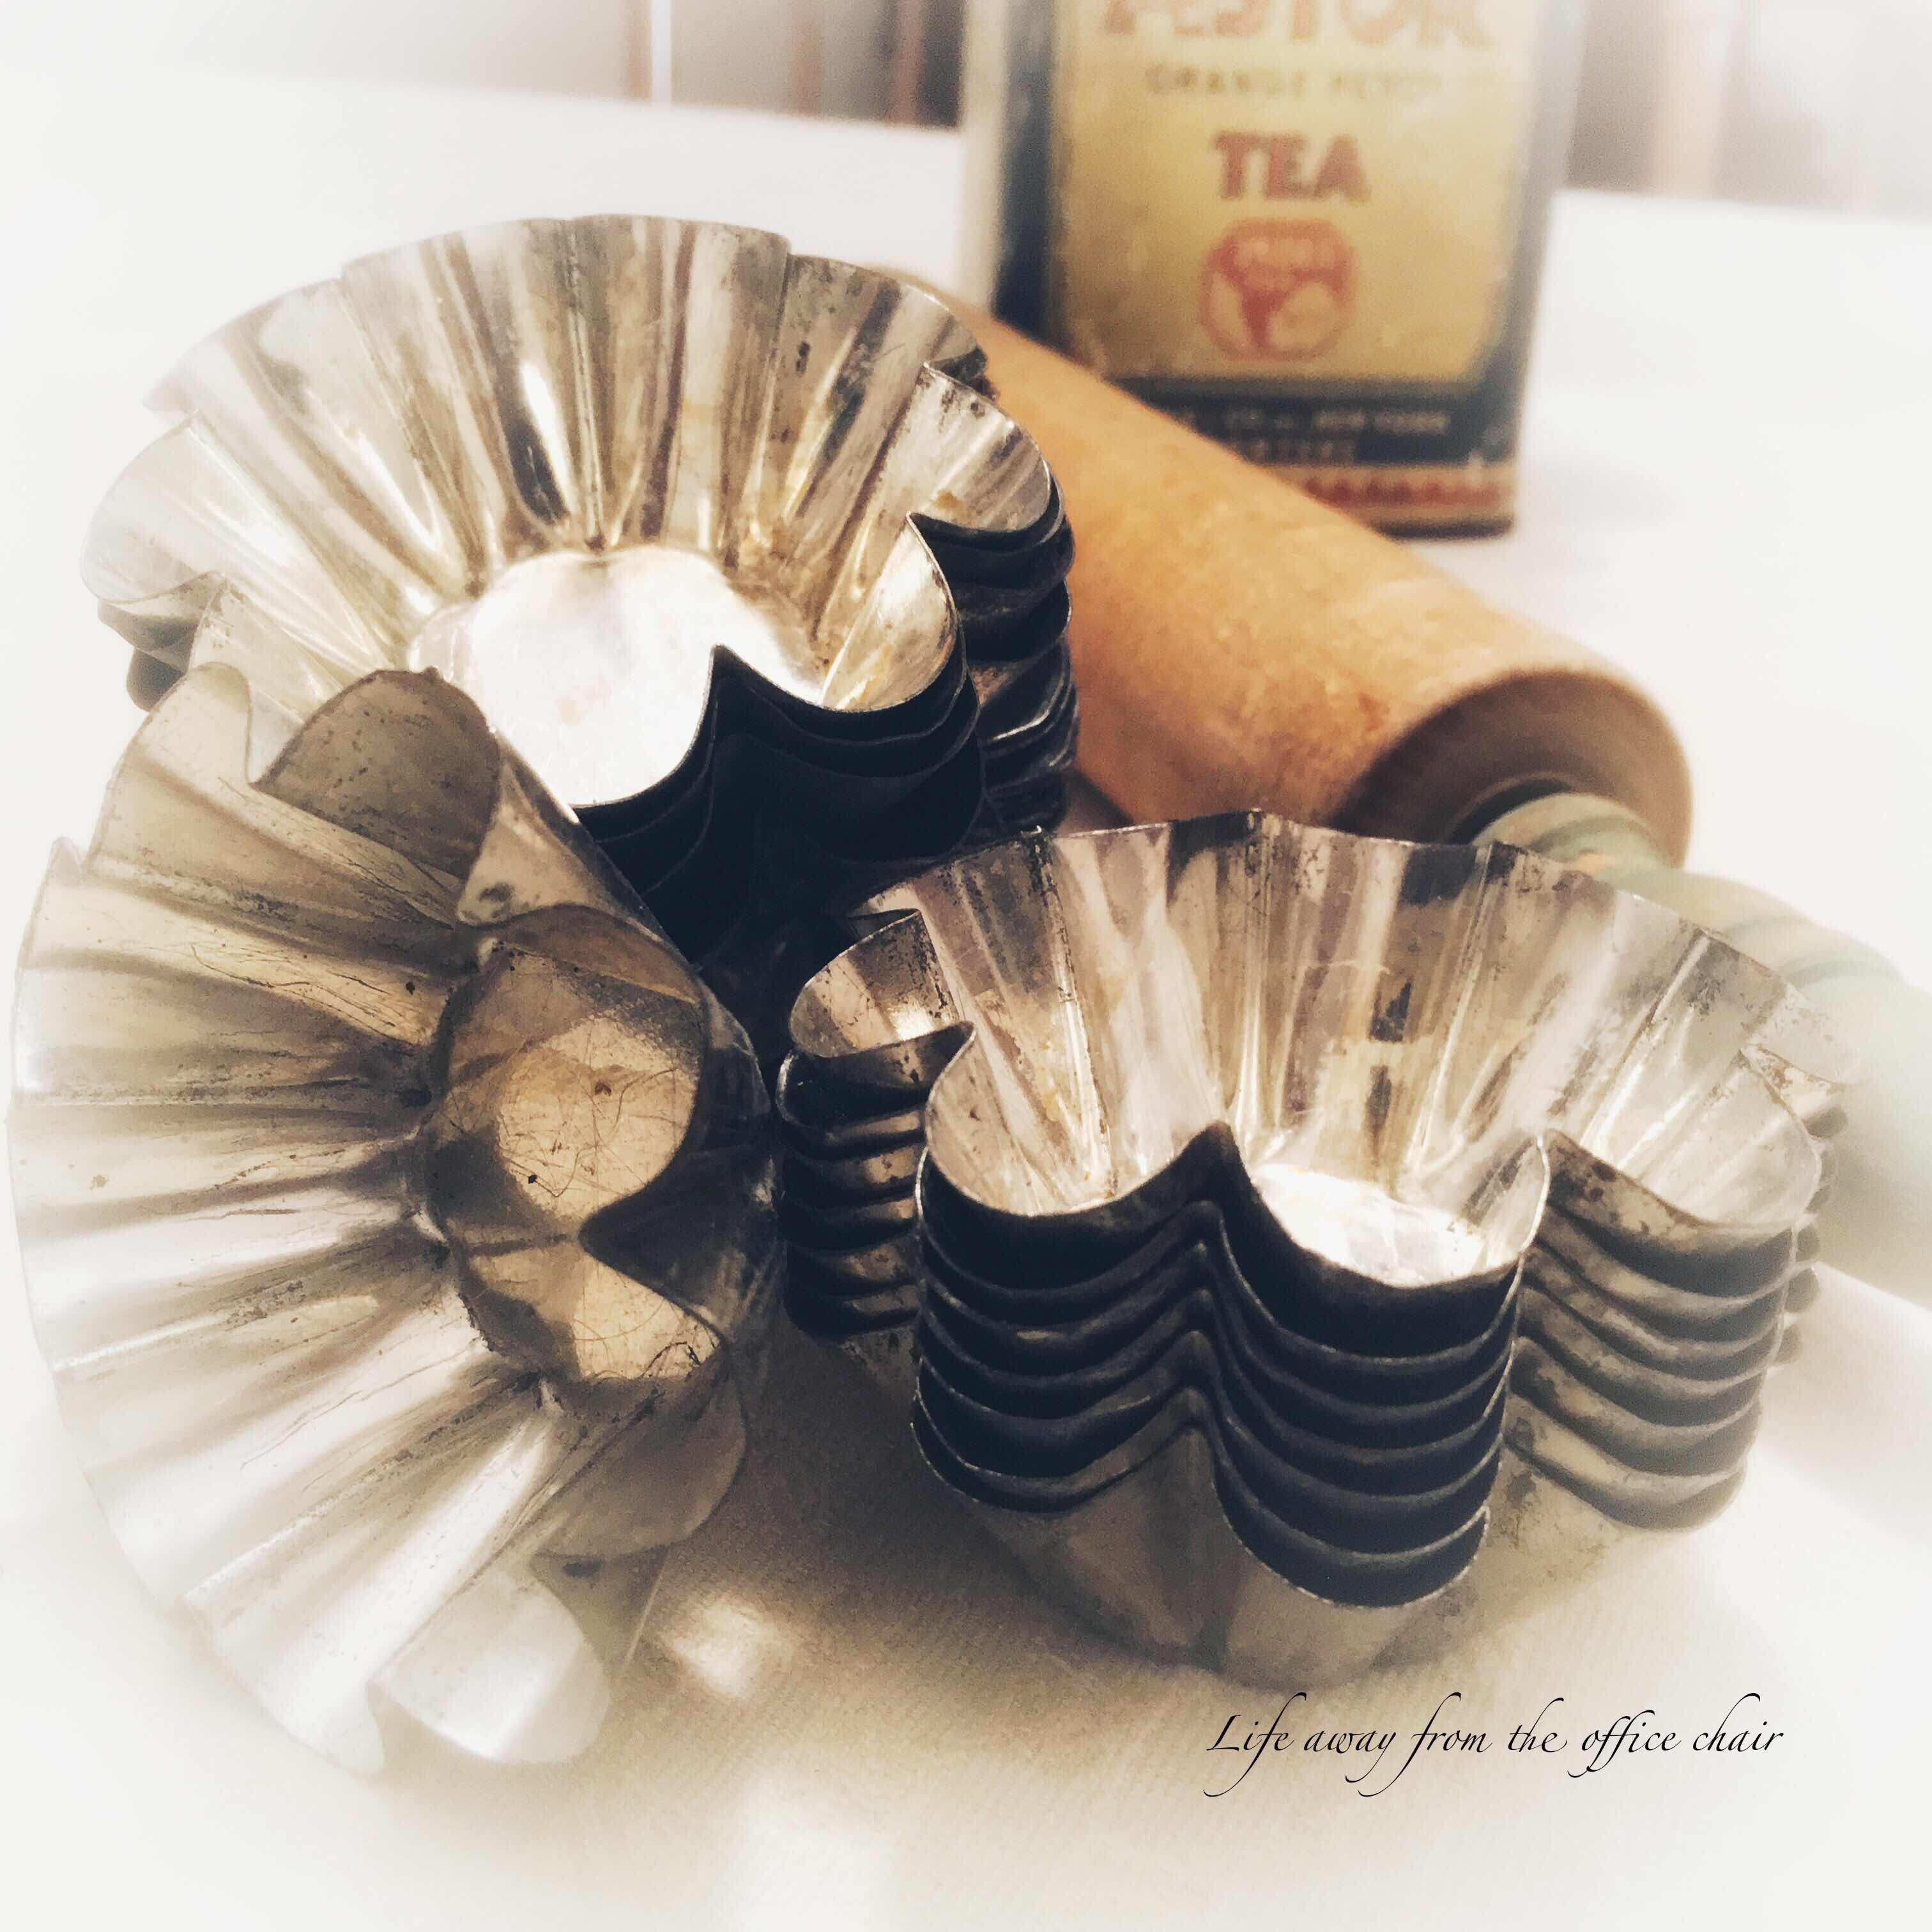
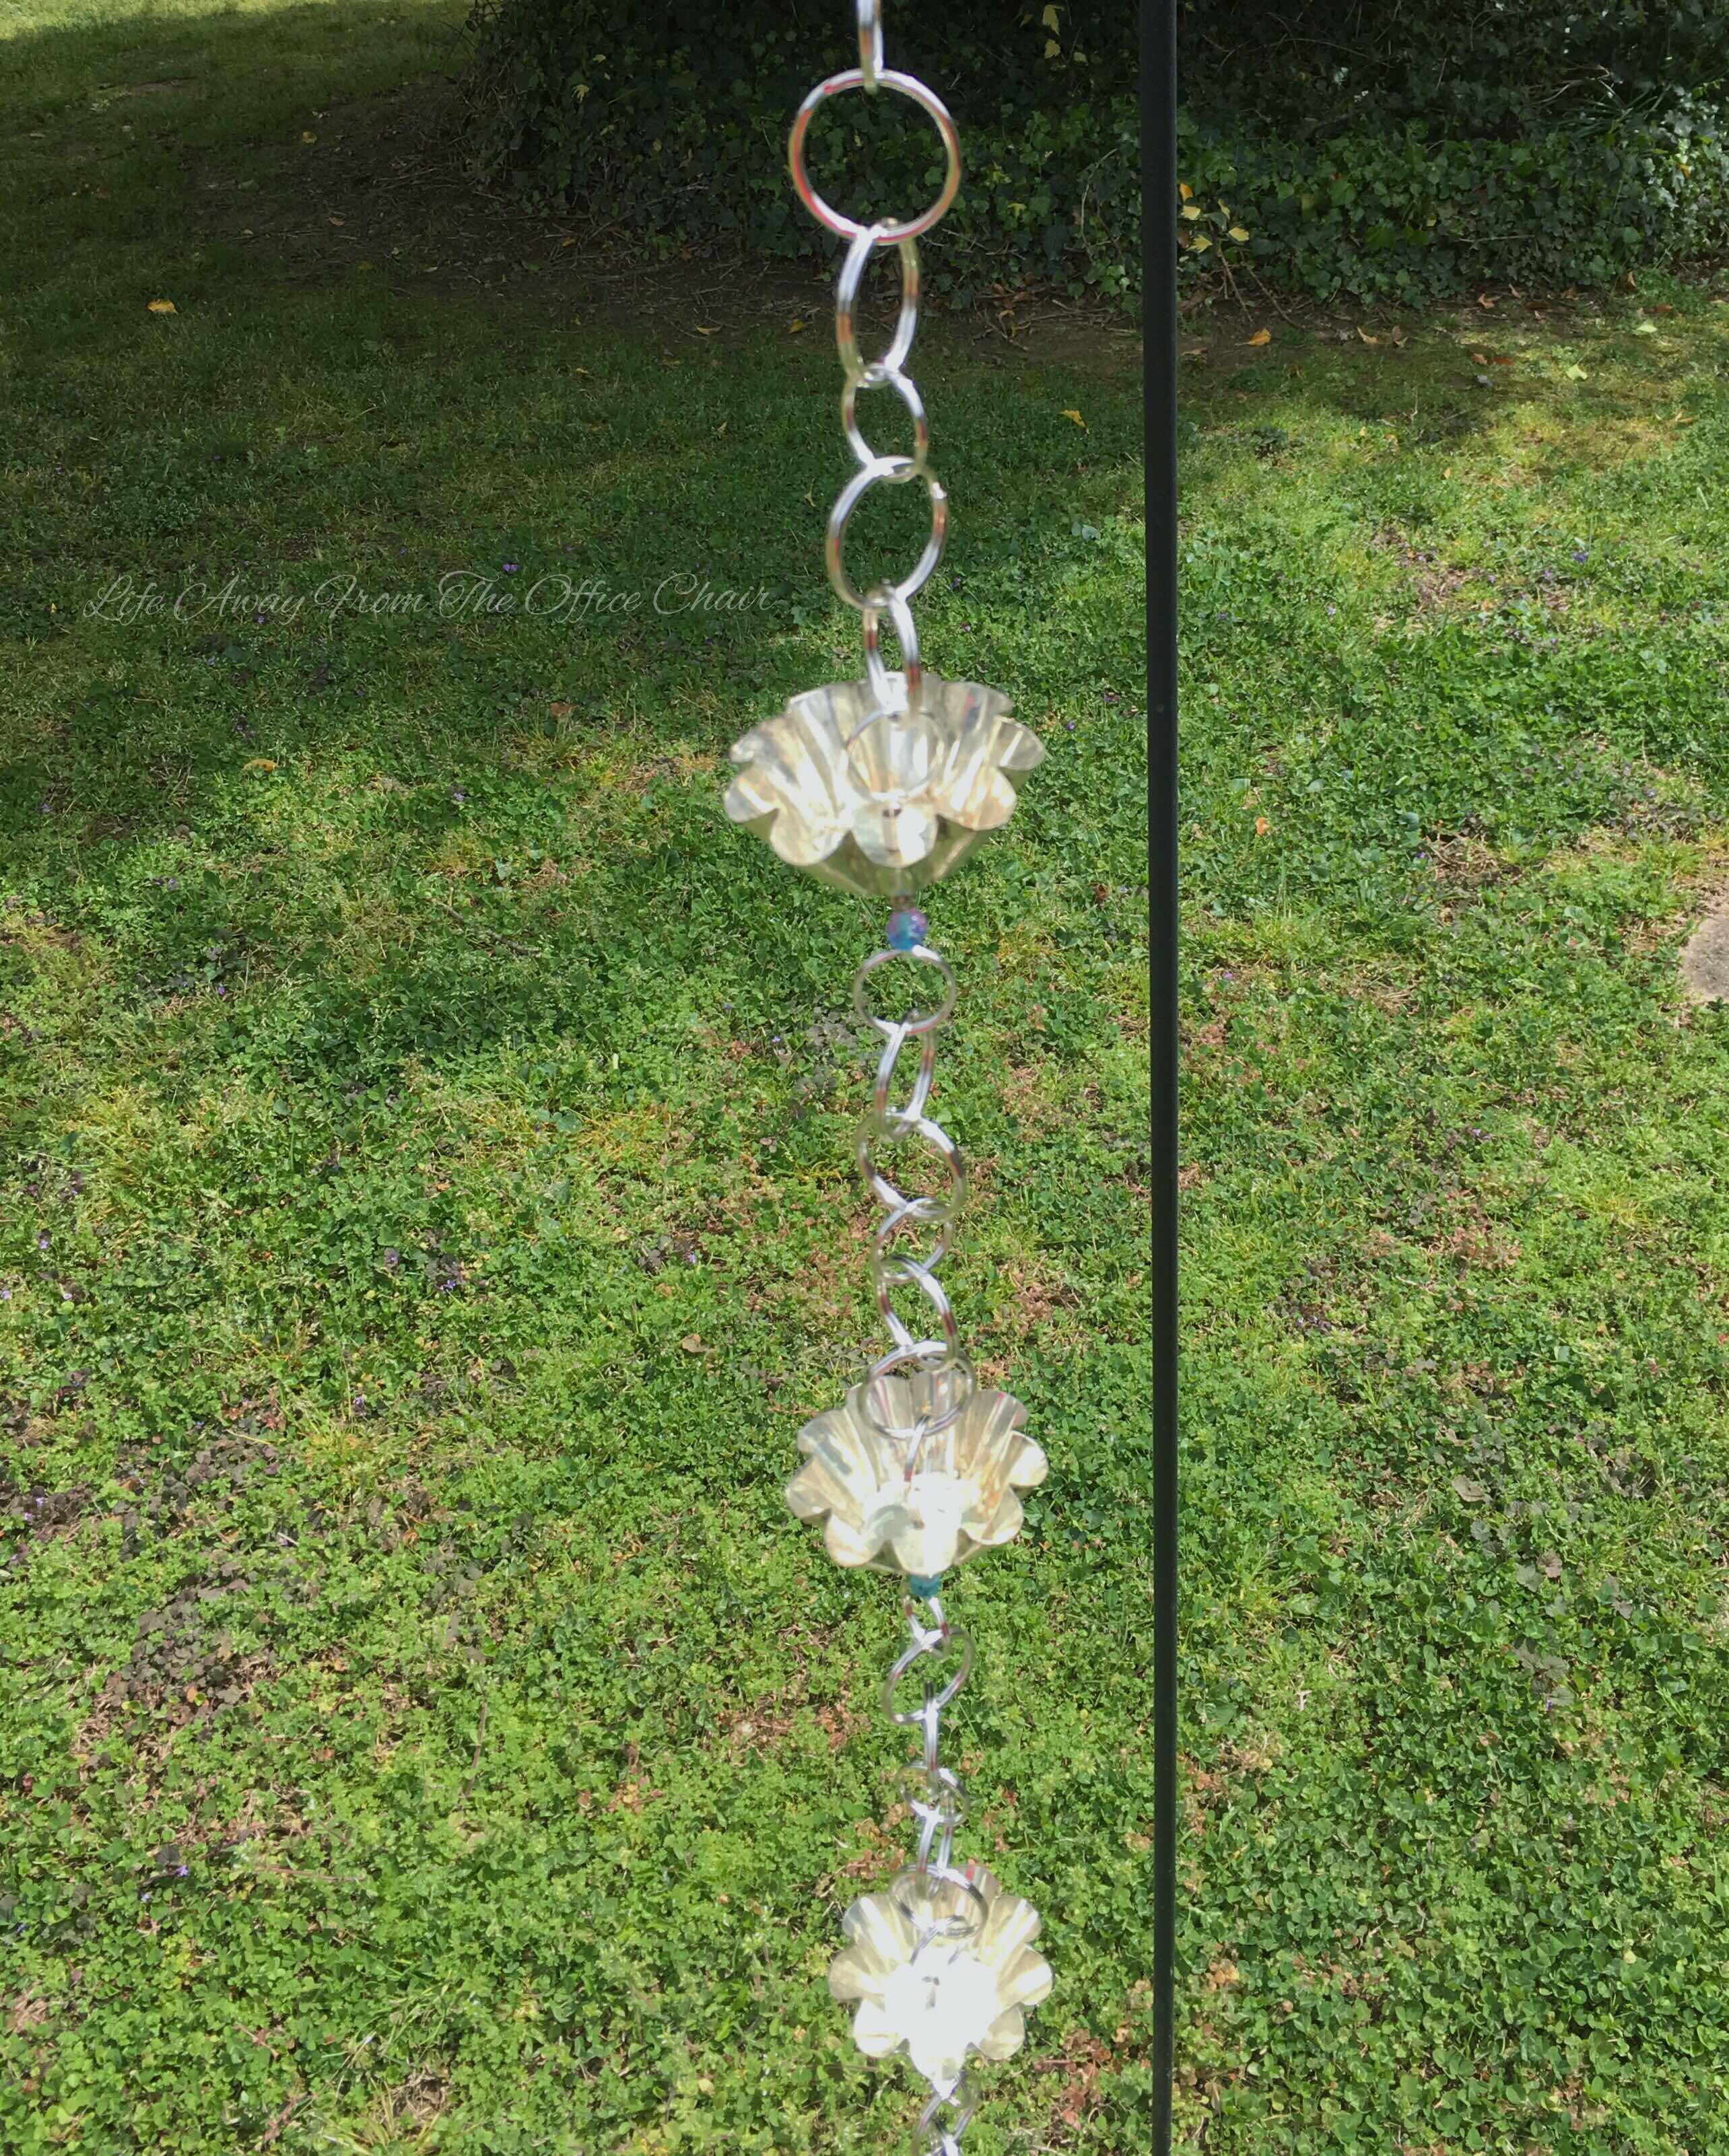
I wanted to make mine using vintage tarte tins.

First, I priced out some chain. It was outragious for a 6ft piece. So what did I do? I went to the craft store and purchased some split rings (key chains). You have to do the math on how many it will take depending on how long you want it. I needed about 6ft. I used 34-1 1/2 inch rings and spaced them with 24-1 inch rings. 

Then the search was on for some old tarte tins. I caved and bought some from a seller at Tin Roof Porch on Etsy. The lot of tins were more than I actually needed but his prices were great. You should definitely go check out the other vintage items he has for sale. I only needed a few to use on my rain chain. I plan to clean up the other ones and keep them. I’m a sucker for old kitchen and bakeware.


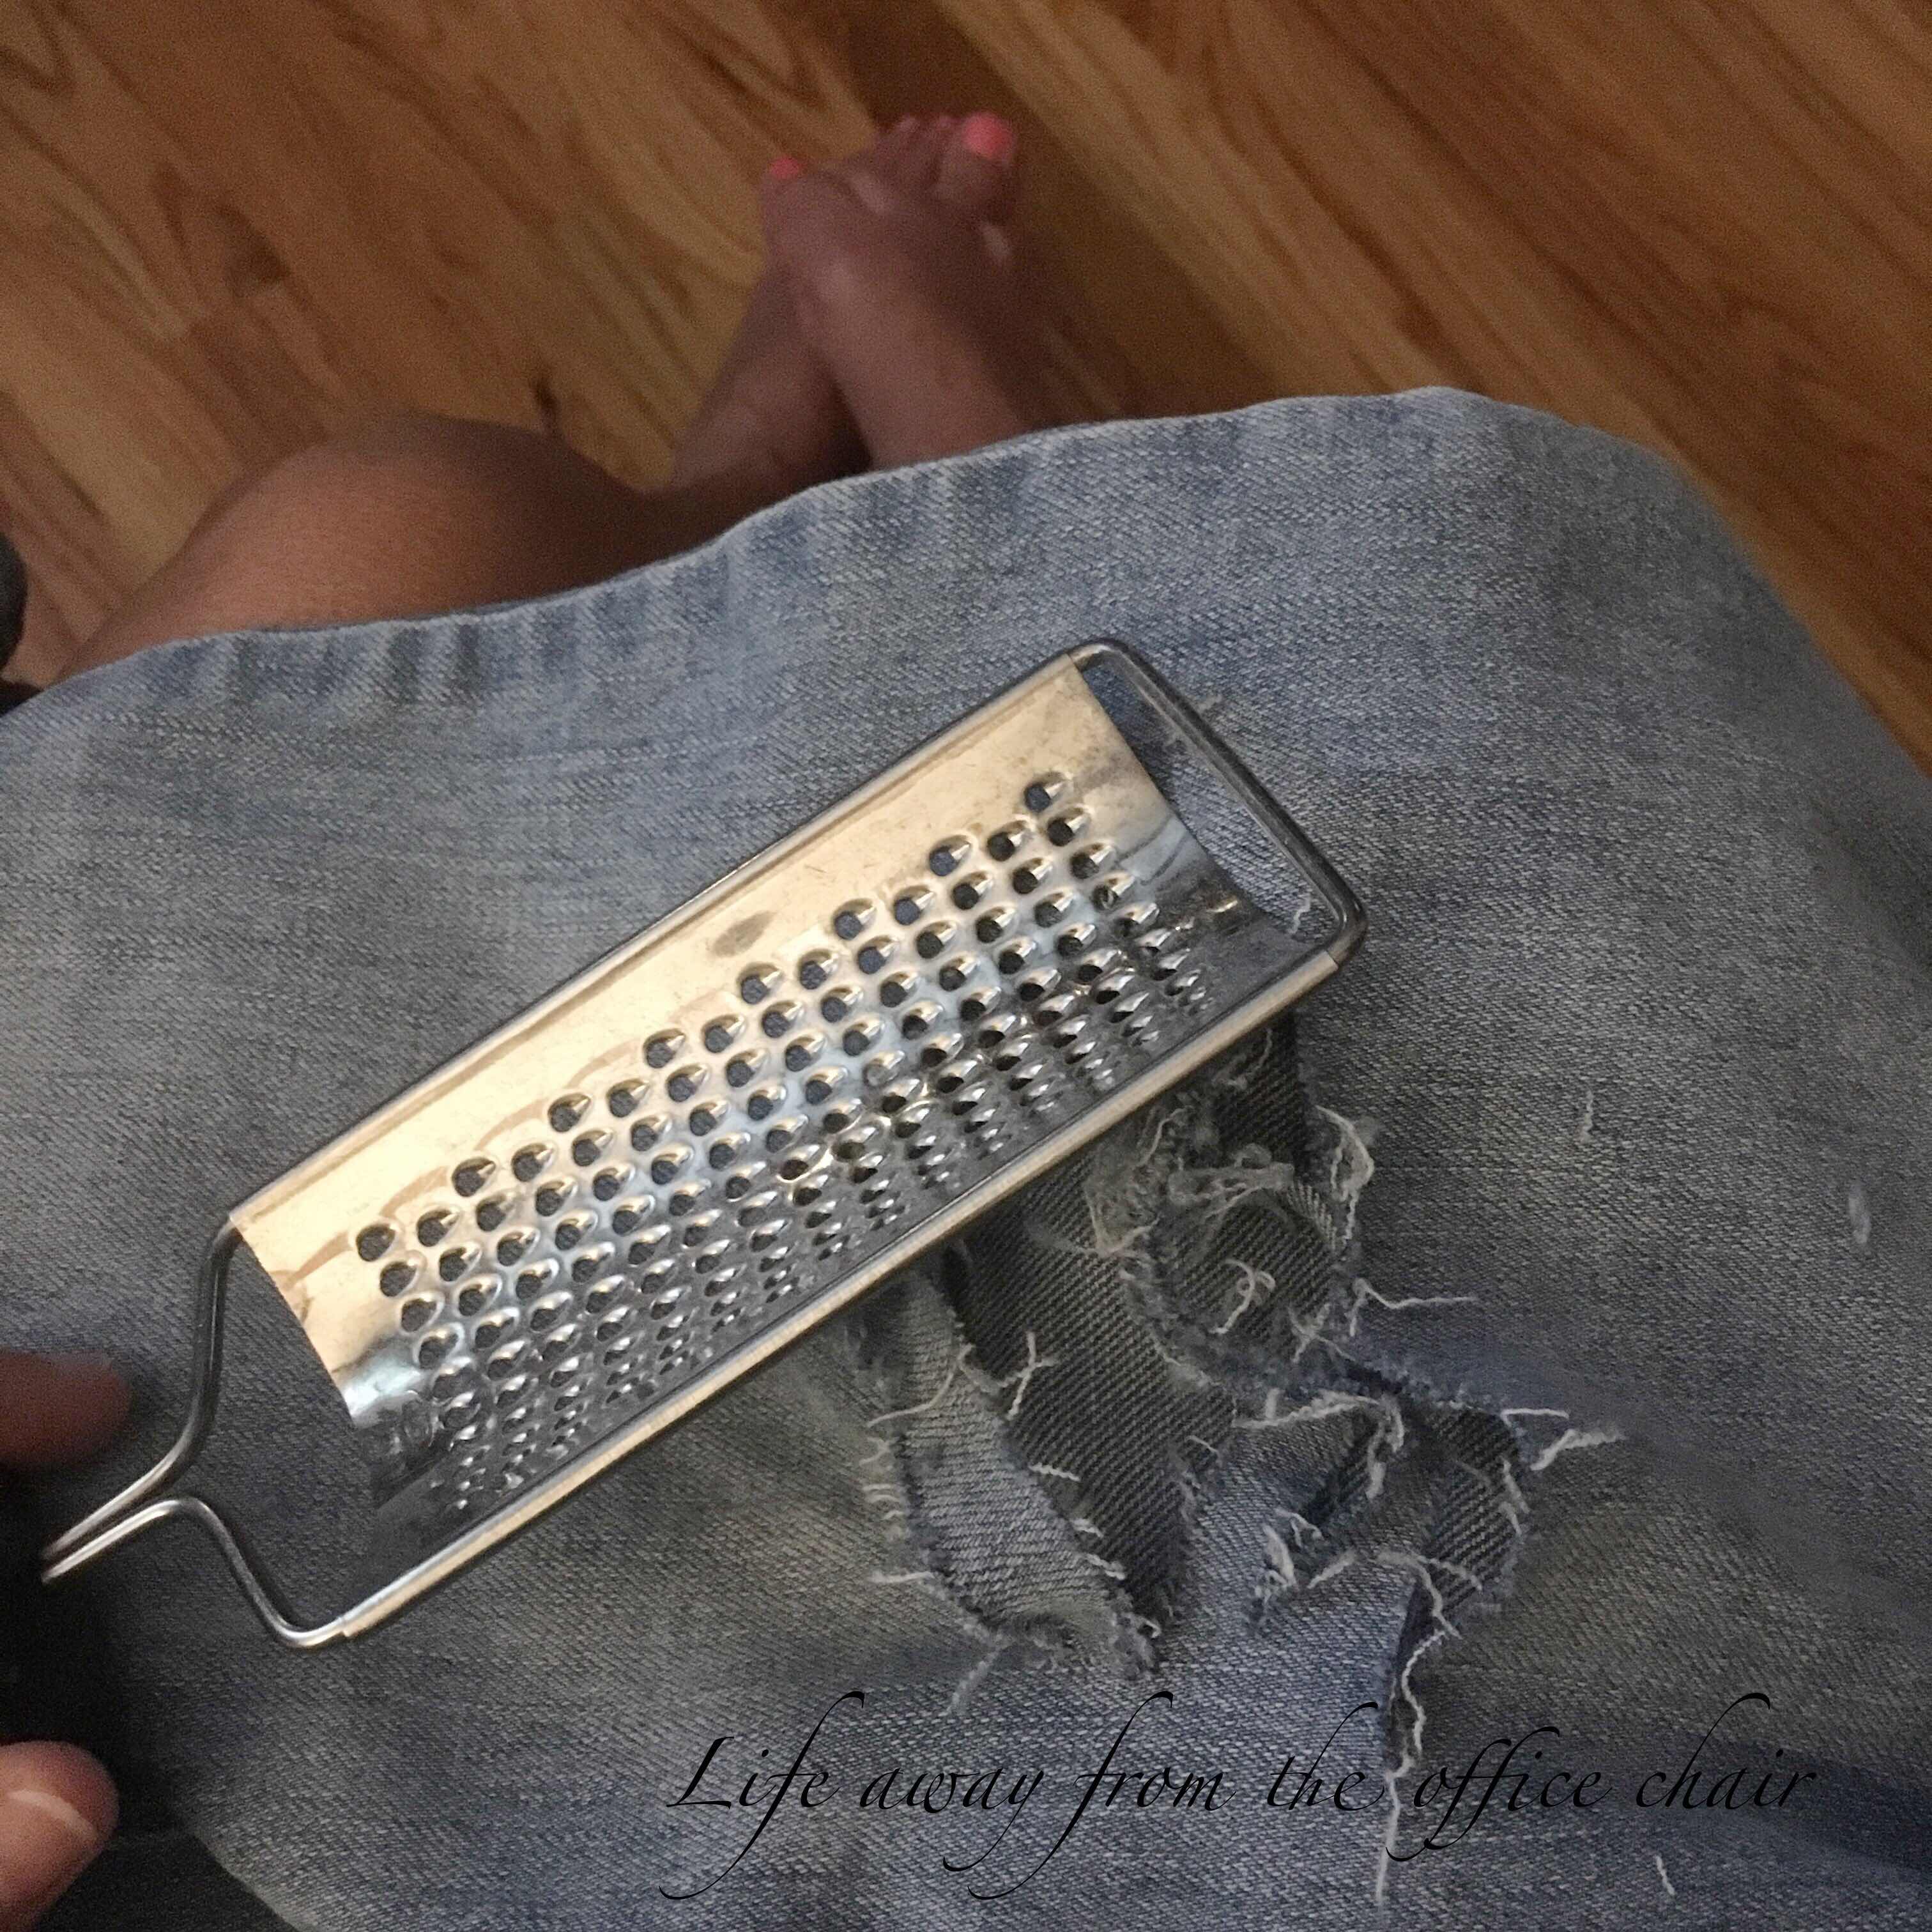
I cringed as my husband drilled tiny holes in the bottoms of these tiny tins for the chain. They were just so darn cute! I can’t believe I actually ruined them to hange outside. 

I had no idea how I was going to get the tins on the chain. I ran to my art closet and pulled out some beads and wire. I played around until I found a solution. The cups were a bit wobbly on the wire, so I dabbed some hot glue on the top beads to hold them straight. I really did not want to do that.


Now my rain chain is ready. I love how it turned out. This will make watching rain even more fun.
I can see the chain from my kitchen window. 


Once I decided on a spot to put it, I anchored it down into a small rock pile. It’s also in a spot where my husband will not have to worry about cutting around it, so that made him happy. I’m sure I will be adding some additional looks around the bottom of the chain. Maybe a pot of flowers or a fairy garden. 

Note: It cost me less than 20.00 to make this one. How cool is that?


I've linked to these fabulous parties:
dishing digging it link party at Lifeandlinda.com
totally terrific tuesdaylink-party at Liveradomlysimple.com
great ideas at flusterbuster.com

Tiny Crochet

I took a break from crocheting a gingham check blanket to try something different.
Remember the lot of vintage crochet thread my mom gave me a while back? Well, I wanted to see what it would look like if I actually crocheted a dish towel out of it. 

I pulled out me tiny crochet needle and the large spool of thread to see what I could do. 
I chose to crochet using the moss stitch as its makes a tighter weave look. 


Oh my gosh! It took like for..ev...er! After a couple rows I wondered what in the world had I started. I refused to give up and kept on crocheting. A few nights and several TV programs later, I created a small dish towel. I’m pretty sure that after its washed, it will be the size of a washcloth as it’s made with 100% cotton thread. Well, see.  


My husband felt of it and like the texture. It’s soft and thin. It was almost like gauze. If it comes out as a washcloth, we can still get some use out of it. 


Now I will get back to working on the gingham check blanket. I have really been taking my time with it as its boring me. The warm weather is among us now too, so it makes crocheting a blanket less appealing. 

I also have another project in the works that I can’t wait to show you. 
So stay tuned. 

Bath Vapor Balls

I’m one of those moms that can come up with a solution in a tight situation. My daughter calls me “resourceful”. Find me some twigs, and I’ll make a rope. I will make a heating pad out of a sock and rice. You get the idea. I can just figure ways to make things work with whatever I have at hand. So, when I found a recipe for vapor bath balls, I could not figure out why, in my whole mommy life, have I never thought of this! During cold season, I’ve used menthol on Kleenexes, and made cotton ball sniffers, but this? I should have thought of this years ago.


I have been lucky to escape the cold and flu in over a year but I know a lot of you have been down with the crud. Or maybe you just need a fresh eye opening shower. Like when you bite into a York peppermint patty, you get that sinsat.......Never mind. 

I’m going to share with you this easy 3 ingredient recipe to make medical history..... Not really, but you will love these if you ever get a stopped up nose or develop a head or chest cold. They are safe for kids, however, I would limit the exposure just in case. They also will not harm your tub, shower or drains. So before you head out to the drug store, grab a bowl, Vick's VapoRub and some cornstarch. I’m gonna share with you this easy and fun way to make a feel good aroma.

 Bath Vapor Balls


1 cup - corn starch
3 tablespoons- Vick's VapoRub (or other mentol gel)
3 tablespoons water
2 drops Food Coloring (optional)


  • In a glass bowl and a fork, toss and mix VapoRub and cornstarch until it starts looking pebbleish. (Is that a word?)


  • Drop in tablespoons of water one at a time while mixing. (You can add food coloring at this time but its optional.)
  • If you pinch the mixture, you will now see how it sticks. (It will still just look "pebbleish").
  • Now use your hands and form balls as big or little as you like. (I was able to make four palm size or 3 inch balls.)
USE:  Place a ball in the floor of your shower or tub. As the ball melts, it will release a menthol vapor to help open up those sinuses.
I have a bowl of these sitting in my room and my room smells like menthol. They are that strong!
STORE: You can place them in a plastic bag or container for keeps.

ENJOY!!!

NOTE: I am not a doctor and this is simply a home remidy to feeling better during a cold. Please consult a doctor if you are not feeling well.


I was inspired by the Original recipe found HERE.


Ive shared this at:
the dedicated house- anything-blue-friday
uptodateinteriors-the-creative-circle


HandMade Greeting Cards

I’m trying my hands at something new. I have recently been creating greeting cards using my crochet art as the main focus. I know cards are becoming a thing of the past, but it is always nice to get a little happy card in the mailbox.

I currently have a few listed in my shop. I want to see how it goes before I create too many. It was not as easy as I had expected. I thought I could simply stamp a few words on a card and run with it. Instead, I struggled with every letter to get them straight. I might have even said a bad word.


I learned that stamping was not meant for lefties. You have to work left to right as you line up each letter with the one before. Well, unless I go backwards, I have to stamp right handed. The struggle is real. It was fun for me though. I think with practice, Ill get better.
I admire anyone that can stamp in a straight line. Just how do you do it? 

Anyway, I left my cards as they turned out. They each have their own character. No two are alike. Some of them took several tries just to get them half way readable. The imperfections add a unique style along with the carefully crocheted tiny motifs that adorn them. I even have my little shop signature on the back of them. Just Hallmark! 


I actually sold one on the same day I posted it. This made me happy. I rely on my buyers, readers and friends to help spread the word. No pun intended.  

Below are examples of some of my greeting cards. You can find more by clicking HERE.
Be sure to look at my other things while your there. 


Arn’t they just so darn cute? 
I plan to make a few more with different sayings. You can help me out with ideas if you wish.

Do you have a reason to send a card?  If so, please purchase one from my shop. I could use the Christmas money. I'm not begging am I?

Now, I am currently crocheting a baby hat and diaper set by request for my baby nephew due in December. 
I also have an order for ten of my mug cozies to create.  This will keep me busy for a day or two as I'll be stamping in between.

DIY Cotton Stems

Happy Fall yall!
Gosh that was hard to say. I’m a sunshine and Summer gal.
We were suppose to head to the beach this weekend but the campground has no vacancies. This has never happened to us before. I’m thinking it’s due to all the Florida folks in for higher ground. Uggh!!! We will just have to wait a couple weeks. The beach in October is still good. It may be a chill in the air but it is what it is. So,with that being said, I went ahead and put summer behind me and got busy creating a few decorations to go with the season.

Today I’m going to share my latest craft I have been itching for months to make. “Cotton stems”.
For the record, there were no farmers, slaves, immigrants, maw maws, paw paws or kids used in making this decoration. It's just the work of my own two hands and maybe Johnson and Johnson. 


My husband has pretty much stopped asking “why?” when I mention needing certain random things. I may get “the look” but he knows by now that I have a craft idea in mind and when that happens, there is no stopping me. I'm sure he appreciates this more than if I were to go on a shopping spree to Hobby Lobby. 

I pulled out a bag of cotton balls from the cabinet and a glue gun from the craft room. I asked my husband to pick me up two pine cones on his morning walk. I snapped a few dry twigs from a Crape Myrtle. That's all I needed for this project. 


I cut off several spikes from the pine cones and glued them onto the hand puffed cotton balls to look like the pods. 


With another dab of hot glue to the middle of the pods, I slid the end of the branches into the cotton. I wish I would have stuck to the darker pine shell. It gives it a better look.
Once finished, I put them in a vase, or jar to make the perfect natural decoration for the season.


I always admire the cotton fields we pass in South Carolina on our beach trips. My creation looks almost like the real thing minus the beetles.

Question: Just how long is a cotton picken minute?
My Answer: As long as it took daddy to fix something.
I've heard it many times "Just give me a cotton picken minute!"

Rustic Bundt Pan Wreath

It's September. I hate to see Summer go but I do like the smell of Autumn. I enjoy the colors its brings. I like flannel and fire pits. It's that time for falling leaves, football games, bonfires and Pumpkin flavored EVERYTHING hits the selves. I have a confession: Pumpkin flavor is not my favorite. Pumpkin Pie is ok if its loaded with whip topping.

I'm ready to bring out my Fall decorations but we don't want to rush it. We want to get one more beach trip in first, so I'll wait until its officially Fall. 

Meanwhile I had this bright idea to make a fall wreath. We do not have much money so I'm always thrifty. When I say thrifty, im talking thrift store or dollar store thrifty. Today we made a trip to the dollar store for some cookies. They have a kind I like and they are only a dollar!

I never go to the dollar store without leaving with a handfull of "things". 
Today I grabbed a spool of seasonal ribbon and a floral stem. 
My husband just gave me a look. "I have a plan", I exclaimed. He just nodded and said "well, ok".

Once we got home, I had an hour to waste before meeting my brother-in-laws for dinner. My husband was resting on the sofa. I quietly pulled out my old rustic and stained bundt pan from the cabanet while my craft idea was still fresh in my head. I cut the ribbon and twisted the floral stem until the idea became reality. 


I created a fall wreath to hang in my kitchen. It took me all of two dollars and two minutes to create. 
The bundt cakes will have to wait till Winter. 

Crochet Nunchucks

I had the strangest request from a customer the other day. She is a photographer and asked if I could make her a set of crochet nunchucks for a photo shoot. A little surprised, I told her I'd take a stab at it (no pun intended). I didn't even need to find a pattern to make me a set of these. After I looked at a few online, I figured it out.


They were pretty simple to make. The hardest part was making them exactly the same on each side. I'd loose count and have to start over. That happens when I watch Law and order and try to crochet at the same time.

I do not plan to make anymore of these  but I will share my pattern with you.

Crochet Nunchucks.
This is will be crocheted in rounds (no joining). you may need a stitch marker.
I used a hook size I (5.0mm)
Make two.

1st Color
Round 1: Start with a magic circle (or chain 3 and join in 1st chain to create a circle).
6sc in the circle. (6).
Round 2: 2sc in each sc (12).
Round 3: *2sc in next, 1sc in next* repeat around (18)
Round 4:  Back loops only,  sc around (18) (this makes your bottom edge of handles)
Round 5: sc around (18)
Round 6: sc around (18)
Round 7: sc around (18)
2nd Color
Round 8-27 sc around (18)
1st Color
Round 28: sc around (18)
Round 29: sc around (18)
Round 30: sc around (18)
Time to add the stuffing!!!
Round 31: back loops only, *2sc together, 1sc* around.
Round 32: *2sc together* around.
Fasten off leaving enough yarn tail to stitch the center hole together.

Chain
I did four I-cords about 5 inches long, sewed and linked them together, then sewed them to the handles. Here is a link on how to crochet an I-cord.

I'm not good at writing out patterns, but I hope you get the idea. Basically I did 5 rounds of end colors and 20 rounds of center color.


I think they turned out really cute and I may crochet another pair one day just for the fun of it but currently I have other projects I need to be working on.

Funny Fact about me: I really do know a couple tricks with real nunchucks.

"I guess you can now call me a "Crochet Ninja"
 I've shared this at:

DIY Earphone Case

I'm bad at keeping up with wires, chargers, cords , etc. So I found this really cool little do-it-yourself earphone case using a mint box. It was an Ice Breakers mint container to be exact. I didn't get a picture before I peeled off the label because I'm inpatient like that.


Here are the supplies you will need:

  • Empty mint box with the label removed.
  • Printed scrapbook or printed paper.
  • Sissors
  • Cylinder to trace a round pattern.( I actually used the bottom of a lysol can).
  • Glue
  • Mod Podge (to seal). 

Find a place to punch two holes for a key ring. I did this on the side I did not want to open since the container opens in two places.


Once you have your circles traced, carefully cut them out and glue them on your container. Do this any way that is easiest for you.


Mine was a little big so I cut out the opening seam and had edges but you can make the print to only fit the opening part if you wish.


Glue the 2nd circle to the bottom. Now you have two printed sides. Using Modge Podge, paint a coat on the entire printed area to seal the print on.


Once its dry, Its ready to use.

Have fun. Customize yours to fit your personality. You can paint them or even leave them plain. Add a clip on the ring and clip to a bag or belt. You can also use it to hold change and other small items. Great project to do with your kids.