Showing posts with label recipe. Show all posts

Chaffles

Ok yall, I could not take it any longer. I have been wanting one of these little Dash mini waffle makers for a couple years now. I just did not need another kitchen gadget. I have a regular waffle maker but always thought it would be nice to have a “limited portion”. I also thought it would be something I could use in my camper. 

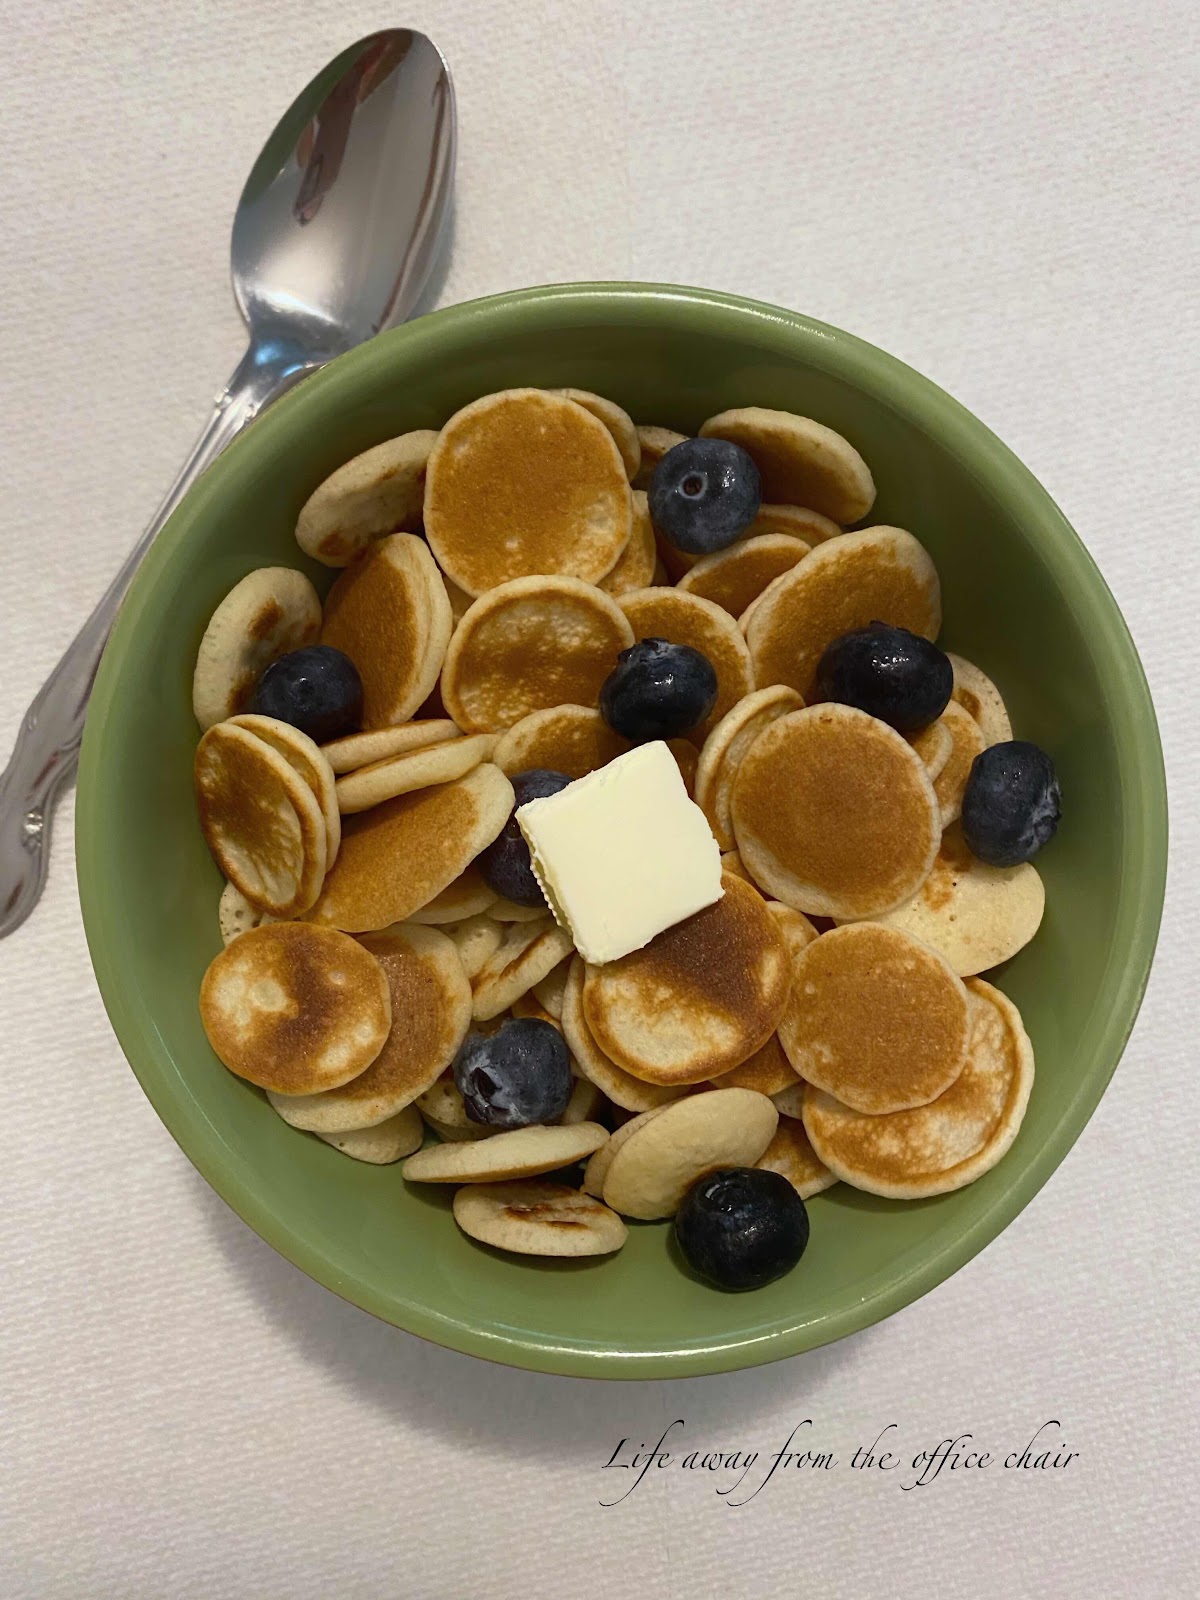
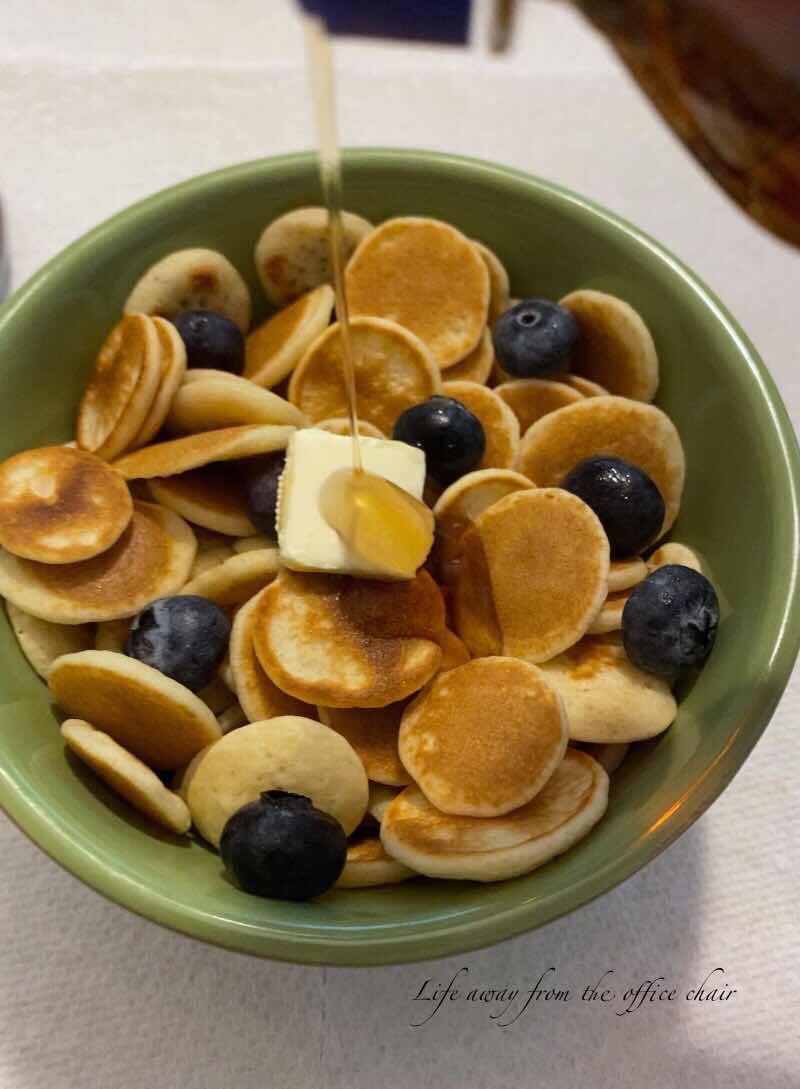
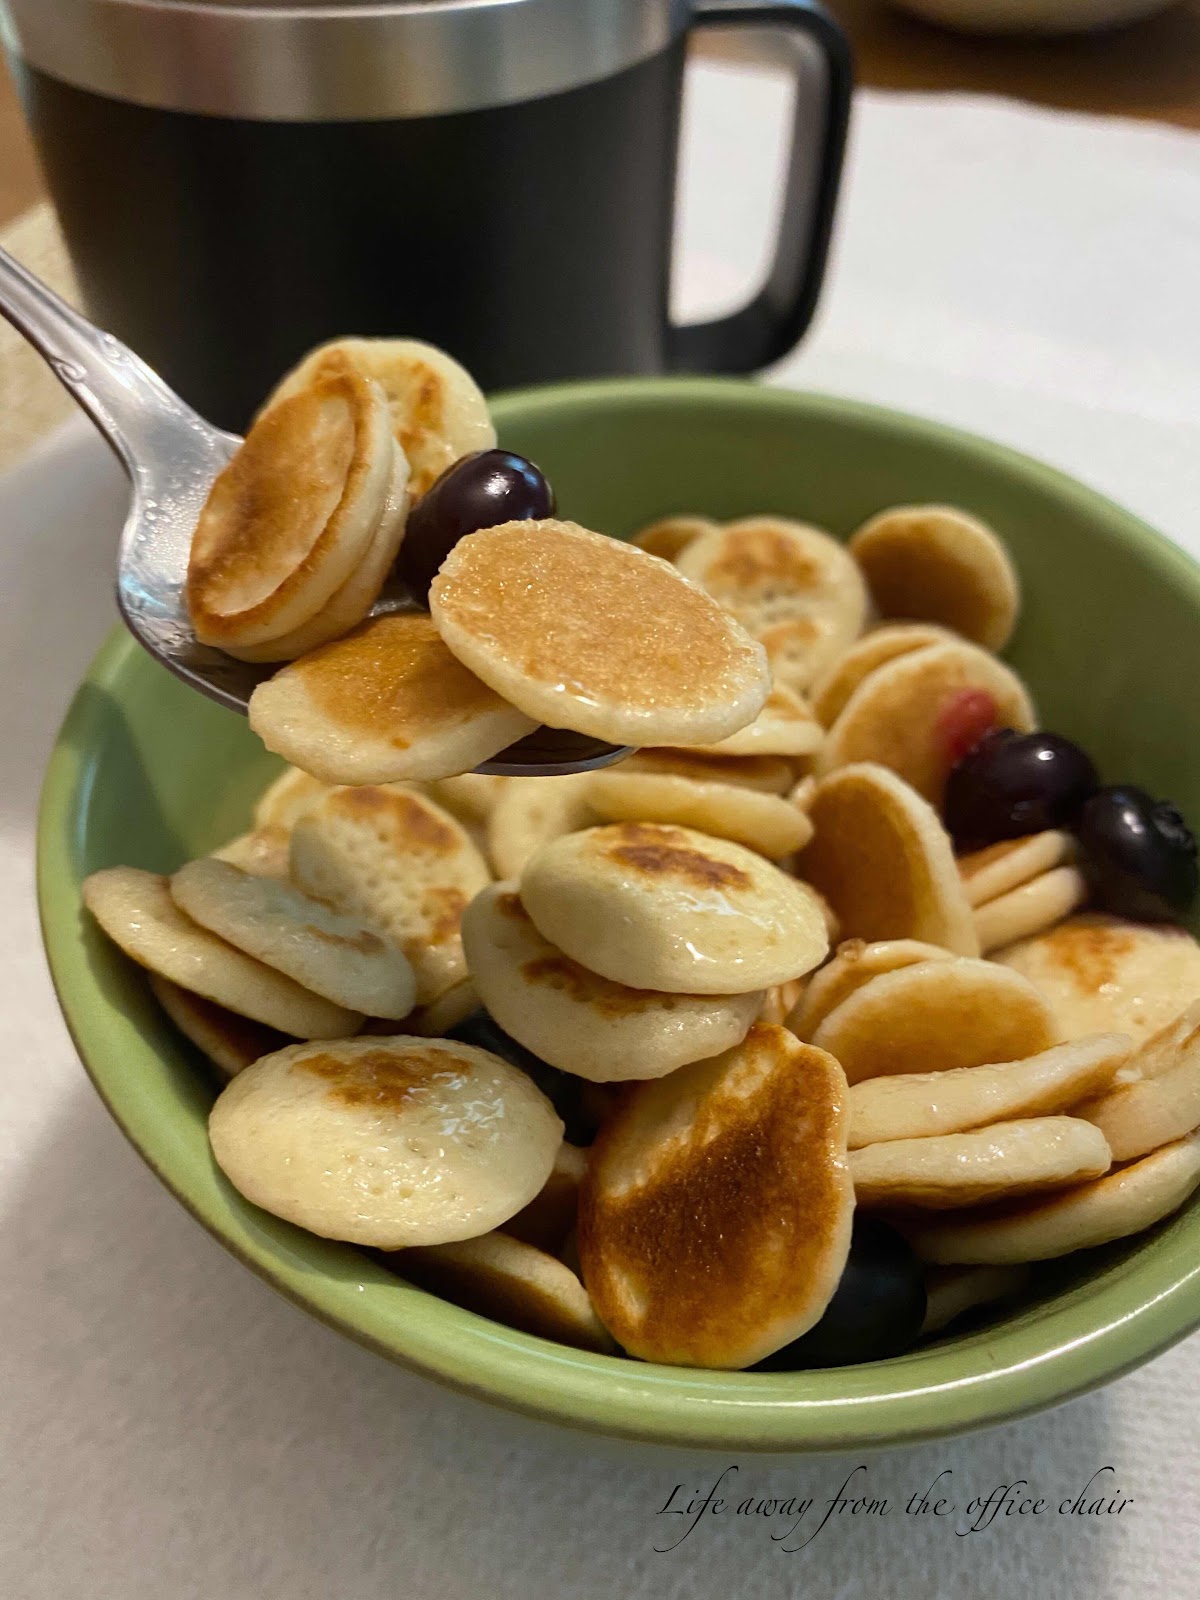
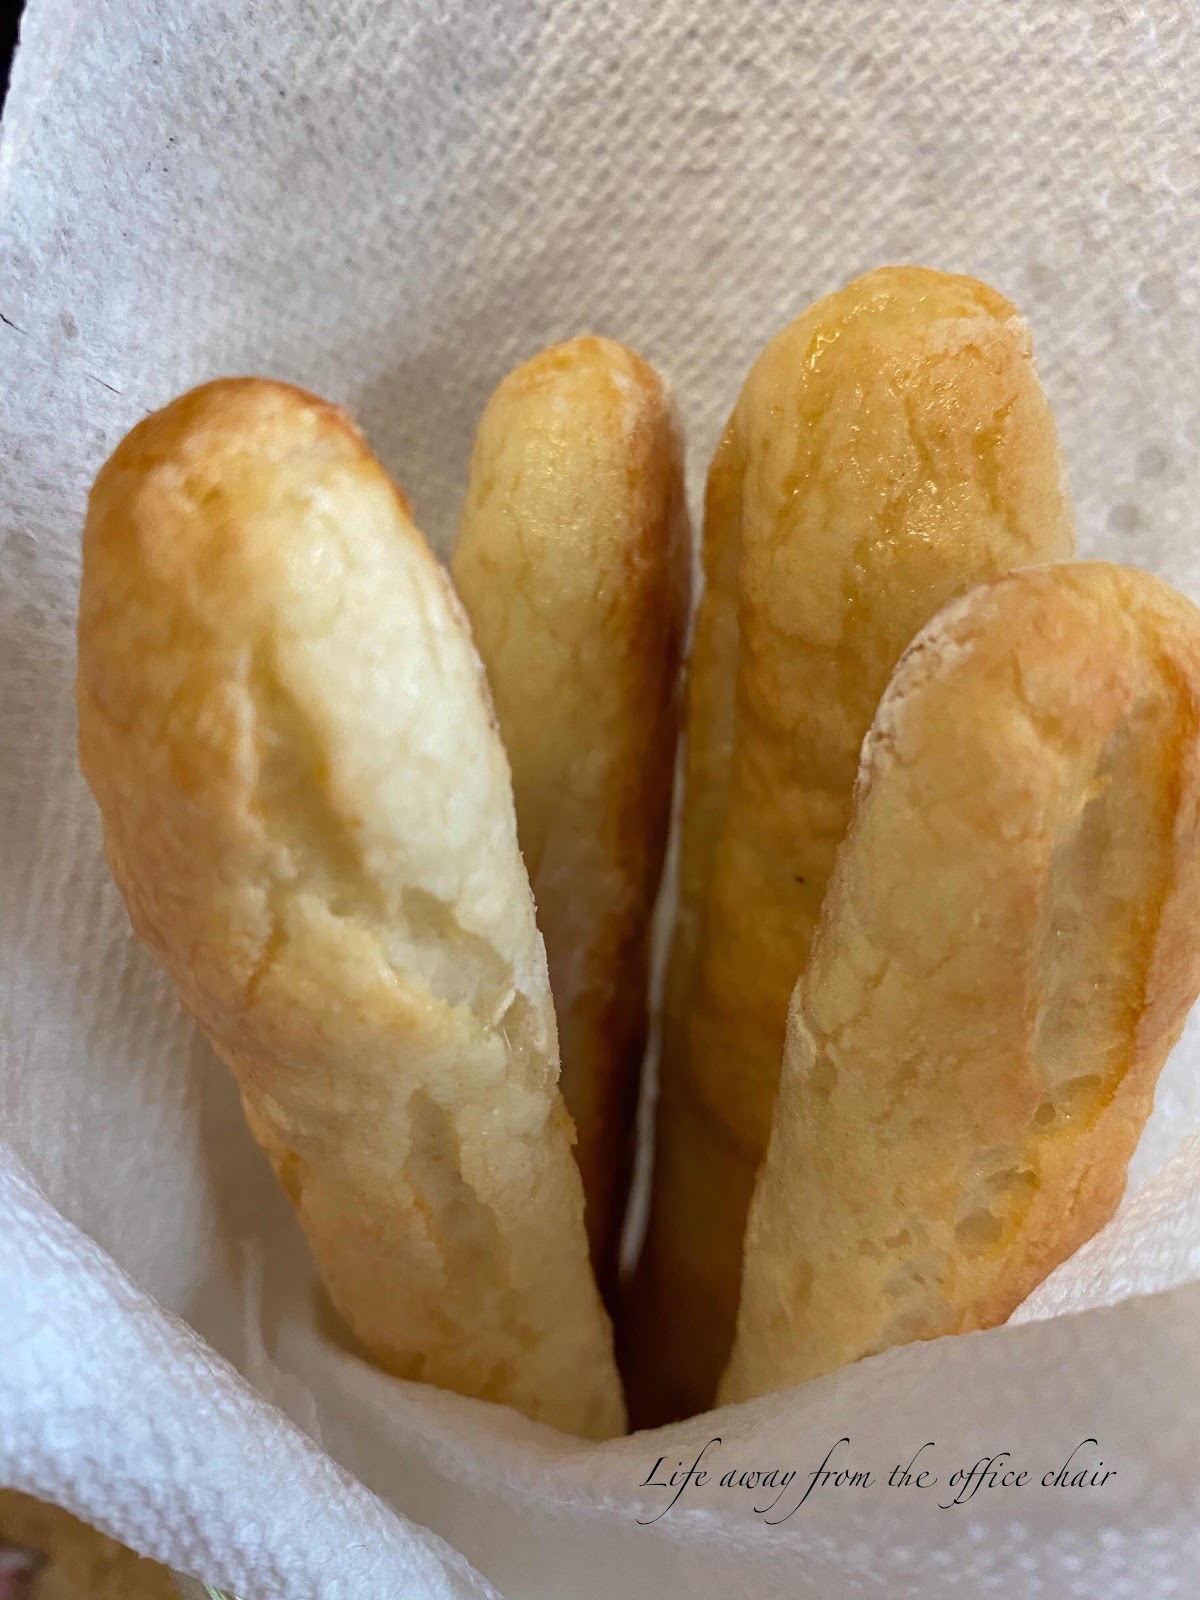
After seeing recipes for “Chaffles”, I finally gave in to my wishes and bought a mini waffle maker. 

What is a Chaffle? 
It is a healthy Keto way to make waffles which means no bread. They are low in calories and high in protein. They are all made with a basic base of egg, cheese and almond flour. Some even leave out the almond flour and just use egg and cheese. I just prefer them a little more fluffy. You can find so many ways to make different flavor Chaffles. 
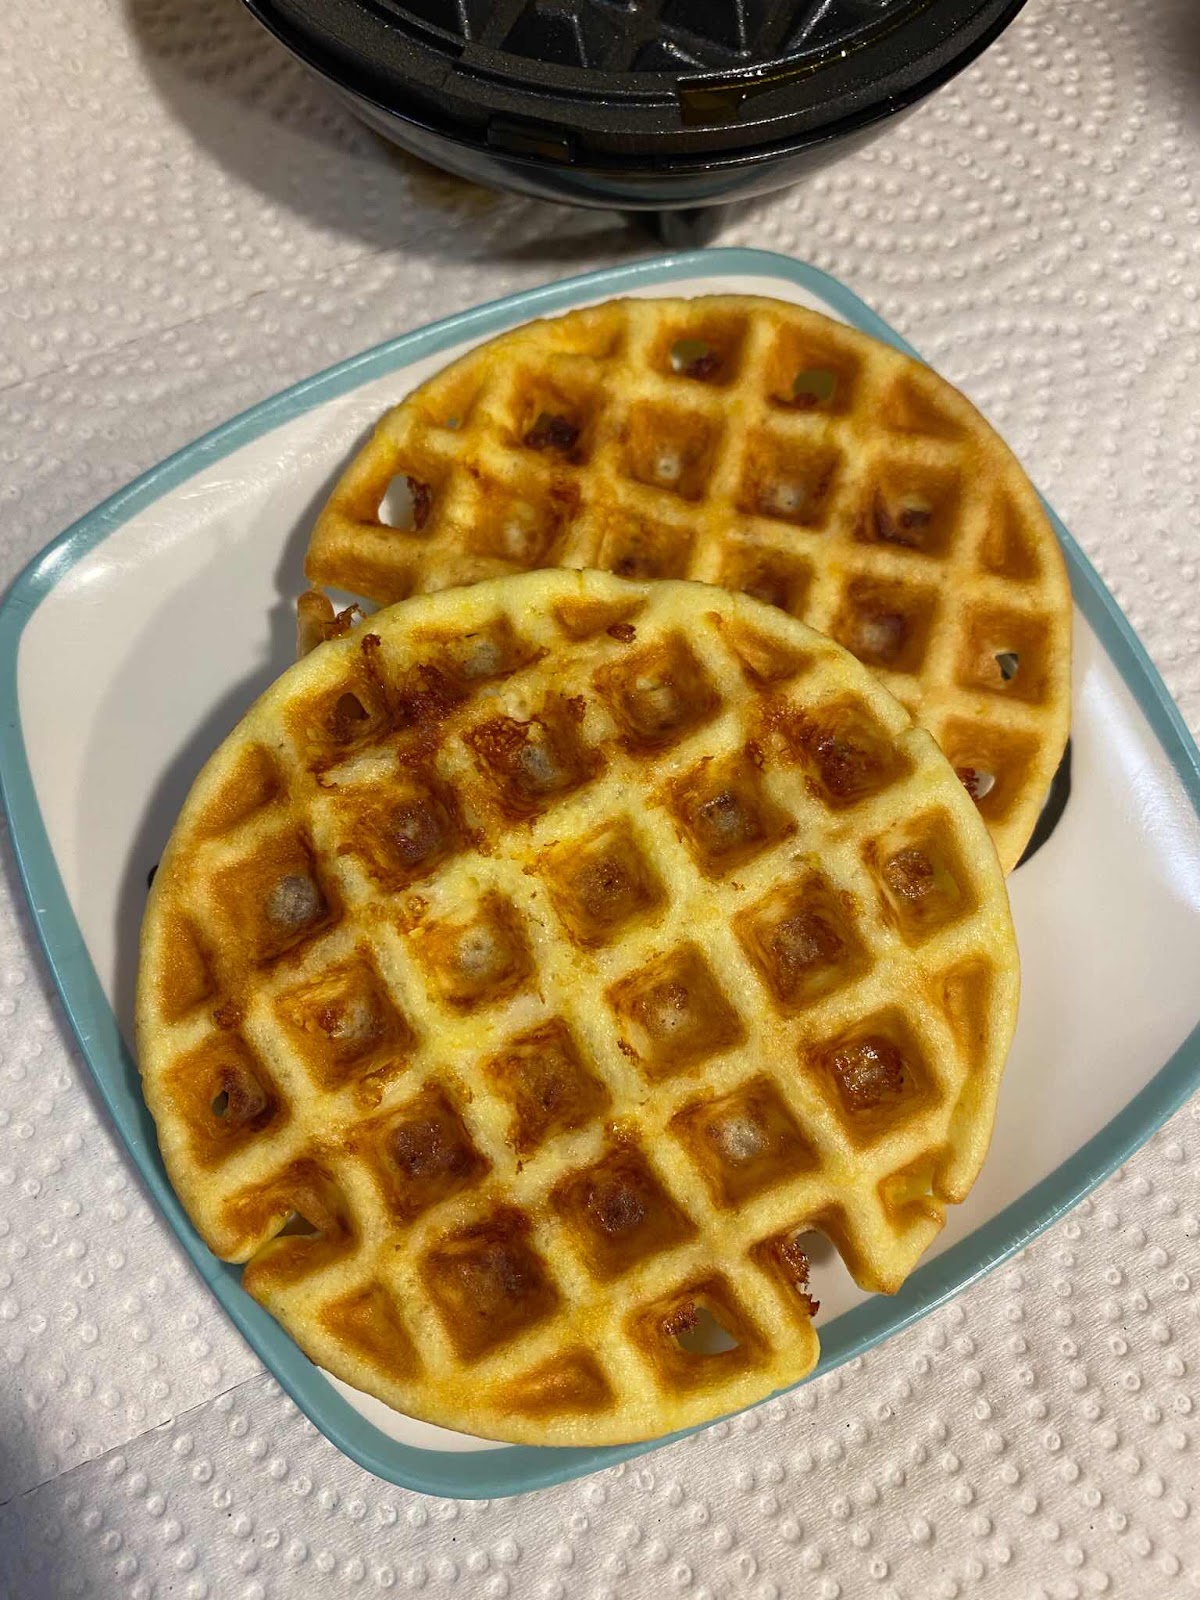

CHAFFLE
1 egg
1/2 cup cheese (I used mozzarella).
1 tablespoon almond flour.
(Makes 2 waffles)

After making my first Chaffle, I was hooked. I added butter and syrup and me and Nick did a taste test. I was afraid they would be eggy or taste cheesy but the didn’t. They were surprisingly good. 
But wait, they go beyond breakfast waffles. You can add in ingredients and make them sweet or savory. 


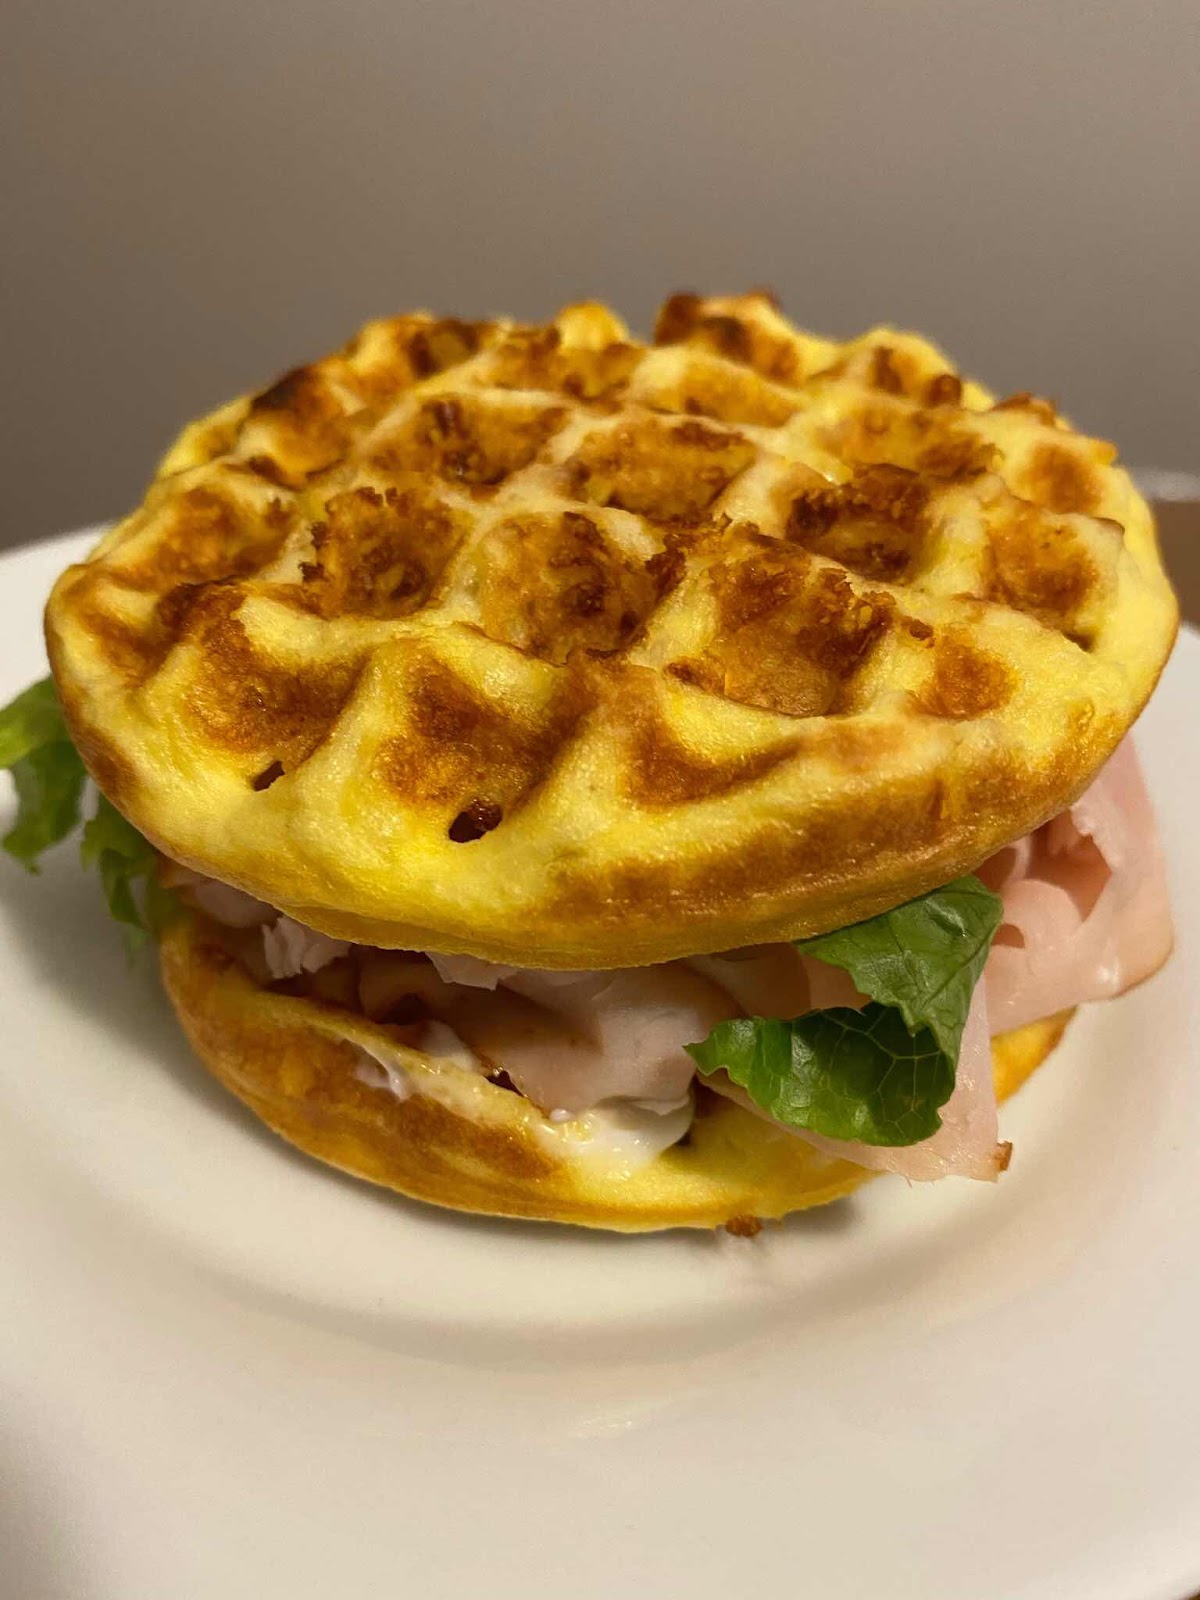
I made a sandwich chaffle to take to work with me and it kept great in the cooler and it was so good! This will be my new way to eat a sandwich for a while. It was filling and didn't leave me feeling bloated. I was satisfied until my next meal. 

You can top your chaffle with cheese and pepperoni then place in a toaster or oven and have your own healthy personal pizzas. 
You can also make chaffle tacos by using them as your taco shell. The possibilities are endless.

Of course I had a sweet tooth tonight so I gave the Chocolate Chaffle a try. I made it the same way as the original chaffle but added some Stevia and cocoa. I’m not sure if I really liked this one or not.


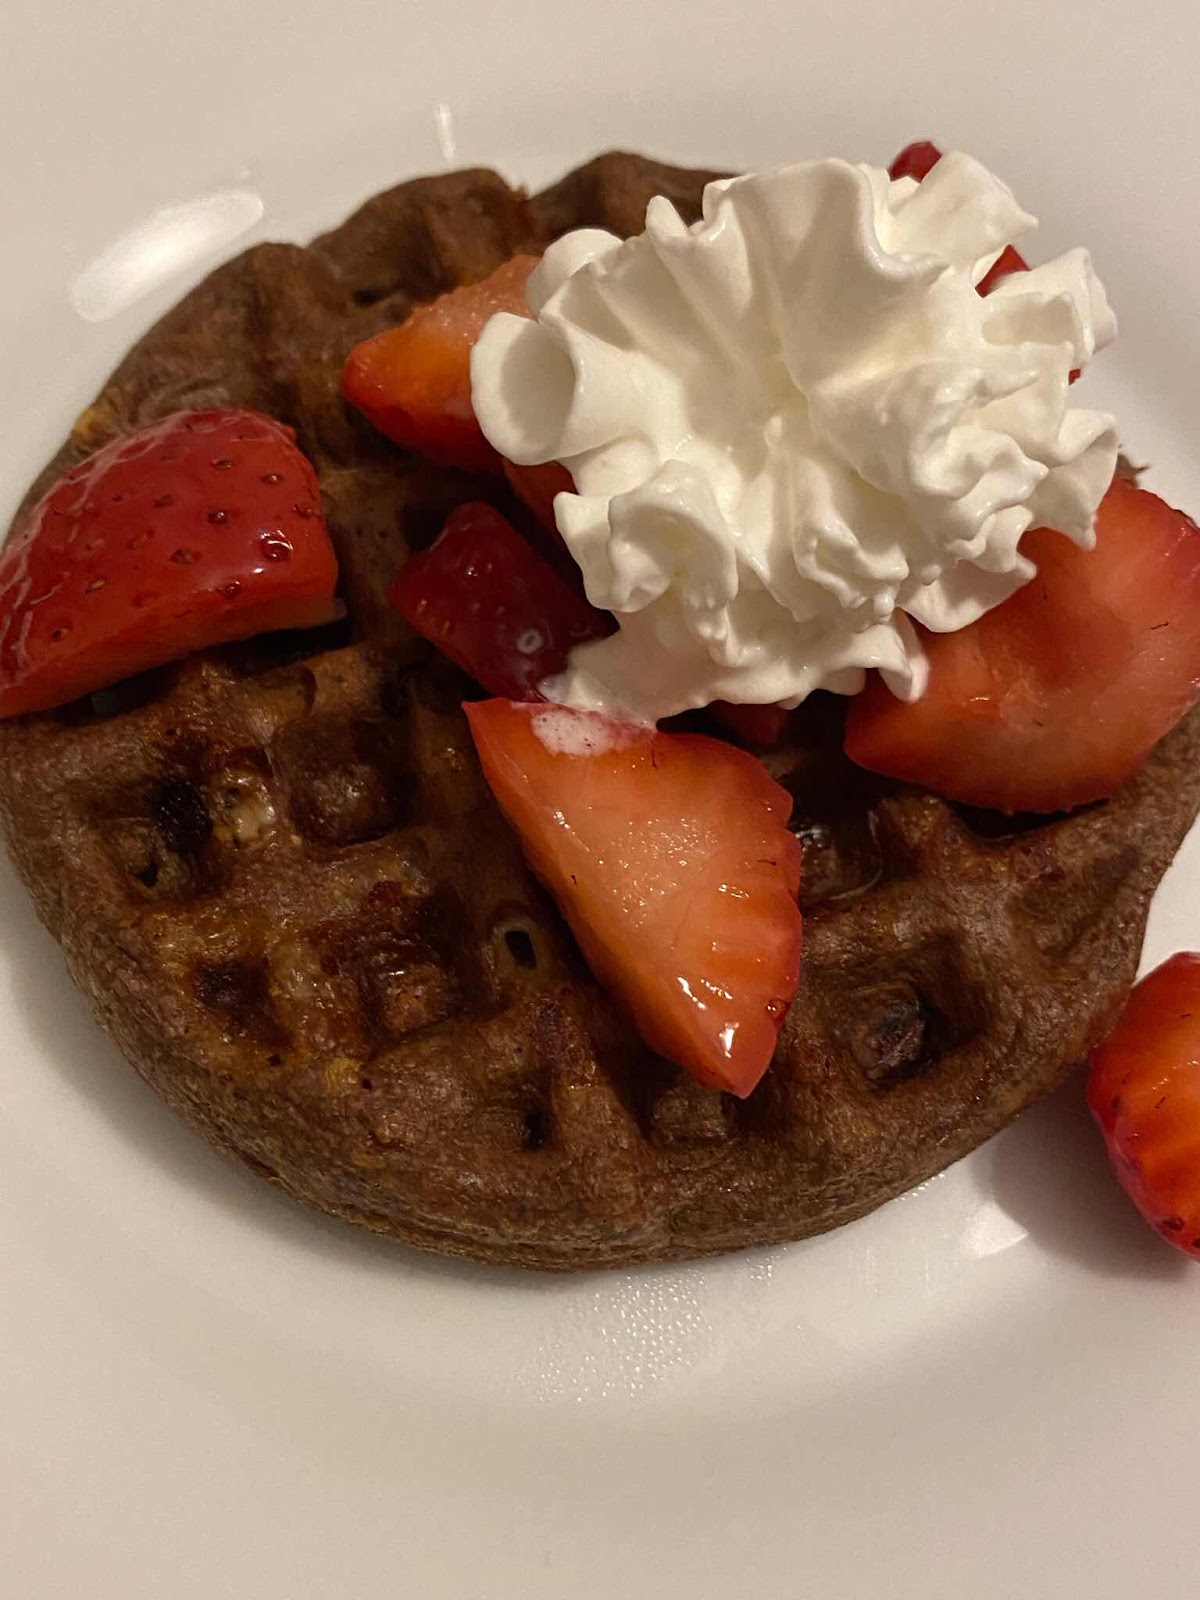
It’s crazy that I could not taste the egg or cheese but I thought it was a little bitter. I am not a fan of artificial sweeteners, so I probably wont make this one again, but my kitchen is smelling pretty good right now. 


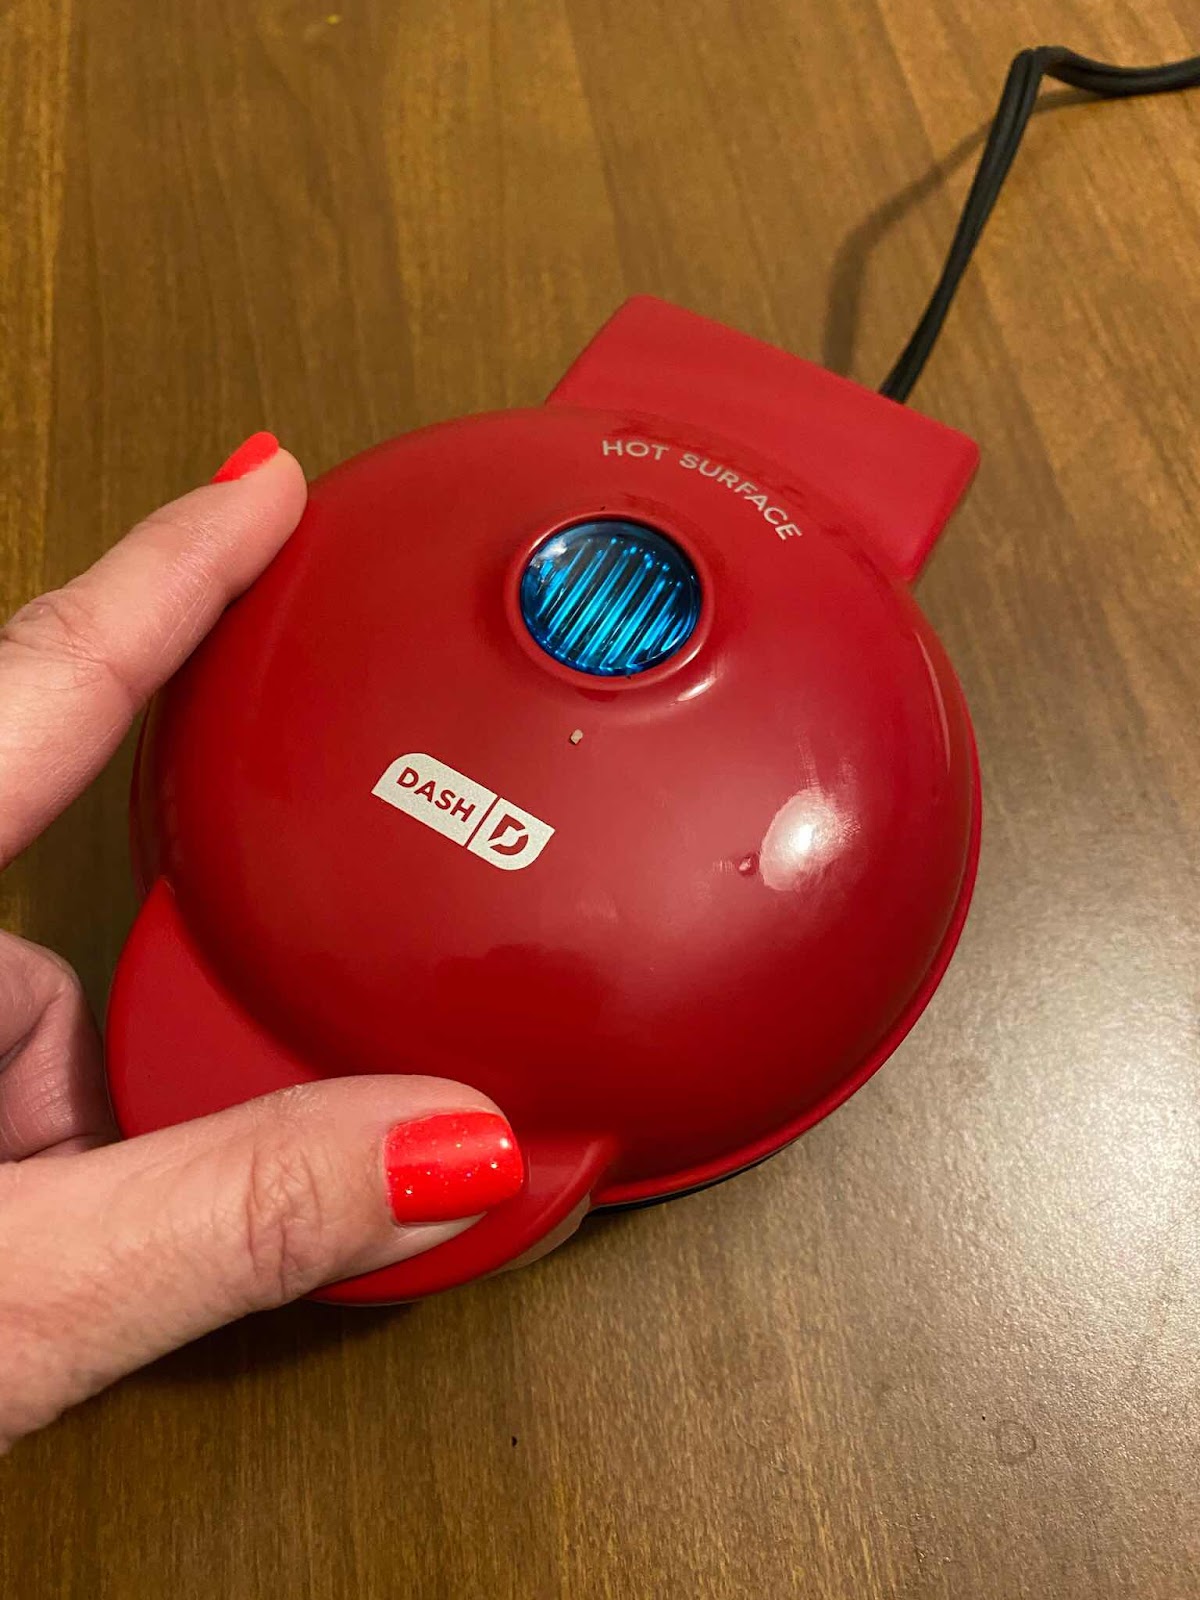
Word is getting around, so these little Dash mini waffle makers are getting hard to find in stock at most stores but you can find them now on Amazon.

As an Amazon Affiliate, the following is a Marketing Link, 
which means I make a small percentage on the sales
 but it in no way affects the price a buyer may pay.
Opinions are my own honest reviews.

Puppy Chow Muddy Buddy

I finally got my Christmas shopping finished. I actually finished last week. It feels great to get that behind me and now I can sit back and enjoy the rest of the season. 

With my work schedule, I have to find time to get things done. I was off on Sunday so I was able to enjoy church again. My daughter came home and we spent the afternoon baking cookies and making treats to hand out to the neighbors. 

This year I will be handing out tins of “puppy chow”. It’s not really puppy chow but that what it’s called because of how it looks. If you buy it in the store, it is called Muddy Buddy.


It is made by coating chex cereal with a peanut butter and chocolate mixture then tossing it into powder sugar. It is absolutely delicious!

Incases you want the recipe, here it is.....

PUPPY CHOW (Muddy Buddy)
6 cups Chex rice cereal.
1/2 Cup peanut butter.
1 Cup chocolate chips.
1/4 Cup butter.
1 Teaspoon vanilla.
2 Cups powder sugar.

In microwave, melt chocolate chips, butter and peanut butter together on high for 30 seconds. 
Microwave 15 seconds at a time until mixture becomes smooth.
Stir in vanilla and pour over cereal mixture. Stir to coat. 
Pour into a 2 gallon resealable food storage bag or a container with a lid.
Shake until coated. 
Transfer into a serving container and add extras of your choice such as pretzels, marshmallows, M&Ms, or other candies.

I just added some Christmas colored M&Ms. 

We also made my favorite holiday cookie, “Pecan balls”. I filled a tin with those to take to work and we have a container of our own. 
I could eat my weight in those things. 

Buffalo Cauliflower Caesar Wraps

I have been trying to eat healthy for years now. Well, I don’t just try, I have actually done pretty good at it. There are days I will eat a meal that is not on my diet and some would say it unhealthy but in reality, no food is “unhealthy” unless your body reacts in an unhealthy way. I have just chosen to try to eat more, let’s say, “natural” foods. Due to health reasons, I had to go on a low sodium diet and have to stay away from processed foods which includes can foods too. So far it’s working for me and I feel great! 

I have also given up caffeine (unless I eat a piece of chocolate). I have limited my bread and sweets and have been trying to eat more vegetables. For the record, I am not a vegetarian. I love meat. I have just been trying to find ways to incorporate more veggies into my diet because, frankly, I am not a fan of vegetables unless its in a salad or a tomato sandwich. 

But lately, I have been addicted to buffalo cauliflower caesar wraps. It’s a great alternative to buffalo chicken. I’m absolutely hooked on this stuff. 
I bought a fresh head of cauliflower and broke it into small pieces. I will put a handful into a ziplock baggie and toss it around with some buffalo sauce. I use the “Sweet Baby Rays’ brand because they are a favorite in bbq sauce as well. 


After I toss the cauliflower, I dump it into my air fryer and cook it for 15 minutes at 390 degrees. It comes out crispy and delicious.

Then I place in on a flour tortilla on top of a bed of lettuce and add a dash of creamy Caesar dressing. I use “Kens” dressing. It’s the best. 


I can’t say it is any more healthy than a Caesar chicken wrap but it’s a good way to to skip the meat and eat some veggies.

Go ahead and try it! But beware, it can be spicy. 

Air Fryer Popover

I have been wanting to make home made popovers. A popover is a light roll made from an egg batter similar to Yorkshire pudding. While they seem large and fluffy, the insides come out somewhat hollow in the middle. 
I found several recipes that are super easy but there is one problem. To make real popovers, I would have to purchase a special popover pan. It looks similar to a muffin pan but are specially made with chambers that air can flow around them causing the dough to puff and, well, “pop over” the pan. 


I was determined to try making popovers but I knew I did not have a special pan nor did I need a dozen of them in my diet. So....
I made my own recipe to create just one popover by using my air fryer. I did not want to heat the oven up for a single serving and besides, I love my air fryer. 


I think it turned out great and made a delicious portion controlled breakfast that kept me full until lunch time. It did not include any sugar until I decided to sprinkle powdered sugar on top. This one reminded me more of a dutch baby pancake but I’m just happy that it tasted so good, and let’s face it, It did “pop over” in it’s own little way. 


I plan to get one of those popover pans soon. Well, soon as I can find one I can afford. 

Air Fryer Popover (single serve)
1/4 Cup- all purpose flour
Pinch of salt
1/4 Cup- milk (I used almond milk)
1 Large egg

Mix flour and salt together.
Whisk milk and egg together.
Pour egg mixture into the flour mixture.
Mix until blended but do not over mix.
Pour into a buttered ramekin or mug.
Add a few berries for some sweetness (optional)
Bake in air fryer at 350 for 15 minutes. 

Top with powered sugar or syrup for a sweet treat.

Pear Pickin

Pears are not one of my favorite fruits but I could not turn down the offer to do some pear pickin. 

One of my former neighbors sent me a message asking if I would like to have some pears. I said “sure”. 
He said, “Great, there is a pear tree behind my shop that is full of pears and they are going to go bad if no one picks them”. So me and Nick grabbed a box and headed to Bessemer City. 


In no time, we had a box of fresh pears. This was a sign business tucked away in an industrial park and we also got a nice tour of the place. It was interesting and we learned a few things.


As soon as I got home I washed them and began looking for recipes. These pears were a little hard and tart but I thought they were good. I have eaten a few for snack and even made some pear preserves which turned out wonderful. Pear preserves are easy to make and great on toast or yogurt.


These preserves also have added cinnamon and vanilla. 


While I was outside the other day, I noticed a few butterflies so I shared some pear with them. Then my daughter came home to visit and I ended up giving her a few pears to take home. I think I have had my feel of pears for the year. 

Now I’ll share with you how I made the pear preserves.

PEAR PRESERVES
•4 cups chopped pears.
•2 cups sugar.
•1\2 Tbls cinnamon.
•1/2 Tbls lemon juice.
•1/2 tsp Vanilla.
~Add  pears and sugar to pot and cook until the pears are soft. Then smash to consistency. 
~Add cinnamon, vanilla and lemon juice and continue cooking until thickens.
Makes one pint (one large jar).
Double recipe for more.

Mini Lava Cake

Monday night I was fixing some air fried carrot chips when all of a sudden my air fryer just shut off. I checked the receptacle to make sure I did not blow a fuse or something and there was nothing wrong there. It was confirmed,“time of death, 4:52pm”. My air fryer bit the dust. It just died. I was upset as this has been my favorite kitchen appliance since I got it in May a year ago as a gift. I use it almost every day.

I immediately jumped online and searched for new one. On Tuesday, Nick and I took a ride across town to check some out. The first store we visited was Target. They had a few different brands. The one that caught my eye was the Ninja 5.5qt air fryer but it was out of stock. They said they could have one for us by Friday. We denied it and went to Best Buy. They had the same air fryer at the same price. Unfortunately they were out of stock too but said they could have one to my door on Thursday......Sold! 

I made supper with it tonight and it worked great. We had chicken breast and corn on the cob. It turned out delicious. I did not stop there. I wanted to play a little more and found a recipe for mini lava cakes. Oh my goodness, let me tell you, “ they were awesome!”


I tweaked the recipe a little and made two mini lava cakes. My remkins were a little large so they did not get as thick as I thought they would. Next time, I will use my smaller remkins. The size did not take away from the rich flavor of these gooey chocolatey desserts. 


The recipe was simple and made with ingredients you probably have in your pantry right now. Be careful, this is not a diet friendly dessert. Each little cake is 483 calories and 43 Carbs. 

Want the recipe? Here ya go.....

Air Fryer Mini Lava Cakes


3 Tbs. Butter
1/2 Cup Chocolate Chips
1 Egg
1 1/2 Tbs. Sugar
3/4 Tbs. Self Rising Flour

-Melt Chocolate chips and butter in microwave (30 seconds at a time).
-Mix until smooth.
-In another bowl, Whisk Egg and Sugar together until smooth.
-Pour in the Chocolate mixture and mix well.
-Add flour and continue to mix until smooth.

Pour into two remkins or mugs and place in air fryer for 10 minutes at 370 degrees. 
Let cool for a few minutes and dump onto a plate and top with ice cream or whip topping. 
(Center will be moist and gooey).

Enjoy.

Pancake Cereal

I love breakfast. That is one meal I do not like to skip. I love all kinds of breakfast from just a muffin or bagel to a full course of eggs, bacon and gravy. I even like breakfast for supper. One of my favorite things to eat for breakfast is French toast, waffles or pancakes. You know, the sweet stuff.

Speaking of pancakes, have you ever eaten pancakes with a spoon? Well, let me introduce you to this little breakfast bowl I created this morning. 


It is called pancake cereal because it consist of a bowl of tiny pancakes. Yes, thats right, teeny tiny little pancakes. They were easy to make but took a lot of patience. Nick laughed at me every time he passed by the stove. 

I got rid of my usual pancake mix because I have had to go on a low sodium diet. Aunt Jemima Pancake mix is the best but too high in sodium for my diet. I scoped out the pantry for something to make pancakes and found a box of Bisquick. I followed the instructions on the back and created a thin pancake batter.


Making tiny pancakes like this requires some sort of squirt bottle or tiny pour. I had a squeeze bottle with a spout that worked perfect. I lined the pan with small drops of mix and carefully flipped each one. You have to do this pretty quick as they will easily over cook. In fact, you do not even have to flip them as they will cook through in just a few seconds. I just wanted mine to be evenly brown. (Nick was still laughing).

Add your favorite toppings and enjoy. 


Pancakes
1 Cup Bisquick
1 Egg
1/2 Cup Milk (I used almond milk)
Mix and pour into a hot greased pan.
Flip when the tops start to become dry (no need to flip for the tiny pancakes).

Fig Butter

I came across more figs again this year. There is a member of my church that gave me a half gallon last year and I enjoyed them in my yogurt and just eating them raw. Mr. L called to let me know he had me some more figs. He asked me to meet him at the church so he could give them to me. He handed me a bag of fresh okra and 5lbs of figs!
I was so excited.


When I got home I immediately washed the figs. I froze some, and put some in the refrigerator for snacks. Then prepared enough of them to make Fig butter. The plan was to make jam but it didn’t turn out jammy. 


So fig butter it is. This is ok because I just finished off a jar of apple butter and now I can enjoy some fig butter on my toast or peanut butter sandwiches. 

It was simple to make and will last in the refrigerator up to 3 weeks. 

FIG BUTTER

1/2  water
1/2 cup sugar
2 cups figs (1 pound) cut in quarters
1/4 cup fresh lemon juice

Put water and sugar in a sauce pan on medium heat until sugar is dissolved.
Add lemon juice and figs. 
Bring to a boil.
Reduce heat to a simmer for one hour, partially covered.
Smash up (I used an immersion blender).
Let cool and store in refrigerator. 

(I doubled the recipe and got over a quart)


Air Fryer Pound Cake

If you know me, you know I love my air fryer. My daughter and her boyfriend got it for me over a year ago for my birthday. I have used it almost every single day since. It has basically replaced my oven and frying pan. My air fryer has even been taken to the beach with us to use in the camper. 

Any thing you can cook in the oven, you can basically cook in the air fryer. Just in a smaller portion. I have made everything from steaks, to cobblers in that thing. When I realized I could make cake in it too, I had to give it a try. I decided to make a pound cake. I did not use my own pound cake recipe. I used one found online that called for yogurt since I was out of milk at the time. The recipe yielded 3 mini loaves, so I cut the recipe down to 1/3 to make just one. 


It turned out delicious. This did not compare to my moms or my daughters pound cake but I was impressed that I could make one almost as good using my air fryer. This one will be added to my recipe book. 


AIR FRYER POUND CAKE
(Makes one mini loaf)

1 Cup-All purpose flour
3/4 teaspoon- baking soda
3/4 teaspoon- baking powder
1/3 teaspoon- salt
3/4 Cup- Greek yogurt
1/3 Tablespoon- vanilla
1 egg
3/4 Cup- sugar
1/4 Cup- butter

Mix dry ingredients in one bowl
Mix wet ingredients in another bowl
Then combine the two and mix well.
Pour into a greased mini loaf pan
Air Fry 320 for 20 minutes. 
(Do the toothpick test to make sure its done through). 

Full recipe can be found at ForktoSpoon.com 


I plan to try more cake recipes soon. 
Do you own an air fryer? If so, what are some of your favorite things to make?

Pie Crust Cinnamon Rolls

I have my Mom to blame for this post.

It all started last week when a storm came through during the wee hours of the morning. We sleep fine through the strong rain and thunder but my parents had a little misfortune as lighting hit a big tree sending it down onto their house. This led to them fleeing their upstairs bedroom. They are ok but were a little shaken up. The tree did significant damage to the roof and a limb arrowed through the ceiling of a spare room. All of this required them to loose power for two days until they could get the tree off the house and fix the power lines. 

My parents emptied their freezer and refrigerator and distributed foods to me and my brothers home. They did not want most of the food back and said we could do what we wished with it. That was dangerous because one of the the items was pie crust (among other goodies). 
I’m one of those people that would rather eat the crust of the pie instead of the filling. 

I had a sweet tooth (nothing new) and decided to use the rolled pie crust and make some little pie crust cinnamon rolls


They were so easy to make and made the perfect snack after we got settle down for some night time TV. 

Want to make some? Here is how I did it.

  • Unroll the dough.
  • Brush with melted butter.
  • Coat with a sugar and cinnamon mixture.
  • Roll the dough back and cut into pieces.
  • Place on a cookie sheet (sprayed or lined with non stick foil or paper). 
  • Brush with butter again. (You can add more sugar and cinnamon if you wish)
  • Bake 350 for 15-20 minutes or until lightly browned. 
I thought they tasted best after they had cooled completely then I made a dipping glaze with powered sugar and a splash of milk. 


We finished these off because starting next week, I’m going back strict to my diet as I have put on a few pounds that I am not so happy about. 
Being on stay at home orders has made it hard not to snack all day long. I have to get back to disciplining myself to healthy eating habits. 
I have a month supply of Nutrisystem foods ready to go. 

Whipped Coffee

My daughter mentioned to me about this thing called Whipped coffee. This got my attention. “Whipped coffee? Oh do tell me more”.
She said she had seen it on the internet and from friends. I immediately turned to Pinterest and searched Whipped Coffee. Sure enough, you can whip coffee into a thick butterscotch colored fluff. 


If your a coffee lover, you will enjoy this. 
Here goes.

2 Tablespoons- Instant coffee.
2 Tablespoons- Sugar (white or brown works).
2 Tablespoons- Boiling water.

Now for the hardest part.

Get your whisk and start start whisking. This will take both arms because one will get tired. You have to whip it for like five minutes or so.
At first it doesn’t look like it will work but give it time. It will lighten up and start getting thick. The more you mix, the thicker it will get.
(You can also use an electric mixer if you wish).


I Think I have some new muscles in my arms now.

After about 5 minutes I had a nice coffee whipped to the consistency of whip cream.


Add the whipped coffee to the top of a iced milk of your choice. I used almond milk.
The coffee whip is rich and stout so before you drink it, give it a whirl in the milk. 

IT WAS DELICIOUS! 
Now go impress your friends and make them a drink that will make Starbucks jealous. 

Two Ingredient Bread Sticks

Here I go again with the “two ingredient” recipes. But seriously, that’s all it takes to make simple bready things. The two ingredients are plain Greek yogurt and self rising flour. No eggs, no milk and no shortening.

I have used this recipe to make pretzels, flatbreads and bagels. They all turned out delicious. What makes the difference is what goes on top. It’s crazy how it takes on the flavor of what it meant to be use for.


The other day I was having soup and salad and wanted some sort of bread stick to go with it, so I grabbed my yogurt and flour and made a dough.
I divided the dough into four pieces. With each piece of dough, I rolled into snake stick shapes and placed them on a lined cookie sheet and baked them for about 12 minutes. 

2 ingredient bread sticks.
•1/2 cup self rising flour.
•1/2 Cup plain Greek Yogurt.

-Bake 425 for 10-15 minutes.
-Brush with Butter (or garlic butter).
Makes four 6 inch sticks. Only 63 calories each.


I love how they turned out. They had the same texture as any other bread stick you get from a restaurant. It was the perfect portion with my lunch.

These bread sticks are not only easy to make, they are also on the healthy side of things. 
Each stick is only 63 calories so its less than a slice of bread and a whole lot better. I will be making more of these as they are now my favorite.


Off post: For some reason after I did an update, the spell check tab on my blogger tool bar is no longer there for some reason. I hope blogger gets that fixed soon. Meanwhile please excuse any misspelled words you find. 

Chickpea Chocolate Chip Cookies

It’s time I share with you, these delicious cookies I made. The best thing about these cookies are they are rather healthy. You will not believe what they are made with. No eggs, no oil, no butter, and no flour. Seriously. Can it get any worst better than that? Maybe. These cookies are made with Chickpeas! Seriously.

Are you a cookie dough eater? I’m not because my daddy always warned us about eating raw eggs. I thought I’d die if did. But again, this dough has no eggs or any dairy product for that matter so if cookie dough is your thing, grab a bowl and dig in. 


They are Gluten free, low sugar and grain free. They can even be made vegan if you change up the recipe a bit such as using vegan chocolate chips or maple syrup instead of honey. In fact, the original recipe is vegan. But hey, I’m not vegan and I didn’t have maple syrup so I’m sticking with this recipe. 


Don’t snarl your nose up until you have tired it. They are absolutely delicious. You can not taste the chickpeas at all and if you didn’t know it, you would never guess it’s in them. These cookies are also full of protein. Now I don’t feel guilty when I eat ten four. 

Chickpea Chocolate Chip Cookies
1 Can chickpeas (rinse and drain)
1/2 Cup peanut butter
1/3 Cup Honey
2 tsp. Vanilla
1/2 tsp Baking Soda
Pinch of salt
1/2 Cup chocolate chips.(or more).


Put all ingredients except chocolate chips into a food processor and blend until smooth.
Fold in chocolate chips.


Drop spoonfuls of batter onto a greased or lined cookie sheet. (They do not rise or spread but do fluff some)
Bake on 350 for 20 minutes.


These cookies come out firm on the bottom and soft and gooey throughout. 
I plan to make more of these to share with family as they taste as good as any other homemade chocolate chip cookies. 

Enjoy


Original recipe was found at Earthyandy.com (via Instagram @earthyandy)

Cauliflower Cheesy Bread Sticks

Are you trying to stay away from bread or foods that include white flour? Probably not unless you are on some kind of low carb diet. But if you are, I have a solution for a substitute by using riced cauliflower.

I have never been a believer in all the smack about making pizza crust, mashed potatoes or anything else using Cauliflower. No matter what I have made with cauliflower, It taste like cauliflower. Period. You can not substitute a veggie for bread. Sorry, it just can not be done.
However, I came pretty close when I decided to give cauliflower bread sticks a try. I do believe you can make anything good if you add enough cheese to it. 


It was a Sunday afternoon and I had nothing else to do so I experimented with a recipe and made Cauliflower Cheesy Bread Sticks. 


We used them as a side dish to our dinner that night. Nick gave them a shoulder shrug but not a full thumbs up. However, after eating a couple of them dipped in marinara sauce, they were a hit. We had enough leftover to use the next day and heated up well in the toaster oven.

Here is the recipe:
  • 2 Cups frozen riced cauliflower (one bag).
  • 2 Eggs
  • 1 Cup Mozzarella Cheese
  • 1 tsp Oregano
  • 2 cloves of minced garlic
  • Salt and pepper
  • 1/2 Cup Mozzarella Cheese for topping.


  1. -Cook or microwave the cauliflower as directed (you want it to be soft).
  2. -Mix all the ingredients together and add to the cauliflower. 
  3. -Spread onto a cookie sheet and form into a rectangle. (Do not add the topping yet).
  4. -Bake 425 for about 25 minutes or until it turns brown. 
  5. -Add 1/2 Cup cheese on top and bake another 5 minutes. 


My thoughts:
They were pretty good. I would make them again. I would change the recipe to just one egg because I thought they were a little too eggy. Also, I would have maybe cooked them a little longer to try and get crunchy edges. 

The original recipe can be found HERE


Air Fryer Cobbler For One

Have I told you how much I love my air fryer? Of course I have. Like, only million times! When I received my air fryer for my birthday last year, I have used more than my oven! You can literally cook anything in this thing that you can in an oven and in half the time.

As I was eating breakfast, I got to thinking about all the ways to use my air fryer. Yes, I might be a little obsessed. 
Then I got to thinking about moms cobbler. I make moms cobbler every year at my New Years dinner and it’s always a crowd pleaser. It is so easy and only calls for a cup of this and a cup of that (that's what my mom says every time I ask for a recipe). 

I started craving some cobbler but did not want to make a whole one. So I decided to try making a single serve by breaking down the ingredients to fit in a cup. In 15 minutes I had a tiny tasty mouth watering blueberry cobbler. 


So if you have an air fryer an oven proof dish like a ramekin, then I am sharing the recipe with you. I will also tell you at the end how to make the *regular size one in the oven for those that do not have an air fryer. Now, grab an apron and lets get going....Just kidding, you will have this made before you can even tie an apron.


Single Serve Air Fryer Cobbler
Turn on the air fryer at 350 degrees and set timer for 17 mins (that's 2 minutes to preheat, 15 minutes to cook).
  • 2 Tablespoons butter.
  • 1/4 cup self rising flour.
  • 1/4 cup sugar.
  • 1/4 cup milk.
  • 1/4 cup fruit.
-Melt butter and ad to a bowl, mug or ramekin.
-In separate bowl mix flour, sugar and milk.
-Pour mixed batter into the butter (do not stir into the butter).
-Add fruit (again, do not stir).
-Place ramekin in Air Fryer and bake for 15 minutes. (If you do not think it’s done enough, just bake for another 3 minutes.)


Caution: Will be hot.
Top with ice cream (optional).

*For the regular size cobbler.
Make the same way but with one stick of butter and 1 cup of everything else instead of 1/4.
Put in a 2 quart casserole dish and bake at 325 in oven for 1 hour.


Friday Bowl- Banana Berry

I remember when I was small, my mom would make me a bowl of bananas and strawberries topped with sugar and cream. It was such a soothing late night snack. This bowl bring back those memories. 

Banana Berry Yogurt Bowl


2/3 Cup -Fage 2% Plain Greek Yogurt
1/2- Banana
1/2- Kiwi
2 Medium- Strawberries
2 Tablespoon- Oat& Honey Granola

224 Calories- 18 g Protein


🍓🍌🍉🍊🍒🍏🍅🍈

I have decided to reserve each Friday to share some of my creative food bowls. I have been eating these at least 4 times a week and I feel great. They are easy, healthy and fun. This is part of my new "Clean Eating" Plan. Wish me Luck.

Two Ingredient Pretzel Bites

Who likes a good pretzel? If you are like me, you can hardly go to the mall without wanting one of those big warm soft pretzels. Am I right? I like them smothered in butter and salt or rolled in cinnamon and sugar. They fall next in line behind Krispy Kreme hot donuts.

Pretzels can be fattening if you don't take it easy, and well, I can’t take it easy. 
So today I am going to share with you these delicious pretzel bites that I made using only two ingredients. These are also easier on the diet. You could possibly even call them healthy. 


It took about 20 minutes to make these from start to finish and not much longer to make them disappear. We could not stop munching on these things. 
The best thing is they are super easy to make.


1 Cup Plain Greek Yogurt.
1 Cup self rising Flour. 
* Make a dough and place on a floured surface.
*Divide dough in quarters and roll each out into rope shapes.
*Cut into bite size pieces.
Boil 1/2 Cup Water and add 1 Tablespoon Baking Soda.
* Dip each piece in the soda water and place on a baking sheet lined with parchment paper.
* Bake 425 for 10 min or until lightly brown.
Melt Butter.
* Brush each piece with melted butter
* Sprinkle with course salt 
* Enjoy

Do these taste like those big warm pretzels from the mall? 
NO.
They are just as good but in a different way.
The ones at the mall are made with yeast bread and are.......
Ok just forget about those mall pretzels, these two ingredient pretzels are a crowd pleaser and you can avoid the calories. 

How do you like your pretzels? 
I like them with salt, but will sometimes dip them in Mustard.

Original recipe can be found at the thegunnysack.com  


Friday Bowl- Chocolate Pomegranate

The produce isle was full of Pomegranates. They were in large tubs sitting across from the cranberries. I just learned that Pomegranate is a Christmas fruit. No wonder I had trouble finding them during the summer. 

I love a good Pomegranate. Put it with some chocolate and you create a sweet combination. 

Chocolate Pomegranate Yogurt Bowl


2/3 Cup Triple Zero Chocolate nonfat Greek Yogurt
2 Tablespoon- Pomegranate Seeds (raw)
1 Tablespoon- Natures Promise Pumpkin Seed Flax Granola
1/2 Tablespoon- Mini semi-Sweet Chocolate Chips.

224 Calories- 17 g Protein


🍓🍌🍉🍊🍒🍏🍅🍈

I have decided to reserve each Friday to share some of my creative food bowls. I have been eating these at least 3 times a week and I feel great. They are easy, healthy and fun. This is part of my new "Clean Eating" Plan. Wish me Luck.

Easy Air Fryer Crab Cakes

Today I would like to share with you these delicious crab cakes. This is one of my favorite air fryer recipes and can be whipped up in just minutes making them a great last minute meal.


“Don’t worry mister crab, these are made with imitation crab meat”. 


I have been making these at least once a month. They make up quick and easy and have been a table pleasure. If you do not have an air fryer, I assume you can bake them in the oven just the same. I honestly do not know. I have rarely used my oven since getting an air fryer. I absolutely love that thing. 

Now, head to the store and grab these simple ingredients:
  • 8 oz pack of imitation crab meat ( chunks or shreds. I doesn’t matter. Your gonna chop it anyway).
  • 1/3 cup of bread crumbs ( I used two pieces of hard toasted wheat bread).
  • 1/2 cup green pepper (finely diced).
  • 1 egg.
  • 1/4 cup mayo.
  • 1/2 juice of a lemon.
  • Cooking oil. 
  • 1 teaspoon Old Bay Seasoning ( or any other seafood seasoning).
-Chop the crab meat fine (I added it to my food chopper for best results).
-Mix all ingredients together and form patties. 
-Place patties in air fryer and spray with oil. 
-Cook for 10 minutes on 380 degrees (I flipped once but optional).


Enjoy on a bun as a sandwich or alone with a meal. 
You can add other ingredients to your liking such as red peppers, onions, etc.
Makes 4-6 patties. Refrigerate left overs.