Showing posts with label Home. Show all posts

Crochet Swiffer Pad *Pattern*

I don't know about you but my swiffer is not like the ones on the TV commercials. Mine sits alone and sings with the duster in the closet. Why? Because I refuse to buy those awfully expensive swiffer pads. I'd rather just use my broom to sweep up the dust.

UNTIL NOW!

I made me a nice little swiffer pad for my swiffer. Its soft and gentle on my hardwood floors but yet has a little more rubbing power than those papery swiffer brands. Dont worry about not haveing the "static power". The dust bunnies stick to this just fine.


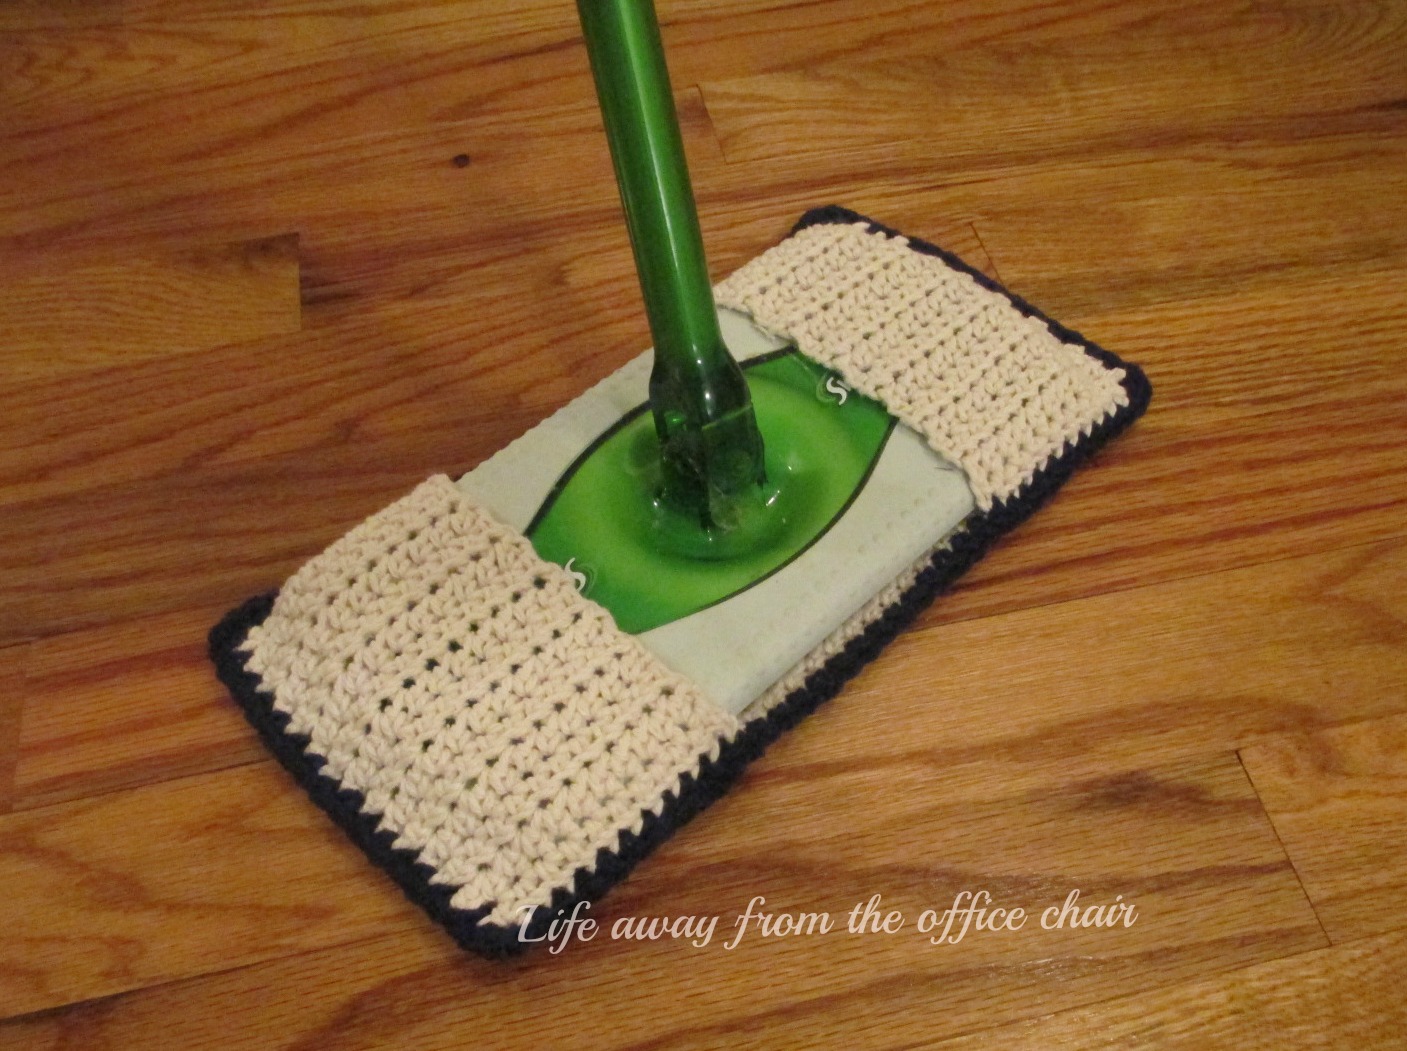
I used 100% cotton, but you can use any yarn I assume. (cotton will shrink some).

Pin It
When it gets dirty, I can just toss it in the washer. It works wet too! I can spray my Stanley Steemer wood cleaner on my floor (thats some good stuff by the way) and wah-lah!  I can swiff and mop with this handy little thing and use it over and over, saving me money.

Crochet Swiffer Pad

H hook

Abbreviations:
Hdc: Half double crochet
Sc: single crochet
Ch: Chain


Make a ch 15 inches long (it was 57 chs for me)

Row 1: Hdc in second Ch from hook. Hdc remaining stitches. Ch1 turn.
Row 2: Hdc in each stitch across. Ch1, turn.
             Repeat until your piece is 5 inches tall. (I used my swiffer to measure).

Fold over each end by 2 1/2 inches and Sc all the way around the pad.

All Done!


Ive shared this at:
made-by-me-75-linky-party-and-features at jaqsstudio
terrific-tuesdays at adventuresofadiymom.
nifty-thrifty-tuesday at coastalcharm
blog-stalking-thursday at thecraftyblogstalker
under-100-linky-party at beyondthepicketfence
friday-link-party at craftionary
strut-your-stuff-saturday-link-party at sixsistersstuff
get-schooled-saturday at too-much-time
make-it-pretty-monday at thededicatedhouse
retro-repin at niftythriftyfamily  


Tawashi

What is a Tawashi? Other than just a new word I recently learned, A Twashi is a Japanese name for a wash cloth or sponge.

Ive been crocheting some dish cloths and looking for new patterns to use when I came across these cute little washy things. Ta Da! Project!

Here is one I made for myself. I made this one special for dishes because while one side is cotton, the other is made of a more abrasive acrylic for more scrubbing power.


Works great!!! There are so many uses for these little scrubbers.


The spiral ones I made are 100% cotton and they can be used on anything. Even a baby face. You can use them on non-stick pans, counter tops, waxing a car, shoe shine, face washing, dusting, etc.....The possibilities are endless with these cute little things. And the best thing is, once they get dirty, just toss them in the washer and dryer and re-use.

 
They will last for years and save me some money on those throw away icky sponges I usually buy.
 
You want one? Can't Crochet? I just might have some of these in my Etsy shop.!
 
Ive shared this on:

DIY Shabby Wreath

I have been looking for a wreath for my front door. Its not that I cant find one, its just that I'm so darn indecisive! I can never make up my mind and then once I have it narrowed down, I just don't want to spend the money. So I came up with another plan. I made my own by using a full size sheet that I was fixing to throw away and a $5.00 Styrofoam wreath from the local craft store.

I started out by cutting  ripping the sheet into 1 to 3 inch shreds. Note: I did not do this perfectly. I just ripped away at it. The word for today is "Shabby".


Then I began to tie each one in a knot around the Styrofoam. After each few that I tied on, I would trim to to the length I wanted them. Note: This will use up the whole sheet.

Add some decorations such as bows, flowers, etc...

And wah lah. There you have it. A shabby wreath.  Easy enough huh?

Yarn Egg

With Easter approaching, I have been having experimenting with making different types of Easter decorations with things I already have around the house. The other day I made an egg out of yarn.

I used a paste made out of flour and water.
1 large balloon
and yarn.
I dipped yard strands into the paste, wrapped it around and around the balloon and let it set over night to harden.

This is the first time I've tried doing this. I seriously didn't think the idea would work but it did and it sat on my mantel for a week before I decided what to do with it.
I cut out an opening, I thought was too big, so it sat a few more day until I found some old ribbon and began experimenting until I come up with some idea that would hide the choppy look around the cutout.

.
Then finally I  put some things in it. I was going to fill it with all chocolate because the only ribbon I could find around the house was brown and it reminded me of chocolate. I threw a few foil eggs in to complete the look.

Oh and did I mention, I saw God today?


Linked on craftomaniac monday , m-i-y-monday at anoriginalbelle , made-by-monday at skiptomylou , make-scene-monday at alderberryhill ,nifty-thrifty-tuesday at coastal charm , creative-projects at todayscreativeblog , made-by-me-25-linky-party-and-features at jaqsstudi  , spring-easter-categorically-crafting at somedaycrafts , simply-link-party at simplydesigning

Paper eggs and Dogwood

I really love spring and Easter is one of my favorite times.
Me and my daughter used to do an Easter tree in my front yard but I no longer have any trees and I miss doing that. I have seen the indoor Easter trees in the stores but it would cost a small fortune by the time you buy one and decorate it.

I decided to make my own (for free) to place in my bay window of my living room, but first things first. I had to come up with some decorations so I made paper eggs. I started by printing some pattern colors to use. I decided I'd do them in honor of my daughter. I used her school colors and some Kappa Delta prints along with some Lilly Pulitzer prints.

 
For one egg,  I cut 4 or 5 egg shapes, fold them in half longways and glue them together by halves. Don't forget the string or ribbon. I really like the way they turned out.

 
The ornaments can be flattened for mailing or storing if you really want to but they are so easy to make, you can just make new ones next year.

Then I used a cutting off of a dogwood as my tree.

EASTER TREE!


Note: Make sure you add water to the vase. I didn't think it would last but the flowers actually bloomed all the way as it sits in my window. 


Linked on made by you monday at skiptomylou ,
craft-o-maniac monday at craftomaniac ,
make-it-yourself-monday at an original belle ,
How to craft at todays creative blog,
Whatever-goes-wednesday at some day Crafts ,
friday-fun-party-and-features at craftionary

Declutter

Yes, I said it. I'm in the process of decluttering my home. I started out the other night with my closets. I still have two more to go and then I'll move on to drawers and then cabinets. With that said, I hope to be finished by Christmas.
I thought I'd share a little Idea I did with my garden flag collection.
While cleaning, I found of my garden flags wadded up in a bag and I found some in other places too, but surprisingly not in the refrigerator where I find a lot of other things I misplace. Yea, really. My husband has to stay behind me.
Anyway, by doing this, I created more space in my junk closet and it doesn't look half bad either.
Here is what I did.

First I dug up enough hangers to accommodate my flags.
I used plastic hangers, but I assume you can use any kind in a different way.

Then I used a knife to saw and weaken an area that I could easily break with my hands. I'm sure there are better and neater ways to do this but I was to busy and impatient at the time.

I gently slid the flags onto the hangers and the places that I broke seemed to fall back into there spot.
Just be careful because were the hanger is broken, it will tend to be jagged and sharp so I would advise anyone wanting to try this to sand it a little with an Emory board to prevent any injuries to your hands or the flags. I just left mine as is.

After I did this little project. I realized all I had to do was hang them on those clippy pant/skirt hangers that I have SO MANY OF!

Linked on home-decor-organizing-link-party at organize your stuff now