Showing posts with label Craft. Show all posts

Propane Tank Monsters

 My daughter and I were headed out for a coffee and a day of shopping. When I turned down the next street from my house heading out to the highway, I noticed two tanks someone had thrown to the side of the road. One was an old propane tank and the other was a helium tank. My mind instantly went into craft mode and knew I had to have them. I told my daughter that if they were still there when we get home, I was going to get them. 


We visited a little coffee shop in the small town of Belmont and walk around town as we sipped our caffeine filled cups of goodness. I ordered the Maple bacon Latte. It was good. 


Before heading home we visited a thrift shop and scored a few good deals.


I hadn’t forgot about the tanks. As were turning into the neighborhood, the tanks were still on the side of the road so I pulled over. We jumped out, grabbed them, threw them in the hatch and headed one home. We giggled because It looked like we were stealing something as we grabbed them so fast not wanting anyone to see us. 


I gave them a little wipe down, grabbed some paint and brushes and we headed out to the porch to turn this trash into another Halloween project. I painted the white one and my daughter painted the green one. 


This was just as fun as painting or carving pumpkins but less mess and a lot cheaper!

They now sit on my front porch steps and I will dispose of them somehow after Halloween. 


Bead Ghost Garland

I’m sorta getting exited about Halloween. Not because of the goules but because of the fun things going on. It’s fun to see the little kids dress up and pretend to be super hero, presidents, princesses and little monsters. They go trick or treating door to door. If it teaches them anything, it’s that there are still nice people in the world that no matter how you look or portray yourself, they will always open the door with a smile and hand you a piece of sweetness. 


On Halloween, they want us to come into work dressed up. We will be doing a trick or treat time for our foster children. It’s always fun to see the smiles on their faces when they walk by our office cubes and collect candy. My unit has plans to all dress up like skeletons. We will call ourselves the “skeleton crew”.


I have been creating some little Halloween decorations during the month. The other day I made these cute little ghost garlands. 


I used some clay and rolled out and molded the little ghost. Once they dried, I strung them on some string along with some wooden beads. I added a little tassel on the ends and wha la, I had a cute little garland to drape around something. 


I have one draped on my mantle at home and the other one is draped on a piece of Fall decor I have in my office. 


I get a lot of complements on it. 


I got the clay from amazon and will post a link below.

The beads were purchased from the dollar store. Well, it’s technically called the “$1.25 store” now. 


Have you made dollar store crafts lately?


Shop: Amazon HERE


As an Amazon Affiliate, this post may include marketing links, 
 which means I make a small percentage on the sales 
 but it in no way affects the price a buyer may pay

Jute Ghost

I have decided not to bring out my Fall decorations this year. Orange is not my favorite color and the Fall is just Summer dying. Don’t get me wrong, I still enjoy the cool air, the smell of falling leaves and bon fires. However, I am not a pumpkin spice person. I am more of a caramel apple person. 


Instead of bringing out my old decorations, I’m keeping it simple in the house this year. I have bought some cute dishtowels for the kitchen, a few little decorations from the dollar store and having fun creating some of my own things. Thats just the minimalist in me. 


I recently created this cute little jute ghost.


I didn’t really plan on it being this color or material but here we are.


I went to the dollar (and a quarter) store in search of some white nautical rope for this project but all I could find was this jute rope. It took three bundles for this project. 


Using a cardboard box, I cut out a half circle, then used a hot glue gun to glue the rope together. I left the ends long enough so I could trim them and unravel the each strand. Then I cut out some eyes and a mouth from the same cardboard and the ghost came alive. 


I love how he looks but now realizing I could have just used the rope from a new mop head. 


Do you decorate for halloween? I throw in a few little ghost or jack o lanterns but that’s about all. It just brings back those childhood memories to have a little fun. 


DIY Clay Oil Diffuser

Here is something I have never done. Playing with clay. I have always wanted to take a pottery class but there are not any near me and from what I hear, they can be a bit pricy. 

But I still wanted to mess around and make something with clay so I purchased some “air drying clay”. I got the idea of the clay oil defusers on line. I thought they were cute and simple. The clay was inexpensive  and I used natural leaves for stamping a design. 


I squeezed and pressed over and over until I had the size and shape I wanted. Using a cookie cutter, I cut out a round shape. I used a straw to make two holes and set them out to dry for 24 hours. 


I like the way they turned out. I debated on painting the print or not but I ended up using some green acrylic paint to enhance the natural print.  I painted one with coffee. It turned out to be my favorite. I plan to hang it in my car. 

I also made a little ring plate using the same technique.


To use the clay defusers, just add a couple drops of your favorite essential oil and hang it from your rearview mirror, office or closet. The clay absorbs the oil and creates a nice aroma. Reapply the oil every few weeks . 


Shop HERE 


As an Amazon Affiliate, this post may include marketing links,

 which means I make a small percentage on the sales 

but it in no way affects the price a buyer may pay


Gourd Art

We have friends from the beach campground that we met years ago. We usually will see them one or two times each year when we go. I heard he had lots of gourds that were ready to harvest. I have always wanted a gourd bird house so I asked him for a couple. 

We did not see these friends the last time we were at the beach but he informed me that he had brought me three gourds and the were with some other friends of his. He told me which site they were at and I went and got the gourds. I did not know what to expect when I first saw them. They were rough and messy looking. They were just plain ole ugly.


When I got home from the beach, I immediately took them out to the patio. I kept looking at them for a few days and thought “this is going to be more work than I thought”. Then I finally tackled it and with a little sand paper and washing, they started looking more like something to work with. My sister took one to paint leaving me with two. 

A couple more weeks went by before I decided to work on a design for the bird house. I wanted something natural looking and did not want to use paint or stain. I ended up stenciling a boho floral pattern and burned it into the gourd with my little wood burner. It was not an easy task and my wood burner was not that great. It was ok though. I do not think any birds will complain about it. 


Next, I had Nick cut me a hole for the entrance. He could not find his hole driller bit so he had to make do with a drill. Again, I do not think the birds will care. I actually like the imperfect look. He also drilled some small holes in the bottom for drainage and a couple at the top to thread a piece of leather through for hanging. I finished it off by rubbing it down with some coconut oil. I can not wait to get it hung next Spring. I hope I have some renters. 

With the other gourd, I had Nick cut it so I could make a bowl. I left it natural as well. I think it will make a great out door planter or decorative bowl for a patio table. 


Cleaning the gourds out was easy. The inside was not as nasty as I thought it would be. There was a white webbed substance that felt like soft toilet paper. I didn't worry about getting it all out in the birdhouse gourd as the birds will actually use it for nesting. The seeds just fell out. 


If you would like some gourd seeds, just let me know by leaving your email in comments 
and I will get back to you.
You will get 25-30 for $5.00 while supply last. 
This just covers shipping and handling. 

Snow Day and Poof

I am currently snowed in from our first snow of the season. We got 4 inches of snow. Ok Northerners, before you laugh. Yes, it was only 4 inches of snow but there is 2 inches of ice underneath it and another layer of ice on top from the 5 hours of sleet and freezing rain we had after the snow. 
When we say “snowed in”, it means we do not want to attempt the hazardous roads. People around here are not used to driving in ice or snow, so we aint that good at it. But, we can actually drive or walk to the grocery store half a mile away if we needed to. 

I have been wanting to crochet a poof ( foot stool). The other day I went to my local craft store and right in the center of the isle were bins full with the type of yarn I needed to create such a project. It was on sale at half price so I grabbed four skeins of blanket weight yarn. I wasn’t sure how many I actually needed. Yellow was the only color I could find with four of the same color. 

I followed THIS PATTERN
I only needed two skeins so I will be returning the other two. 


I worked on this poof a couple nights while watching some of my favorite shows. Today since I wanted to stay in from the winter storm, I cozied up in my recliner and finished crocheting my poof. 


This was also great way to get rid of some old raggedy blankets I had stashed away. They were some old ugly crocheted blankets from Nicks grandmother. They did not hold much value to him but I felt bad to throw them away. They worked great to stuff my poof. This saved me from the expense of polly fill stuffing and I was able to do some decluttering. 


I like the way if turned out though I have no idea where to use it. I just wanted the challenge of making one. I suppose I could use it in the camper or just let it take up some space in my room. It is sorta cute sitting in the corner of the bedroom. 

I also found the bottom of my laundry basket and dyed my hair.

What is the weather like where you are? Are you experiencing cold or warm temperatures? 

Bucket Light

When you go camping, you see a lot of cool things people do to be resourceful. It’s fun to see camping hacks that cost little to nothing to make. You also see neat survival techniques and ways to save space. I get fascinated.

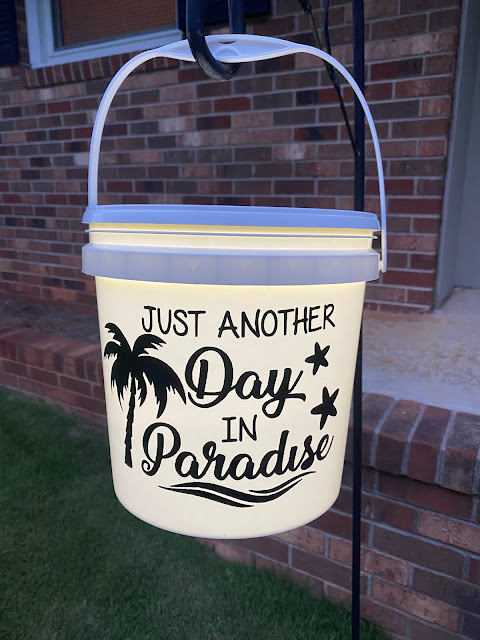
I have seen several different ways to light up your camping space but one that I just had to make was a bucket light. It was easy to make and this one only costed me a dollar for the light and a dollar for the batteries at the dollar tree.


You can get three to five gallon buckets from a hardware store for a few dollars but I knew where I could find a smaller bucket for free. When I used to work at Belks, they would have buckets of hand sanitizer wipes placed at the registers for employees. They would throw them away once they become empty. I got my hands on one before it hit the trash can. 

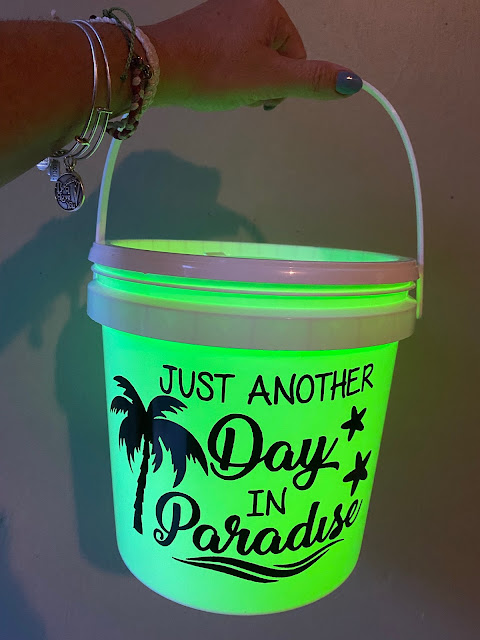
Optionally, you can add a picture or saying on the side. I asked my Sister to make me a vinyl decal to put on mine. She did a good job and I love it. We took it with us to the beach and hung it in the center of our picnic shelter. It was a great light. Since It has a battery operated light in it, I could use it inside if the power went out or carry it down to the ocean at night for some romantic lighting. A five gallon bucket light would make a nice lighted seat during a night of fishing.


To get the different colors I just placed colored solo cups over the little battery light on the inside. Most people purchase better lighting with larger lights that have a remote control for on and off and color changing. I didn’t want to get all that fancy. I just wanted a little light and it’s perfect. 


Pot Holders

I have several pot holders but my absolute favorite are the ones that my daughter made me when she was little. They are made with a little weaving loom and cotton loops. It was an easy craft and kept her busy for hours. They seem to never wear out despite how bad they look. My mom still has a few that I made when I was a little girl. Thats 50 years ago!


I made some pot holders the other day but they are not nearly as cute as the weaved ones my daughter made. 
Using the thermal stitch, I crocheted two.


This stitch works up fast and creates a double layer thickness as you go. Instead of the regular single crochet stitch, you work through the back loop and the back loop of the previous row. Below, I highlighted the stitches you work through. I love how thick they are and fit nice in my hands for a good grip.


This was a great project to use up some of my scrap pieces of yarn. 

The pattern to these can be found at Sewrella.com.


As  an Amazon affiliate, this post includes a Marketing Link, which means I make a small percentage on the sales 

but it in no way affects the price a buyer may pay.

Opinions are my own honest reviews.


It’s Been A While

It’s been a while since my last blog post. I mean, not a really long time, but longer than I had planned. 
I’ll try not to let it happen again but I’m sure I will.

I have trouble writing blog post when things are not comfortable in the world around me. I like to blog positive, happy or fun post. 
Oh, I have a lot to say about the things going on in the world today but I try to stay away from political topics or bad news. We get enough of that on TV. 

I also had a pretty busy week last week so I was never in a quiet frame to write a post. 
As I have mentioned in a previous post, I have been crocheting “ear savers”. They are these little bands that fit around the back of your head with a button on each end. Medical workers use them to hold their mask on without having to put the masks around their ears. They have been wearing mask so much that their ears are sore. These are a big relief to them. 


There is business in my town called “Morgans Shoes and Bootery’. They also are a big supplier of professional scrubs. This is where most medical workers and others buy their uniform scrubs. This means they are probably in need for ear savers too. My handmade ear savers are a big hit and they sell out quick. They have been ordering 50 at time from me. I can have them ready usually within 3 days. 


I also had a couple of job interviews last week. Both interviews went well and they seemed to like me. 
One already denied me and I am currently waiting back from the other. My search continues. 
With all the craziness going on right now, a lot of businesses have put a freeze on hiring. Hopefully things will get better. I’m tired of being home all the time. However, I love all the quality time I get to have with my husband. 


Paper Eggs

Today I want to share with you a great little Easter craft you can make with your kids or if your like me, your simply so bored that you are trying to find things to do to keep you busy. Either way, this is a fun and easy.

What you will need is: 
-Printed paper.
-Glue (I used a glue stick).
-Scissors.
-String or yarn.

You can use any kind of paper such as used cards, magazines and book pages or scrap book paper. I did not have any of these things so I went online and found some floral colors and printed them on regular copy paper. 


I cut out one egg shape to use as a pattern and used it to cut out several other pieces. You will need 4 shapes for one egg. Try to get them all the same so they match up. Mine were a little off because I do not draw or cut accurate, but they were close enough not to notice. 


Fold each piece in half to make a crease. 


Now, glue four pieces together sides to sides. Somewhere along the way, make sure you glue a string between the pieces so you can hang them. The length of the string is up to you. 


Now get creative and find something to hang your fabulous eggs on. I took some branches from a dogwood and placed in a vase. You can use branches with blooms, paint them or leave them naked like mine.


This craft will keep you and the kiddos busy for about and hour. It’s on you to figure out how to keep them busy the rest of the day. 
Stay safe and take advantage of this time with family.

Crochet Change Purses.

It’s crochet season! This is one of my favorite pass time activities, especially on a rainy day or while I’m settling in for the day relaxed in my recliner watching TV.

The other day as I was cleaning out my yarn basket and noticed I had a yarn stash of small pieces that were not enough to make anything bigger than my hand. Instead of throwing them away, I decided to crochet some tiny change purses. I also made use of my little purse frames I had collected for another project that never worked out. 

These are perfect to keep a little spare change in. I remember when I was teenager, it was a rule to always keep a quarter in your pocket in case you need to make an emergency call. Now days you need a cell phone a lot more than a quarter to get any help. 


I love how these little purses turned out. They can also be used as little pill boxes or even slid under a child’s pillow for the tooth fairy visit. 

If you crochet, they are easy to make. Sewing them on the frame is the hardest part. I’m not good at writing crochet patterns, but basically it’s a single stitch in the rounds. Increase your rounds until you have the circumference of the open purse frame. Then you continue in the round without increasing until you have the depth you want. Then sew it on the frame using a strong thread. 

That's it. It will take its shape once the sewing in complete.  
               

If you do not crochet and would like one of these tiny purses, they can be found in my Etsy Shop with Free shipping. 


Or
Click the shop link at the top of my blog page.


Crochet Dream Catcher

Dream catchers are from the Native American culture made from a woven net or web on a handmade hollow hoop. Often they will include sacred items such as feathers or beads. Traditionally they were hung over cribs or cradles for protection. The webbing is suppose to replicate a spider web.

Today I want to show you this cute little dream catcher I made by crocheting a lacy web around a tiny plastic hoop. The plastic hoop is actually the rim cut off of a plastic cup. I started crocheting in the center and worked my way out, then attached it to the hoop. I have the link to the pattern at the end of my post. 


Did you know I have never owned a dream catcher? I never cared to own one.

Being from a Christian home, we always associated dream catchers with witchcraft or paganism because people use dream catchers as a spiritual tool. It was believed to bring good dreams to those that sleep under them. Dreams from the spirits would pass through. Only the good dreams can pass through and the bad dreams are caught in the webbing and fade away by the morning. 


Now that I am older, I see these cute little things as no more than a native craft item. I let prayers to God handle my bad dreams. 
This dream catcher was fun and easy to make. I like some boho styles and this is a little charmer. 

Now about that boogie man under my bed. 


Want to make your own dream catcher? 
I used this pattern found HERE 


Loofah Garden

I mentioned earlier in the year that I was wanting to start a loofah garden. 

A loofah is a natural sponge grown on a vine. They have the shape of a cucumber but are in the gourd family and grow really large. In order to grow these things, it requires a trellis for them to climb. In the Fall they will dry out and then you peel the skin to find a nice natural sponge inside. I'm pretty excited.

I ordered some seeds from a garden in the mountains of North Carolina. I had read where it takes a while for the seeds to sprout. I started them in February and they sprouted in just two weeks!


Afraid they would die before I could plant them, I started some more seeds in March. They have already started climbing the windows and are begging to be planted. I can hardly wait to get them outside.

I came home from work the other day and my sweet husband had built me a frame and trellis. He did a really good job. The next day he had me some fresh dirt. After our afternoon walk, I could not wait any longer so we put on our garden gloves, poured the dirt and planted the tiny plants. Now my loofahs are ready to grow. 


I contacted the nursery where I purchased the seeds and she said one plant will get big and will produce lots of loofahs. She said each plant will give me 10 to 12 loofahs, so only 3 or 4 plants is all I need. I hope this works. I have never had any luck growing things. I’m actually thinking about taking up two of them. I am just waiting to see if they thrive without being eaten by squirrels, bunnies and birds. 


I added some string to train them to grow up the trellis. They started grabbing hold within 15 minutes of planting them. 
Now we wait. I hope they do not get shocked from being transplanted outside.

Loofah plants will produce large yellow flowers before the loofah gourd begins. These flowers will attract lots of bumble bees, butterflies and humming birds. The plants will need them for pollination.
I will keep you updated on the progress. This is going to be fun.

Rag Bunny

I reached up into the closet and pulled down the rag bunny. It always brings back memories.

I remember the days when times were tough and money was more tight than today. I would have considered us poor. We lived in a little old house that used to belong to Nicks grandparents. He and his father did a great job remodeling the inside and we made it our first home. I actually loved that house but hated where it was. It sat on about 10 feet from the road on the corner of a busy intersection. It was not safe to play outside or even enjoy the porch out front. However, there was a lot of love and memories in that house and you could always get a whiff every now and again of his Italian grandmothers cooking through the walls.

We both worked and it took my whole paycheck to pay for daycare and insurance. The only reason I worked at the time was to have insurance. I still can’t say I would have rather been a stay at home mom. I needed an outlet, and my daughter needed to interact with other children. It all worked out. 

Every Easter, I have always created my daughter an Easter basket. When she was little I refused to go out and pay lots of money on the fluffy stuffed animals and throw away toys that we simply could not afford. One year I found a piece of scrap material to line her basket to match her new dress. With enough scrap left over I created a matching bunny. This was my first time doing anything like this but I wanted her to have a rabbit doll. 

I cut out shapes of each limb. By needle and thread, I sewed and stuffed each piece together and attached it all together. It was not perfect or pretty but she was tickled to have a bunny that mommy made. 

The rag bunny is still around. She didn’t take it with her when she moved out. I bring it out every year and add it to my Easter decorations. Sometimes it sits on the bed or in the rocker. Sometimes its added to other decor. This year its sits on my mantel. It brings back memories of her being little and how sometimes the simplest and cheapest gifts can be the best. 


DIY Wine Glass Charms

My daughter received a gift from a friend to host a wine tasting. She can invite up to ten guest. She only has to supply her home counter space, glasses and a few pick ups. Her boyfriend has a nice home and has allowed her to use his place for the wine tasting event.

I was invited but I will not be attending. I will leave it to her and her group of gals. Though I feel like I'm in my 20's, when I get around girls in their 20's, I feel I'm in my 40's again.

For the wine tasting, she will have some lite pick ups for snacking. She can sit back an enjoy the rest of the party as the wine demonstrator will be doing all the work.

She was looking for some wine markers for the wine glasses. These can be a little costly when you need to buy more than a couple. They usually will come in gift packs of four and can be as much as $10.00 a pack. I put on my thinking cap and came up with a simple and cheap solution. Wine tassels.


She liked the idea as most of her friends like the look of little trendy tassels on things they purchase.

I can hardly call this a DIY project as all I did was add a charm on an earring hoop.


Yes, that's all. I went to the local craft store and found a pack of earring hoops for 2.99. I was going to make the actual tassels but since I was running out of time, I decided to purchase some from a crafter on Etsy. I got twelve different colors for less than 8.00.


I chose more regal colors instead of the pops of bright circus colors.
We liked how they turned out and each person will have a choice of their own color as no two colors are the same.

I put this project together in less than ten minutes but now looking at them, It's driving me crazy that the ring hoop and the tassel loops are two different metals. Maybe no one will notice. ya think?

You can use the same technique and add other types of charms or beads to the earring hoops.


Happy Mail from Cali

My sweet friend Annette is a maker of crafty stuff. She is also another Nutrisystem Ambassador. How cool is that? I love how we can follow and support each other on our weight loss journey and be able to share craft ideas at the same time. You can find her on Instagram under the name "Mexicanstew". Her names comes from her being Mexican and married to a Stewart.
Is that not the cutest thing?
I was thinking, If I created a name like hers it would come out something like "Americandime"

Well, I got my first Happy Mail the other day. When I came in from work there was a package for me sitting on the counter. My husband smiles and says "your popular today". It was from Mexicanstew. I tore into it not knowing what I was going to find, but I knew it was going to be good.


Inside was the most adorable little hand made greeting cards. Now, she had no idea I loved greeting cards, but I do. Especially the ones that are blank inside. I hate shopping for cards in the store and you can't beat a pretty handmade card with a personal hand written note inside.


There was also one of her handmade lotion bars. I will keep this one in my purse. It's good for dry skin and even safe enough to use on your lips. I love lemon smells and it just so happens to be the fragrance of Lemon Grass.


To top it off, she included one of her little draw string bags shes makes.
I have been all over the house thinking of what I can use it for. I will be heading out of town this weekend and will be taking it with me. It could be used for a makeup or a jewelry bag. But I plan to either use it to pack my lingerie in my suitcase or carry a small crochet project in it. decisions, decisions.

You can find items like these in her Etsy shop but you may have to wait until she gets it stocked back up and running.


Handmade With Love From Texas

I have always wanted to make my own soaps. I just never understood the whole concept of buying soap to make soap. I got to thinking about it and thought, “I guess it is the same as buying wax to make candles”.

Every time I go to small shops where handmade soaps are made, I am always drawn over to the rack to admire them and take a sniff. However, I have never purchased any bars of homemade soaps. Never have I even tried a bar of it. I always use liquid soap at home.  

My blogging friend Benita made some goat milk based soap and I was excited when I receive a few of them from her in the mail the other day to try. I immediately opened one to try it out. I was impressed! I loved the smell and silky feel of these little soaps. The light fragrance of honey almond smelled clean and fresh. 


I'm sold! So far I used the soap on my hands and face and love the feeling it gave my skin. I plan to use it in the shower next for an all over feel.
I was amazed at how creamy it felt without making my skin feel oily but yet made it feel hydrated and soft. I accidentally got a little in my eyes and it did not even irritate them like most soaps will.

Would you just look at that lather!


Making soap could be fun as I have read about so many different fragrances and ingredients you can use. Benita has given me the inspiration to try making my own. I’m still not sure I could pull it off as good as hers are. I am doing a loofah garden this year and the loofah sponges will be ready to harvest in the Fall. I think this would make a great combination to homemade soap projects. 


Head over to Benita's blog ,Chasing Quaintness and check it out. She is so talented and her post are fun and interesting. 
She also host link parties you can join in or just look around. 


PS: I think she should really sell these soaps!!

DIY- Desk Top Zen Garden

I have been wanting a Zen garden for a while now. AKA Japanese rock garden.


Zen gardens go way back to the sixth century when Monks created the first Zen gardens to aid in meditation. It was a place to go for peace and serenity. They would consist of a large area of sand in a setting that included rocks, small plants and rakes. Ripples in the sand represent the nature of water. Rocks are delicately placed to add energy.

Small Zen gardens are popular right now. Kits for these small gardens online can cost up to $100.00 depending on the quality of dish, sand and rock you choose. That's just crazy, so I decided to make my own for less than $9.00.


First I called my brother in law at the beach and asked him to bring some soft white sand when he comes to visit. When he arrived last week with a bucket of sand, I was excited. I mean, who else can have the beach delivered to them?


Next I ran out to the thrift store where I found a small shallow glass dish and an unwanted fake succulent to adopt.

I needed a rake so I visited an Etsy shop and purchased an authentic Art of Bali brand Zen rake. This was the most expensive part of my project costing a whopping $5.75.


I glued the plant to the bottom of the glass dish, poured in the sand and began to play. I think I spent a half hour playing with this thing once I got it all together. It's amazing how something so simple can add hours of soothing fun to your desktop or table.


Many people have resorted to small desk size Zen gardens as they reduce stress, improve focus and relaxation. Most Zen garden include a little buddha statue, but I prefer to stay away from that. Meditation? Na, My meditation is in prayer.
I just like the way it looks. It adds some tranquility decor to my office. I do think it is relaxing. After all, I am fidgety. This may even keep me from all the doodling on paper that I do.


Glass dish- Goodwill -.99 cent.
Plastic Succulent- Goodwill $1.49.
Desktop Zen garden Rake- TheZenGardner $5.75.
Sand- Myrtle Beach, SC-  FREE +1 cup of coffee.

No way to get real sand? 
Visit your local dollar store where you can purchase a small bag of craft sand for only a dollar.